[JAVA]-JavaWeb基础与应用
[JAVA]-JavaWeb基础与应用
[TOC]
1.JavaWEB基础知识
【1】基础概念
🔖JavaEE
JavaEE规范是J2EE规范的新名称,早期被称为J2EE规范,其全称是Java 2 Platform Enterprise Edition,它是由SUN公司领导、各厂家共同制定并得到广泛认可的工业标准(JCP组织成员)。
JavaEE规范是很多Java开发技术的总称。这些技术规范都是沿用自J2EE的。一共包括了13个技术规范。例如:jsp/servlet,jndi,jaxp,jdbc,jni,jaxb,jmf,jta,jpa,EJB等。
其中,JCP组织的全称是Java Community Process。它是一个开放的国际组织,成立于1998年,主要由Java开发者以及被授权者组成,职能是发展和更新。
JavaEE的版本是延续了J2EE的版本,但是没有继续采用其命名规则。J2EE的版本从1.0开始到1.4结束,而JavaEE版本是从JavaEE 5版本开始
🔖Web
WEB,在英语中web即表示网页的意思,它用于表示Internet主机上供外界访问的资源
Internet上供外界访问的Web资源分为:
静态web资源(如html 页面):指web页面中供人们浏览的数据始终是不变
动态web资源:指web页面中供人们浏览的数据是由程序产生的,不同时间点访问web页面看到的内容各不相同
静态web资源开发技术
Html
常用动态web资源开发技术:
JSP/Servlet、ASP、PHP等
在Java中,动态web资源开发技术统称为Javaweb,即动态web页面
🔖系统结构
系统结构划分
按照基础结构划分:C/S结构,B/S结构两类
按照技术选型划分:Model1模型,Model2模型,MVC模型和三层架构+MVC模型
按照部署方式划分:一体化架构,垂直拆分架构,分布式架构,流动计算架构,微服务架构
CS VS BS
CS(客户端-服务器):在客户端(PC、移动等)安装应用(APP),通过网络访问部署在服务器上的应用
BS(浏览器-服务器):客户端通过浏览器的方式访问资源,借助网络访问服务器内容(客户端无需安装额外的APP资源,只需通过浏览器访问服务器资源)
- 两种结构的区分
1)硬件环境不同,C/S通常是建立在专用的网络或小范围的网络环境上(即局域网),且必须要安装客户端。而B/S是建立在广域网上的,适应范围强,通常有操作系统和浏览器就行。
2)C/S结构比B/S结构更安全,因为用户群相对固定,对信息的保护更强。
3)B/S结构维护升级比较简单,而C/S结构维护升级相对困难
- 优缺点
1)C/S:是能充分发挥客户端PC的处理能力,很多工作可以在客户端处理后再提交给服务器。对应的优点就是客户端响应速度快。
2)B/S:总体拥有成本低、维护方便、 分布性强、开发简单,可以不用安装任何专门的软件就能实现在任何地方进行操作,客户端零维护
【2】常见的web服务器
WebLogic是BEA公司的产品,是目前应用最广泛的Web服务器,支持J2EE规范,而且不断的完善以适应新的开发要求。
另一个常用的Web服务器是IBM公司的WebSphere,支持J2EE规范,启动界面如图
在小型的应用系统或者有特殊需要的系统中,可以使用一个 免费的Web服务器:Tomcat,该服务器支持全部JSP以及Servlet规范
常用应用服务器列表
| 服务器名称 | 说明 |
|---|---|
| weblogic | 实现了javaEE规范,重量级服务器,又称为javaEE容器 |
| websphereAS | 实现了javaEE规范,重量级服务器 |
| JBOSSAS | 实现了JavaEE规范,重量级服务器。免费的 |
| Tomcat | 实现了jsp/servlet规范,是一个轻量级服务器,开源免费 |
Tomcat的安装与配置
安装的时候需考虑tomcat和其他开发工具的版本兼容性,具体可参考(可在tomcat官网查看相关信息)

获取Tomcat安装程序包
tar.gz文件是Linux操作系统下的安装版本
exe文件是Windows系统下的安装版本
zip文件是Windows系统下的压缩版本
tomcat目录层次结构说明
以tomcat-9.0.24为例,其解压后的目录结构如下所示
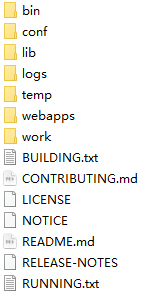
# tomcat目录层次结构说明
bin     # 存放启动和关闭tomcat的脚本文件(tomcat的二进制文件目录)
conf    # 存放tomcat服务器的各种配置文件
lib     # 存放tomcat服务器运行时所依赖的jar包
logs    # 存放tomcat的日志文件
temp    # 存放tomcat运行时产生的临时文件
webapps # wen应用目录/默认应用发布目录(供外界访问的web资源的存放目录)
work    # tomcat的工作目录
(1)window下安装(tomcat8免安装版)配置
a.解压相关文件夹

b.两个目录下的主要配置
- 打开tomcat对应的目录下的bin目录
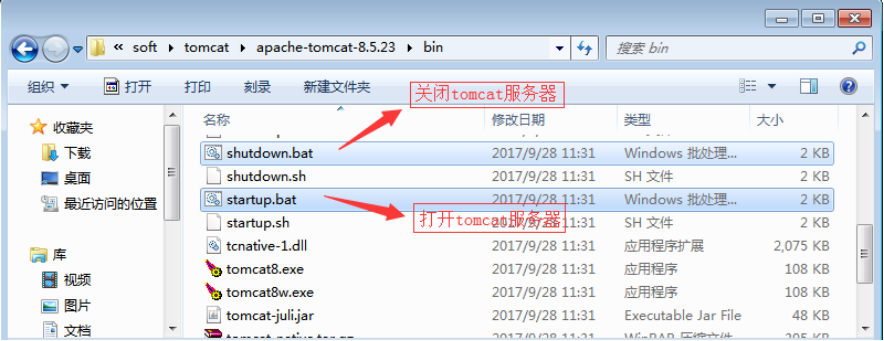
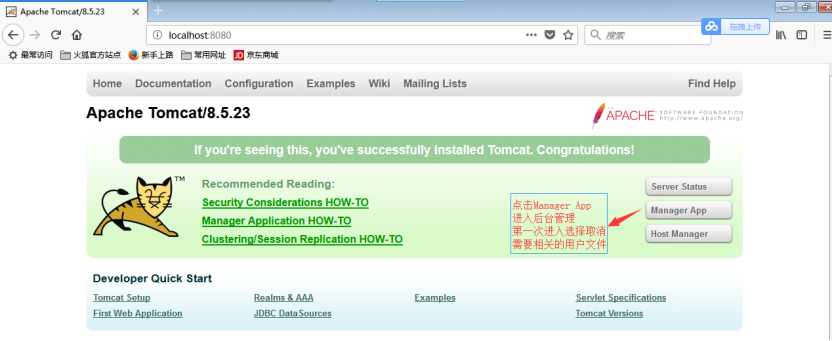
访问官网进行测试:localhost:8080
- tomcat安装目录下的conf目录:配置后台管理账号、配置访问端口号
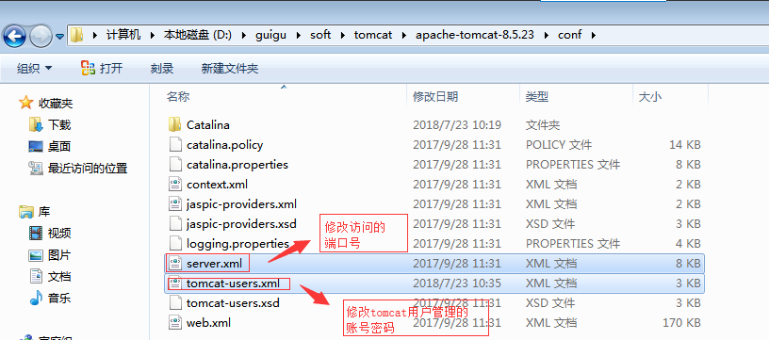
配置tomcat后台管理账号

此处设置为root/root
<role rolename="manager-gui"/>
<user username="root" password="root" roles="manager-gui"/>
完成配置之后重新启动tomcat服务器,先关闭(shutdown.bat)后重启(startup.bat),随后再次点击Manger App,进入tomcat的后台管理部分
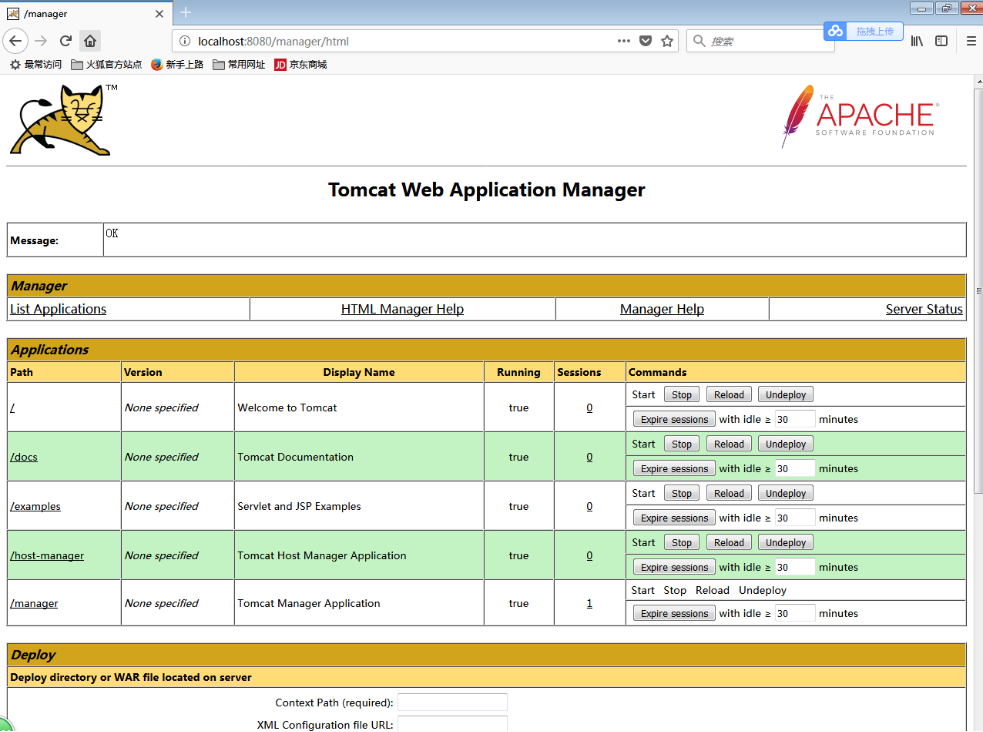
修改访问网址的端口号
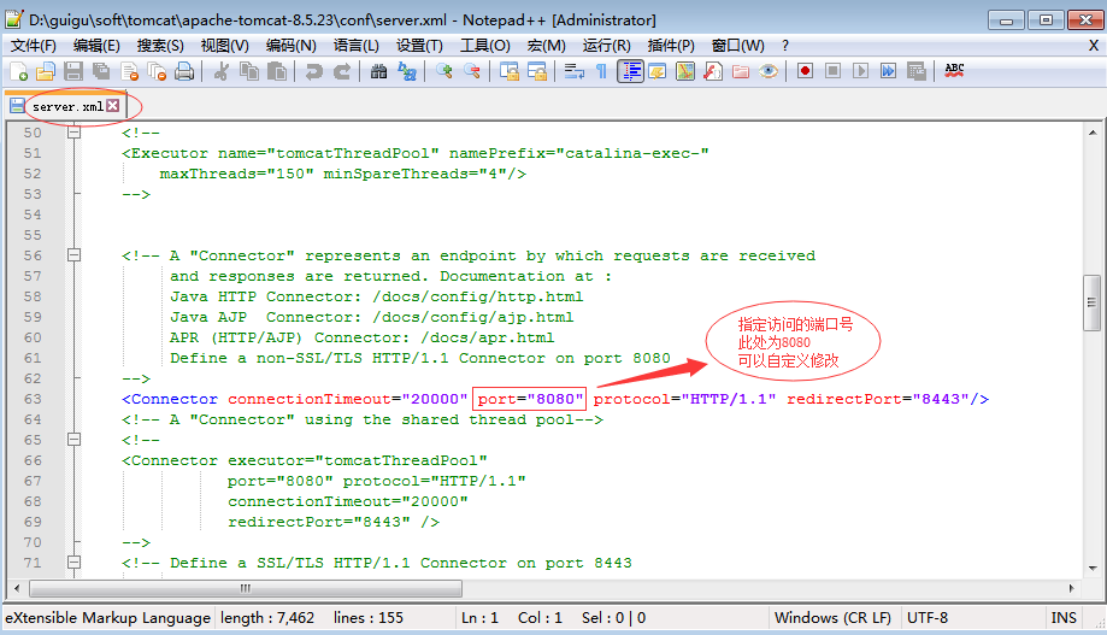
修改端口号:tomcat的安装目录下conf文件,server.xml中可以修改访问的端口号,修改完成之后同样的需要重新启动tomcat服务器进行访问
(2)linux下安装tomcat
安装步骤说明(简单参考)
# 从官网下载指定版本的.tar.gz并解压到指定目录
tar -xvf apache-tomcat-8.5.32.tar.gz

# 进入bin目录,启动tomcat
./startup.sh
防火墙规则修改
如果需要通过浏览器访问tomcat服务资源,需要检查防火墙内容或者放行tomcat端口
- 方式1:关闭防火墙(service iptables stop),不建议使用
- 方式2:放行指定端口(tomcat默认是8080)
# 修改配置文件
		cd /etc/sysconfig
		vi iptables
			复制(yy , p)
				-A INPUT -m state --state NEW -m tcp -p tcp --dport 22 -j ACCEPT
			改成
				-A INPUT -m state --state NEW -m tcp -p tcp --dport 8080 -j ACCEPT
# 重启加载防火墙或者重启防火墙
			service iptables reload
			或者
			service iptables restart
(3)在eclipse中配置tomcat
a.添加指定版本的tomcat
window->Preferences->Server->Runtime Environments->add(edit)根据tomcat的版本要求,配置tomcat的安装路径
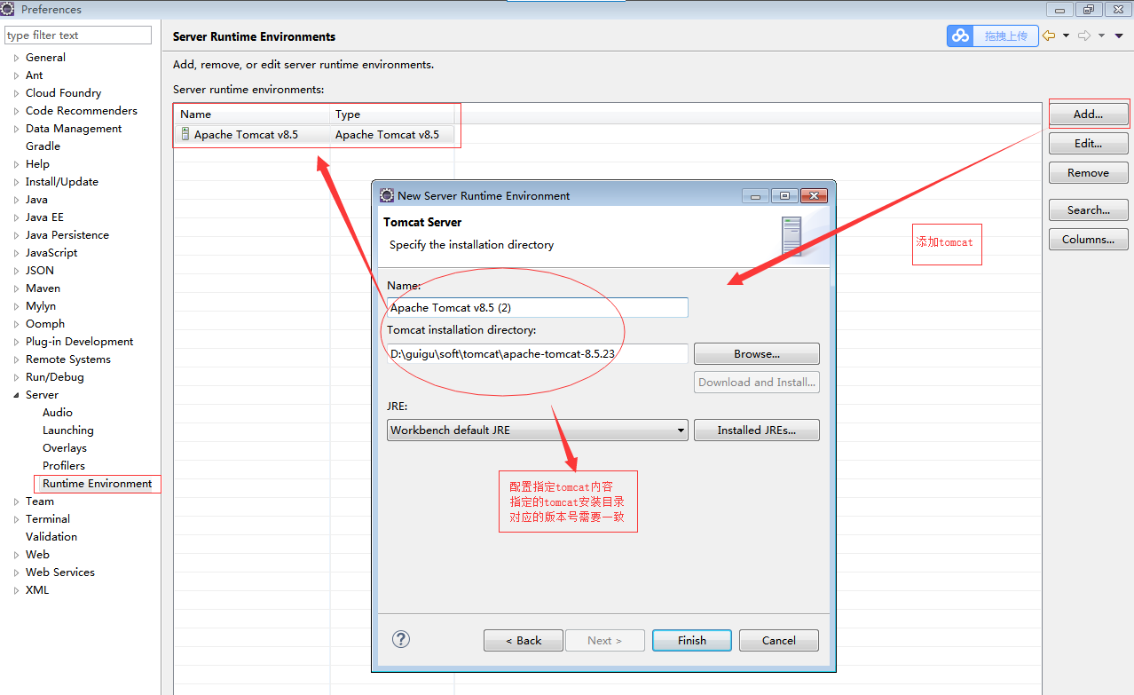
b.创建动态网站进行测试
新建动态网站进行测试,此处需要注意在创建的时候需要勾选“生成Web配置的核心文件”,在创建的时候也可以选择运行在指定的服务器上。
File->New->Dynamic Web Project->按照创建提示一步步创建自己的工程
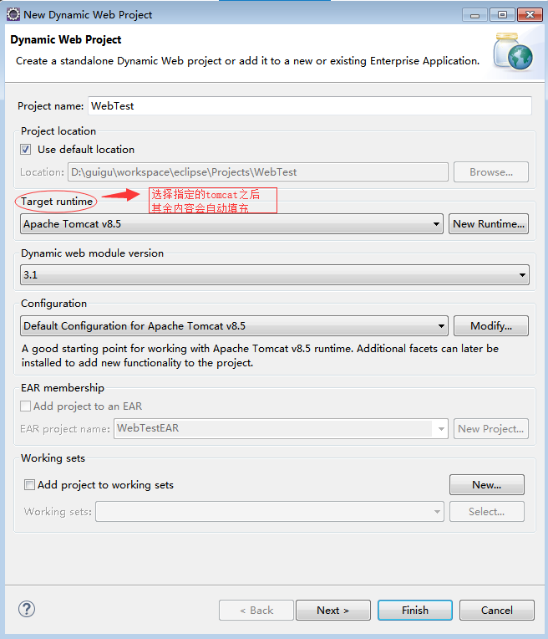
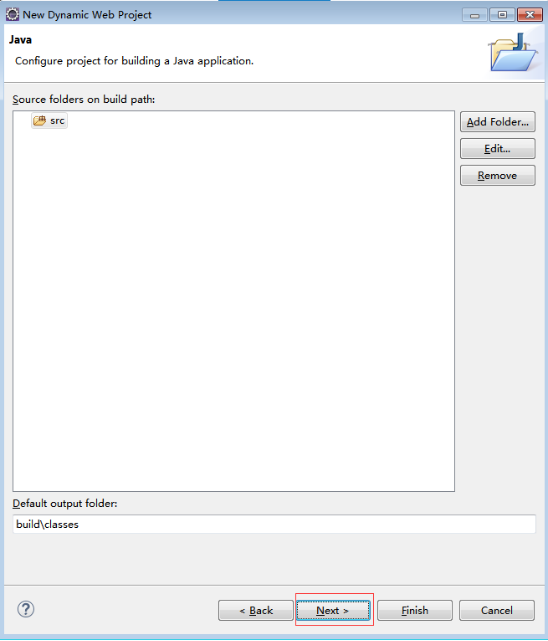
勾选生成核心配置文件web.xml
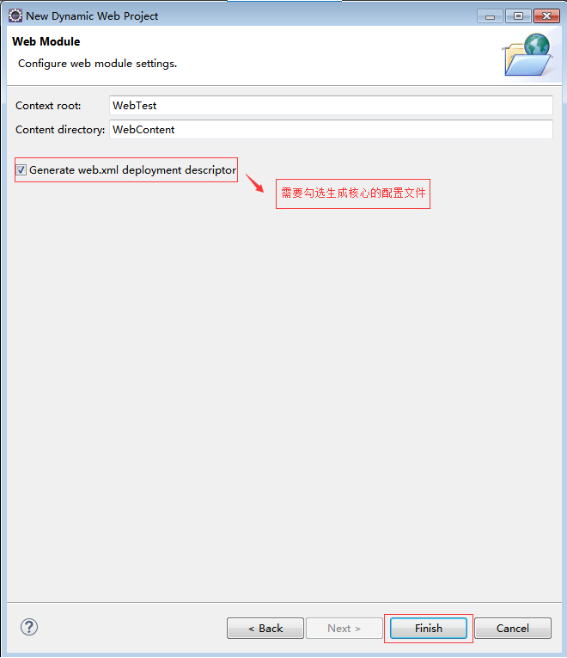
点击完成,将指定工程加载到相应服务器
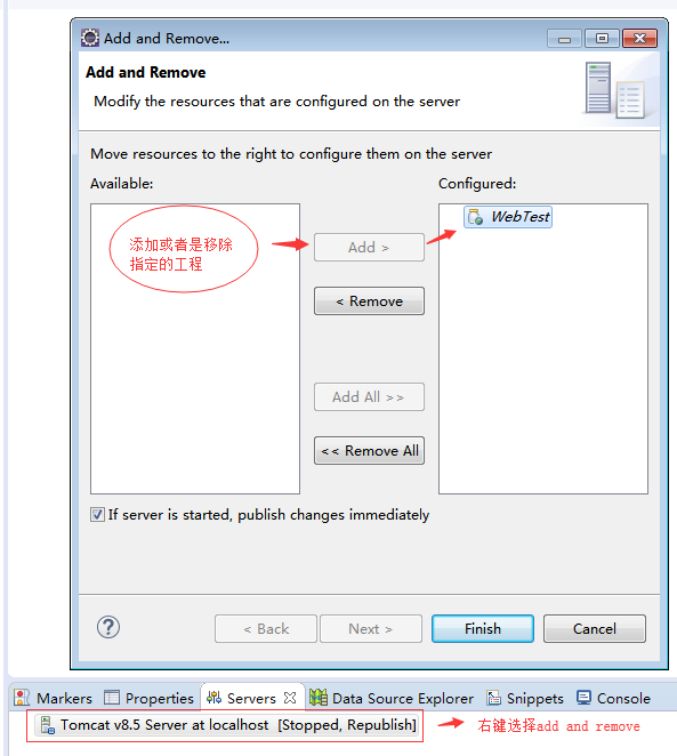
配置双击Server下的指定的服务器
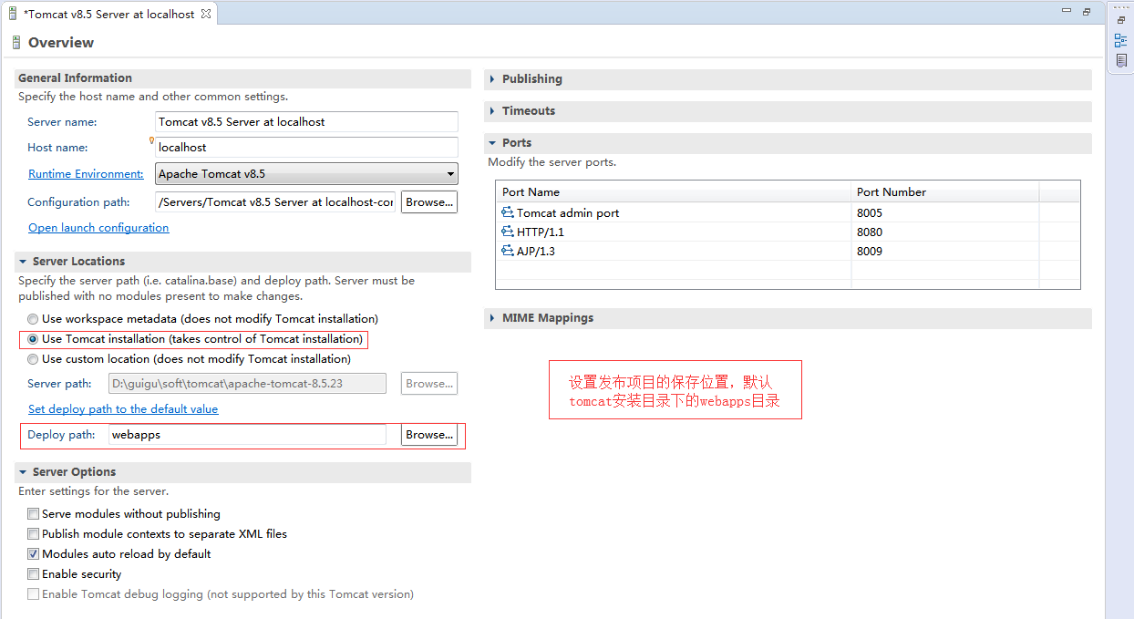
添加index.html发布项目测试

本机访问:localhost:端口号/工程名/项目资源
ip访问:ip地址/端口号/工程名/项目资源
eg:(通过ipconfig查看ip地址)
本机访问:localhost:8080/WebTest/index.html
ip访问:192.168.8.70:8080/WebTest/index.html

(4)idea中集成tomcat
Edit Configuation->打开Run/Debug Configurations,随后配置tomcat
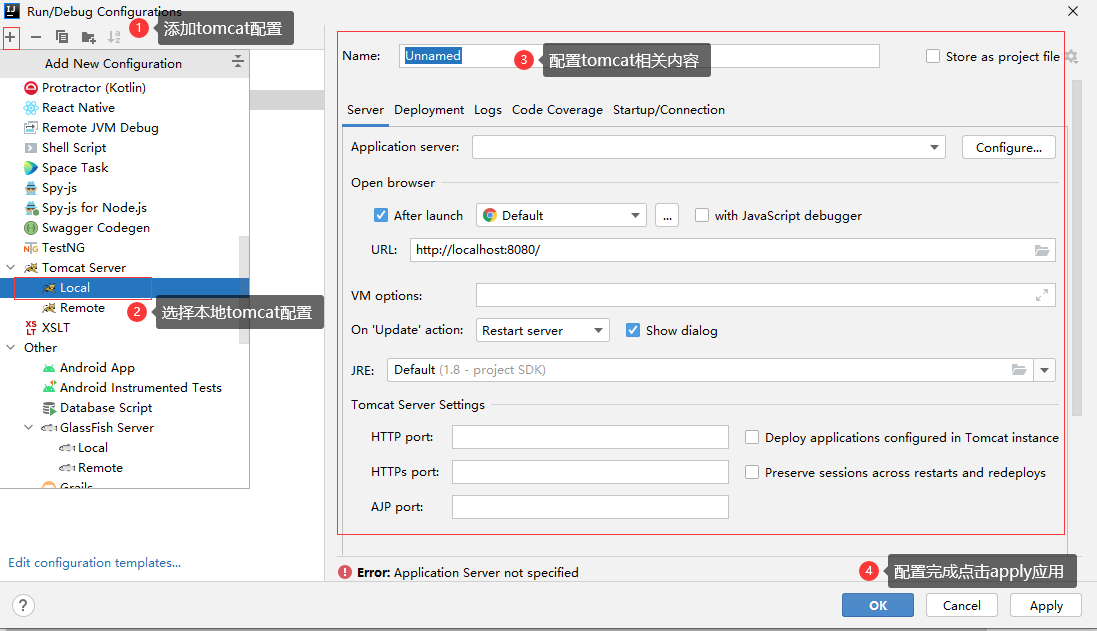
# 基本参数说明
Application Server:指定本地tomcat所在路径

Open browser:可指定默认打开的浏览器
URL:访问URL

Tomcat Server Settings:可配置基于http、https协议的访问端口
(5)Tomcat常见问题
1)启动一闪而过
tomcat的启动文件:startup.bat(windows)、startup.sh(linux)
tomcat的关闭文件:shutdown.bat(windows)、shutdown.sh(linux)
如果出现启动一闪而过的情况,可能是没有配置环境变量导致,需要相应配置JAVA_HOME环境变量
2)Address already in use:JVM Bind
java.net.BindException:Address already in use:JVM Bind
端口被占用,在windows或者linux下查看对应端口进程,如果占用指定的端口进程不重要则可直接kill
# window下排查
netstat -a -o
# 查看pid,随后在任务管理器中结束占用端口的进程
还可通过修改tomcat配置的端口号进行调整(tomcat/conf/server.xml文件)
3)tomcat虽能正常启动,但启动产生许多异常
如果出现该情况,tomcat下可能部署了多个项目,每次tomcat启动都会发布项目,如果这些项目中启动有存在异常的情况则可能报错。如果可以根据tomcat启动日志排查异常项目,则可将异常项目从发布目录中暂时移除;如果无法明确异常项目,则可通过重新解压一个新的tomcat对项目进行物理隔离(多个tomcat启动注意端口号重复问题)
此外,如果出现启动产生异常且tomcat无法正常启动的情况则需要通过解压一个新的tocmat进一步排查是tomcat问题还是项目问题,结合实际情况进行调整
2.Servlet开发
Servlet是sun公司提供的一门用于开发动态web资源的技术
Sun公司在其API中提供了一个servlet接口,用户若想用发一个动态web资源(即开发一个Java程序向浏览器输出数据),需要完成以下2个步骤:
编写一个Java类,实现servlet接口
把开发好的Java类部署到web服务器中
快速入门,用servlet向浏览器输出“hello servlet”
阅读Servlet API,解决两个问题:
输出hello servlet的java代码应该写在servlet的哪个方法内?
如何向IE浏览器输出数据?
【1】Web的目录结构
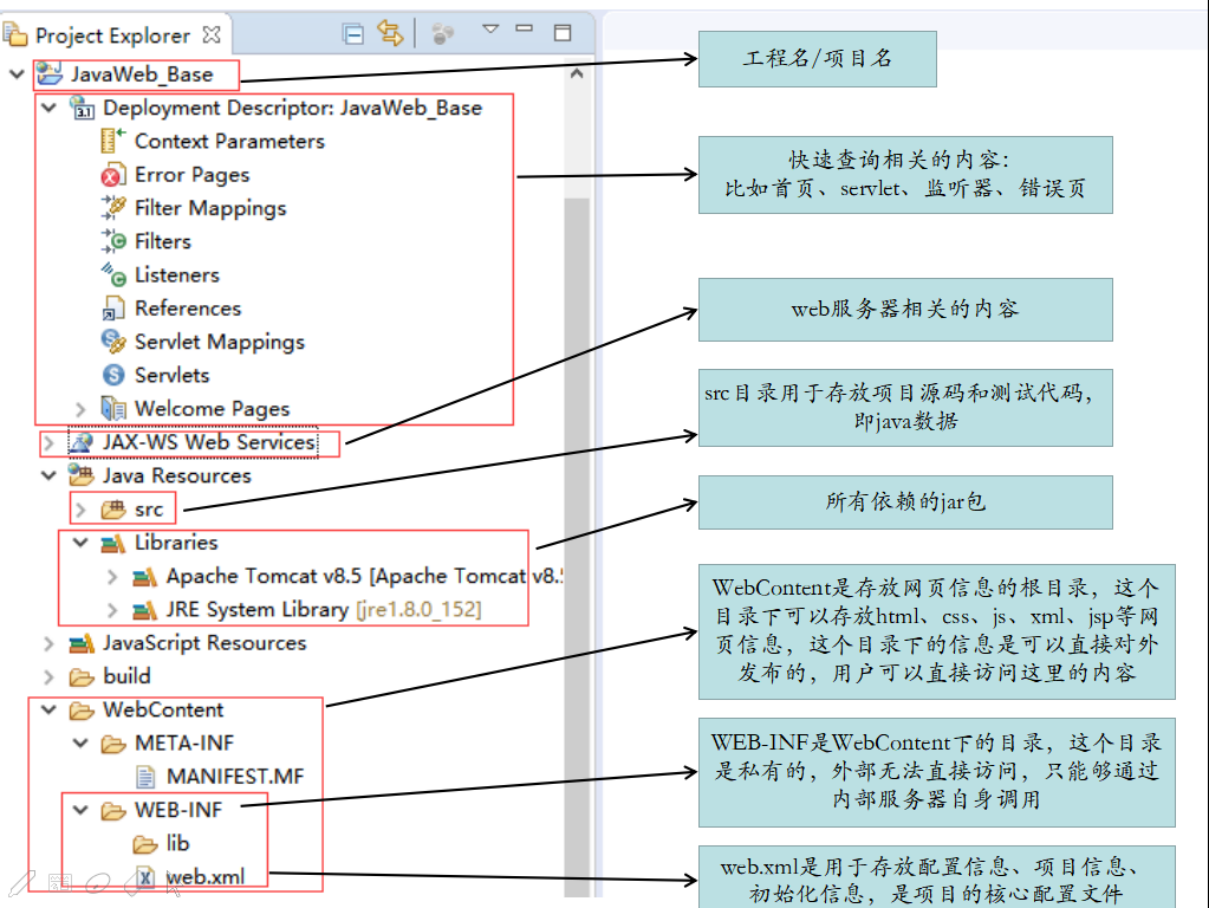
【2】Servlet入门基础
Servlet实现的方式
- 方式1:实现Servlet接口,实现接口方法
- 方式2:继承GenericServlet,重写service方法
- 方式3:继承HttpServlet(javax.servlet.http包下的抽象类,是GenericServlet的子类)
方式1:使用配置文件的方式配置servlet
编写一个类继承HttpServlet:重写一个方法service方法
在web.xml配置这个Servlet :配置<servlet></servlet>、<servlet-mapping></servletmapping>
web.xml中配置:
<servlet>
	<servlet-name>ServletDemo1</servlet-name>
	<servlet-class>com.noob.web.base.ServletDemo1</servlet-class>
</servlet>
<servlet-mapping>
	<servlet-name>ServletDemo1</servlet-name>
	<url-pattern>/ServletDemo1</url-pattern>
</servlet-mapping>
<servlet-mapping>
	<servlet-name>ServletDemo1</servlet-name>
	<url-pattern>/demo.html</url-pattern>
</servlet-mapping>
Servlet代码
/**
 * 方式1:使用配置文件的方式配置servlet
 * 	a.继承HttpServlet并重写service方法
 * 	b.在web.xml中配置servlet相关属性
 * 		<servlet>...</servlet>
 * 		<servlet-mapping>...</servlet-mapping>
 */
/**
 *  web.xml中相关配置内容:
 *  a.配置servlet
 *    <servlet>
 *  	  <servlet-name>类名</servlet-name>
 *  	  <servlet-class>类全名</servlet-class>
 *    </servlet>
 *  b.配置servlet的映射
 *    <servlet-mapping>
 *    	  <servlet-name>类名(需与servlet中的名称一致)</servlet-name>
 *  	  <url-pattern>映射路径(访问路径)</url-pattern>
 *    </servlet-mapping>
 *  c.同一个servlet可以对应多个不同的访问路径
 */
public class ServletDemo1 extends HttpServlet{
	/**
	 * 说明:
	 * a.service方法是用于处理客户端请求和相应客户端的方法
	 * b.HttpServletRequest request对象是客户端请求服务器,把客户端传递的数据
	 *   都封装在request对象中
	 * c.HttpServletResponse resp对象是服务器响应客户端,把服务器要传递到客户端
	 *   的数据都封装在resp对象中
	 */
	@Override
	protected void service(HttpServletRequest req, HttpServletResponse resp) throws ServletException, IOException {
		/**
		 *  利用resp对象向客户端输出数据
		 *  resp.getWrite()获取的是PrintWriter对象
		 */
		resp.getWriter().write("hello servletDemo1......");
	}
}
访问说明
localhost:8080/JavaWeb_base/ServletDemo1
服务主机IP:端口号/项目部署URI/Servlet映射
请求过程:客户端-->tomcat-->应用-->应用中的web.xml-->Servlet-->响应浏览器请求
方式2:使用注解的方式配置servlet
/**
 * 方式2:使用注解的方式配置servlet
 * 直接创建servlet(按照提示完成自动加载需要的内容)
 * 在实际的开放中通常使用到的是doGet()、doPost()方法
 * 也可用service()方法
 * @WebServlet("映射路径")
 */
@WebServlet("/ServletDemo2")
public class ServletDemo2 extends HttpServlet {
	private static final long serialVersionUID = 1L;
	/**
	 *	实际开发中 需要重写的是doGet方法和doPost方法 ,不需要重写service方法
	 *	service方法 会根据客户端请求的方式是get还是post,分别调用doGet方法和doPost方法
	 */
	protected void doGet(HttpServletRequest request, HttpServletResponse response) throws ServletException, IOException {
		response.getWriter().write("hello servletDemo2......");
	}

	protected void doPost(HttpServletRequest request, HttpServletResponse response) throws ServletException, IOException {
		doGet(request, response);
	}
}
⚡Servlet的映射规则
(1)映射规则介绍
<servlet>
	<servlet-name>ServletDemo</servlet-name>
	<servlet-class>com.noob.web.base.ServletDemo</servlet-class>
</servlet>
<servlet-mapping>
	<servlet-name>ServletDemo</servlet-name>
	<url-pattern>路径映射配置</url-pattern>
</servlet-mapping>
映射规则
1)方式1:明确指定路径映射(eg:/ServletDemo)
明确访问路径为:http://localhost:8080/JavaWeb_base/ServletDemo,只有路径映射完全匹配方可访问
2)方式2:以”/开头+通配符”的方式(eg:/servlet/*)
访问路径:只要满足http://localhost:8080/JavaWeb_base/servlet/前缀的所有资源均可访问
参考链接:http://localhost:8080/JavaWeb_base/servlet/test.do、http://localhost:8080/JavaWeb_base/servlet/test.jsp
3)方式3:以”通配符+固定格式结尾”的方式(eg:*.do、*.action)
访问路径:只要符合固定结尾格式的内容,无需关心URI(但必须保证协议、主机、端口的正确性)
参考链接:http://localhost:8080/test.do、http://localhost:8080/test
由上述内容可知,该映射配置方式与app应用名(URI)无关,只需要关注协议、主机IP、端口、限定格式这几个属性即可
映射规则的优先级
参考上述排序,其优先级为1)> 2)> 3),即"明确指定" > "/开头+通配符" > "通配符+固定格式结尾"
# 配置参考(分别定义ServletDemo1、ServletDemo2、ServletDemo3、ServletDemo4),配置如下映射
<servlet-mapping>
	<servlet-name>ServletDemo1</servlet-name>
	<url-pattern>/ServletDemo1</url-pattern>
</servlet-mapping>
<servlet-mapping>
	<servlet-name>ServletDemo2</servlet-name>
	<url-pattern>/servlet/*</url-pattern>
</servlet-mapping>
<servlet-mapping>
	<servlet-name>ServletDemo3</servlet-name>
	<url-pattern>*.aciton</url-pattern>
</servlet-mapping>
<servlet-mapping>
	<servlet-name>ServletDemo4</servlet-name>
	<url-pattern>/*</url-pattern>
</servlet-mapping>
访问路径1:http://localhost:8080/JavaWeb_base/ServletDemo1
检索web.xml,可以看到ServletDemo1、ServletDemo4均符合条件,但明显ServletDemo1的优先级高于ServletDemo4,因此虽然有两个Servlet的映射规则都能够匹配上请求的URL,但基于http”单一请求、单一响应”,最终由ServletDemo1执行并负责处理、响应
访问路径2:http://localhost:8080/JavaWeb_base/test.action
检索web.xml,可以看到ServletDemo3、ServletDemo4均符合条件,但明显ServletDemo4的优先级高于ServletDemo3,以此类推,最终由ServletDemo4执行并负责处理、响应
(2)Servlet多路径映射
一个Servlet可配置不同的访问映射路径,因此在业务逻辑处理中可通过校验不同的URL请求实现相应的功能
# 配置ServletMuiltDemo不同的访问映射路径
<servlet>
    <servlet-name>ServletMuiltDemo</servlet-name>
    <servlet-class>com.noob.web.base.ServletMuiltDemo</servlet-class>
</servlet>
<!--映射路径1-->
<servlet-mapping>
	<servlet-name>ServletMuiltDemo</servlet-name>
	<url-pattern>/servletMuiltDemo</url-pattern>
</servlet-mapping>
<!--映射路径2-->
<servlet-mapping>
	<servlet-name>ServletMuiltDemo</servlet-name>
	<url-pattern>/servlet/*</url-pattern>
</servlet-mapping>
<!--映射路径3-->
<servlet-mapping>
	<servlet-name>ServletMuiltDemo</servlet-name>
	<url-pattern>/muiltDemo</url-pattern>
</servlet-mapping>
# ServletMuiltDemo根据URL处理不同的业务逻辑

public class ServletMuiltDemo extends HttpServlet {

    /**
     * 根据不同的请求URL,做不同的处理规则
     * @param req
     * @param resp
     * @throws ServletException
     * @throws IOException
     */
    @Override
    protected void doGet(HttpServletRequest req, HttpServletResponse resp) throws ServletException, IOException {
        // 1.获取当前请求的URI
        String uri = req.getRequestURI();
        uri = uri.substring(uri.lastIndexOf("/"),uri.length());
        // 2.根据截取的路径进行校验,填充相应的业务逻辑
        if("/servletMuiltDemo".equals(uri)){
            System.out.println("映射路径1");
        }else if("/muiltDemo".equals(uri)){
            System.out.println("映射路径3");
        }else {
            System.out.println("其他处理");
        }
    }

    /**
     * 调用doGet方法
     * @param req
     * @param resp
     * @throws ServletException
     * @throws IOException
     */
    @Override
    protected void doPost(HttpServletRequest req, HttpServletResponse resp) throws ServletException, IOException {
        doGet(req,resp);
    }
}
随后测试访问:
http://localhost:8080/JavaWeb_base/servletMuiltDemo
http://localhost:8080/JavaWeb_base/muiltDemo
http://localhost:8080/JavaWeb_base/servlet/test.action
【3】Servlet的运行流程
@WebServlet("/ServletDemo3")
public class ServletDemo3 extends HttpServlet {
	private static final long serialVersionUID = 1L;

	@Override
	public void init() throws ServletException {
		System.out.println("servlet的init方法在初始化的时候只执行1次......");
	}

	protected void doGet(HttpServletRequest request, HttpServletResponse response) throws ServletException, IOException {
		response.getWriter().write("hello servletDemo3......");
	}

	protected void doPost(HttpServletRequest request, HttpServletResponse response) throws ServletException, IOException {
		doGet(request, response);
	}

	@Override
	public void destroy() {
		System.out.println("servlet的destory方法在销毁的时候执行......");
	}

}
【4】Servlet的生命周期
Servlet的生命周期和工作原理
Servlet的的声明周期分为三个阶段:1.初始化阶段 2.响应客户阶段 3.终止阶段
这三个阶段分别对应init方法 service方法 和destory方法,这三个方法分别在不同的阶段进行调用
servlet的初始化阶段
在以下时刻servlet进行初始化 servlet初始化包含以下三种情况,这三种情况都会执行init方法
1)servlet容器启动后,自动加载某些配置信息。需要配置<load-on-startup></load-on-startup>
<servlet>
	<servlet-name>ServletDemo4</servlet-name>
	<servlet-class>com.noob.web.base.ServletDemo4</servlet-class>
	<!-- 服务器启动的时候自动初始化这个Servlet -->
	<load-on-startup>1</load-on-startup>
</servlet>
2)在servlet容器启动后,客户端第一次向servlet发起请求
3)servlet的文件被更改后 重新加载servlet
注意: init方法只会在第一次初始化servlet的时候执行
servlet响应客户端阶段
Servlet当接受到客户端请求后,servlet会根据这个请求创建两个对象HttpServletRequest对象和HttpServletResponse对象,这个对象分别代表接受请求和响应请求,然后servlet调用service方法。Service方法会根据HttpRequest对象从请求中获取相关的数据,然后处理请求,最后通过HttpResponse对象把数据写出到客户端
servlet终止阶段
当web应用被终止,或者servlet容器终止运行
当servlet容器被重新加载
当前终止的时候回调用destroy方法进行终止
@WebServlet("/ServletDemo4")
public class ServletDemo4 extends HttpServlet {
	private static final long serialVersionUID = 1L;
	@Override
	public void init() throws ServletException {
		System.out.println("自动加载init......");
	}
	protected void doGet(HttpServletRequest request, HttpServletResponse response) throws ServletException, IOException {
		response.getWriter().write("hello servletDemo4......");
	}
	protected void doPost(HttpServletRequest request, HttpServletResponse response) throws ServletException, IOException {
		doGet(request, response);
	}
}
【5】Servlet相关的对象
📌ServletConfig对象
在Servlet的配置文件中,可以使用一个或多个<init-param>标签为servlet配置一些初始化参数
当servlet配置了初始化参数后,web容器在创建servlet实例对象时,会自动将这些初始化参数封装到ServletConfig对象中,并在调用servlet的init方法时,将ServletConfig对象传递给servlet。进而,程序员通过ServletConfig对象就可以得到当前servlet的初始化参数信息
阅读ServletConfig API,该对象的作用说明如下:
- 获得字符集编码
- 获得数据库连接信息
- 获得配置文件web.xml配置的参数
参考案例:通过ServletConfig对象获取web.xml配置的参数
  <servlet>
  	<servlet-name>ServletConfigDemo</servlet-name>
  	<servlet-class>com.noob.web.servletConfig.ServletConfigDemo</servlet-class>
  	<init-param>
    	<param-name>username</param-name>
      <param-value>noob</param-value>
    </init-param>
    <init-param>
    	<param-name>password</param-name>
      <param-value>000000</param-value>
    </init-param>
  </servlet>
  <servlet-mapping>
  	<servlet-name>ServletConfigDemo</servlet-name>
  	<url-pattern>/ServletConfigDemo</url-pattern>
  </servlet-mapping>
/**
 * ServletConfig对象的使用
 * 1.在web.xml中配置相关的内容
 * 		<servlet>
 * 			<servlet-name>...</servlet-name>
 * 			<servlet-class>...</servlet-class>
 * 		配置初始化信息,在程序中便可通过ServletConfig对象获取
 * 			<init-param>
 * 				<param-name>属性名</param-name>
 * 				<param-value>属性值</param-value>
 * 			</init-param>
 * 		</servlet>
 */
public class ServletConfigDemo extends HttpServlet {
	private static final long serialVersionUID = 1L;

	/**
	 * 定义ServletConfig对象,这个对象是针对单个Servlet
	 * 获取配置信息和配置内容,可以通过init方法进行初始化
	 */
	private ServletConfig servletConfig ;

	@Override
	public void init(ServletConfig config) throws ServletException {
		this.servletConfig = config;
	}

	protected void doGet(HttpServletRequest request, HttpServletResponse response) throws ServletException, IOException {
		// a.通过ServletConfig对象获取配置文件的信息,并通过response对象输出到客户端
		String username = servletConfig.getInitParameter("username");
		String password = servletConfig.getInitParameter("password");
		response.getWriter().write("username:"+username+"--password:"+password);

		// b.获得所有的请求参数的key值即name属性(返回类型为枚举类型),依次遍历
		Enumeration<String> params = servletConfig.getInitParameterNames();
		while(params.hasMoreElements()) {
			// 获取相应的属性名称和属性值
			String name = params.nextElement();
			String value = servletConfig.getInitParameter(name);
			response.getWriter().write("username:"+username+"--password:"+password);
		}
	}

	protected void doPost(HttpServletRequest request, HttpServletResponse response) throws ServletException, IOException {
		doGet(request, response);
	}
}
📌ServletContext对象
在 Servlet 规范中,一共有 4 个域对象。ServletContext 是 web 应用中最大的作用域,也叫 application 域,它可以实现整个应用之间的数据共享
WEB容器在启动时,它会为每个WEB应用程序都创建一个对应的ServletContext对象,它代表当前web应用。
ServletConfig对象中维护了ServletContext对象的引用,开发人员在编写servlet时,可以通过ServletConfig.getServletContext方法获得ServletContext对象
由于一个WEB应用中的所有Servlet共享同一个ServletContext对象,因此Servlet对象之间可以通过ServletContext对象来实现通讯。ServletContext对象通常也被称之为context域对象。
查看ServletContext API文档,了解ServletContext对象的功能
(1)案例1:多个servlet共享数据
/**
 * 案例1:多个servlet共享数据
 * 在一个servlet中实现ServletContext对象存储数据
 * 在另一个servlet中获取该数据
 */
@WebServlet("/ServletContextDemo1")
public class ServletContextDemo1 extends HttpServlet {
	private static final long serialVersionUID = 1L;

	protected void doGet(HttpServletRequest request, HttpServletResponse response) throws ServletException, IOException {
		/**
		 * ServletContext可以作为域对象,进行存取数据
		 * 获取ServletContext对象有两种方式
		 * a.通过ServletConfig对象获取:this.getServletConfig().getServletContext()
		 * b.直接获取:this.getServletContext()
		 */
		ServletContext sc1 = this.getServletConfig().getServletContext();
		ServletContext sc2 = this.getServletContext();
		// 利用域对象存取数据
		sc1.setAttribute("username", "noob");
		sc2.setAttribute("password", "000000");
	}
	protected void doPost(HttpServletRequest request, HttpServletResponse response) throws ServletException, IOException {
		doGet(request, response);
	}

}

@WebServlet("/ServletContextDemo2")
public class ServletContextDemo2 extends HttpServlet {
	private static final long serialVersionUID = 1L;

	protected void doGet(HttpServletRequest request, HttpServletResponse response) throws ServletException, IOException {
		// 获取ServletContext对象
		ServletContext sc = this.getServletContext();
		// 获取当前域对象的某个属性,通过response对象向客户端输出数据
		// 此处获取的是域对象的某个属性,用的是getAttribute()方法
		String username = (String) sc.getAttribute("username");
		String password = (String) sc.getAttribute("password");
		response.getWriter().write(username);
		response.getWriter().write(password);

		/**
		 *  分析:在此之前必须先加载ServletContextDemo1中的数据设置域对象,
		 *  否则得到的结果为null或者是报错(属性不存在则页面显示报错)
		 */
	}

	protected void doPost(HttpServletRequest request, HttpServletResponse response) throws ServletException, IOException {
		doGet(request, response);
	}
}
运行结果:先执行ServletContextDemo1再执行ServletContextDemo2方能获取数据
(2)案例2:获取全局的web初始化参数
web.xml中配置:
<!--配置应用初始化参数-->
<context-param>
    <!--用于获取初始化参数的key-->
    <param-name>content</param-name>
    <!--初始化参数的值-->
    <param-value>hello context...</param-value>
</context-param>
/**
 * 案例2:获取全局的web初始化参数
 * 在web.xml中定义全局的初始化参数
 *  -- 定义全局的web初始化参数
 *  <context-param>
 *  	<param-name>属性名称</param-name>
 *  	<param-value>属性值</param-value>
 *  </context-param>
 */
@WebServlet("/ServletContextDemo3")
public class ServletContextDemo3 extends HttpServlet{
	private static final long serialVersionUID = 1L;
	@Override
	protected void doGet(HttpServletRequest req, HttpServletResponse resp) throws ServletException, IOException {
		ServletContext sc = this.getServletConfig().getServletContext();
		// 此处获取的是全局的web初始化参数,用的是getInitParameter()方法
		String content = (String) sc.getInitParameter("content");
		System.out.println("content:"+content);
	}
	@Override
	protected void doPost(HttpServletRequest req, HttpServletResponse resp) throws ServletException, IOException {
		doGet(req, resp);
	}
}
(3)案例3:实现servlet之间的转发
/**
 * 案例3:实现servlet之间的转发
 */
@WebServlet("/ServletContextDemo4")
public class ServletContextDemo4 extends HttpServlet {
	private static final long serialVersionUID = 1L;
	/**
	 *  利用ServletContext实现servlet之间的转发
	 *  需要注意的是转发之前定义的内容显示都是无效的,只显示转发之后的内容,
	 *  但程序代码还是照样执行
	 */
	protected void doGet(HttpServletRequest request, HttpServletResponse response) throws ServletException, IOException {
		response.getWriter().write("hello!ServletContextDemo4......");
		/**
		 *  实现转发
		 *  a.定义ServletContext对象
		 *  b.定义RequestDispatcher对象获取转发路径
		 *  c.利用RequestDispatcher对象调用forward方法实现转发
		 */
		ServletContext sc = this.getServletContext();
		RequestDispatcher rd = sc.getRequestDispatcher("/ServletContextDemo5");
		rd.forward(request, response);
	}
	protected void doPost(HttpServletRequest request, HttpServletResponse response) throws ServletException, IOException {
		// TODO Auto-generated method stub
		doGet(request, response);
	}
}
/**
 * 定义ServletContextDemo4转发之后的内容
 */
@WebServlet("/ServletContextDemo5")
public class ServletContextDemo5 extends HttpServlet {
	private static final long serialVersionUID = 1L;
	protected void doGet(HttpServletRequest request, HttpServletResponse response) throws ServletException, IOException {
		response.getWriter().write("hello!ServletContextDemo5......");;
	}
	protected void doPost(HttpServletRequest request, HttpServletResponse response) throws ServletException, IOException {
		doGet(request, response);
	}
}
结果分析:执行ServletContextDemo4发现页面执行ServletContextDemo5的页面内容,但地址栏不发生变化

(4)案例4:读取资源文件
/**
 * 案例4:读取文件文件资源
 * 在src下放置文件资源jdbc.properties,正常情况下直接通过“/jdbc.properties”
 * 便可直接定位访问到该文件资源,但是在此处需要考虑文件工程源码与项目发布的路径并不一致
 * 的问题,从而导致在原有路径并无法获取指定的文件资源
 * 通过查看对比该文件资源在工程源码的路径与项目发布的路径中的准确位置
 * a.工程源码路径:
 *   D:\dev\workspace\eclipse\Projects\JavaWeb\src\jdbc.properties
 * b.项目发布路径:
 *   D:\dev\soft\tomcat\apache-tomcat-8.5.23
 *   \webapps\JavaWeb\WEB-INF\classes\jdbc.properties
 */
@WebServlet("/ServletContextDemo6")
public class ServletContextDemo6 extends HttpServlet {
	private static final long serialVersionUID = 1L;
	private void test1() throws IOException {
		// 普通获取文件资源的方式(无效、报错)
		FileInputStream fis = new FileInputStream("/jdbc.properties");
		System.out.println(fis);
	}
	private void test2() {
		// 利用ServletContext获取文件资源
		InputStream in = this.getServletContext().getResourceAsStream("/WEB-INF/classes/jdbc.properties");
		System.out.println(in);
	}
	protected void doGet(HttpServletRequest request, HttpServletResponse response) throws ServletException, IOException {
//		test1();
		test2();
	}
	protected void doPost(HttpServletRequest request, HttpServletResponse response) throws ServletException, IOException {
		doGet(request, response);
	}
}
【6】Request对象和Response对象
请求对象&响应对象
Web服务器收到客户端的http请求,会针对每一次请求,分别创建一个用于代表请求的request对象、和代表响应的response对象。
request和response对象即然代表请求和响应,那我们要获取客户机提交过来的数据,只需要找request对象就行了。要向客户机输出数据,只需要找response对象就行了。
HttpServletResponse对象
(1)HttpServletResponse基本概念
常用状态码
| 状态码 | 说明 |
|---|---|
| 200 | 执行成功 |
| 302 | 和307一样,都是用于重定向的状态码(307目前已不再使用) |
| 304 | 请求资源未改变,使用缓存 |
| 400 | 请求错误。最常见的就是请求参数有问题 |
| 404 | 请求资源未找到 |
| 405 | 请求方式不被支持 |
| 500 | 服务器运行内部错误 |
状态码首位含义
| 状态码 | 说明 |
|---|---|
| 1xx | 消息 |
| 2xx | 成功 |
| 3xx | 重定向 |
| 4xx | 客户端错误 |
| 5xx | 服务器错误 |
response细节问题
getOutputStream和getWriter方法分别用于得到输出二进制数据、输出文本数据的ServletOuputStream、Printwriter对象
getOutputStream和getWriter这个方法互相排斥,调用了其中的任何一个方法后,就不能再调用另一方法
Servlet程序向ServletOutputStream或PrintWriter对象中写入的数据将被Servlet引擎从response里面获取,Servlet引擎将这些数据当作响应消息的正文,然后再与响应状态行和各响应头组合后输出到客户端
Serlvet的service方法结束后,Servlet引擎将检查getWriter或getOutputStream方法返回的输出流对象是否已经调用过close方法,如果没有,Servlet引擎将调用close方法关闭该输出流对象
(2)案例1:通过response对象输出中文到客户端
基本概念
通过response对象输出中文到客户端
方式1:
使用程序控制浏览器的编码集:response.setHeader("Content-type", "text/html;charset=UTF-8");
方式2:
使用程序控制浏览器的编码集:response.setContentType("text/html;charset=UTF-8");
方式3:
仅仅设置输出的编码集:response.setCharacterEncoding("GB2312");
但需注意设置的输出编码集必须与浏览器的编码集一致,否则无效,如果使用方式3需要每个浏览器均进行匹配,常常与setHeader联用
参考案例
/**
 * 案例1:通过response对象输出中文到客户端
 */
@WebServlet("/ResponseDemo1")
public class ResponseDemo1 extends HttpServlet {
	private static final long serialVersionUID = 1L;
	/**
	 * 方式1:使用程序控制浏览器的编码集
	 * response.setHeader("Content-type", "text/html;charset=UTF-8");
	 */
	private void test1(HttpServletResponse response) throws IOException{
		response.setHeader("Content-type", "text/html;charset=UTF-8");
		response.getWriter().write("setHeader方法:使用了程序控制浏览器的编码集为UTF-8"+"<br/>");
	}

	/**
	 * 方式2:使用程序控制浏览器的编码集
	 * response.setContentType("text/html;charset=UTF-8");
	 */
	private void test2(HttpServletResponse response) throws IOException{
		response.setContentType("text/html;charset=UTF-8");
		response.getWriter().write("setContentType方法:使用了程序控制浏览器的编码集为UTF-8"+"<br/>");
	}

	/**
	 * 方式3:仅仅设置输出的编码集
	 * (但需注意设置的输出编码集必须与浏览器的编码集一致,否则无效)
	 * 如果使用方式3需要每个浏览器均进行匹配,常常与setHeader联用
	 */
	private void test3(HttpServletResponse response) throws IOException{
		response.setCharacterEncoding("GB2312");
//		response.setCharacterEncoding("UTF-8");如果浏览器编码集不为UTF-8则设置无效
		response.getWriter().write("setCharacterEncoding方法:仅仅设置输出的编码集"+"<br/>");
	}

	protected void doGet(HttpServletRequest request, HttpServletResponse response) throws ServletException, IOException {
		// 测试
		test1(response);
		test2(response);
		test3(response);
	}

	protected void doPost(HttpServletRequest request, HttpServletResponse response) throws ServletException, IOException {
		doGet(request, response);
	}
}
结果测试:http://localhost:8080/JavaWeb/ResponseDemo1
(3)案例2:通过response对象完成文件的下载
/**
 * 案例2:通过response对象完成文件的下载
 */
@WebServlet("/ResponseDemo2")
public class ResponseDemo2 extends HttpServlet {
	private static final long serialVersionUID = 1L;
	/**
	 * 定义encodeDownloadFileName方法针对不同的浏览器进行编码
	 */
	private String encodeDownloadFileName(String filename,String agent) throws IOException {
		if(agent.contains("Firefox")) {
			// 火狐浏览器
			filename = "?UTF-8?B?"+new BASE64Encoder().encode(filename.getBytes("UTF-8"))+"?=";
		}else {
			// 针对其他不同的浏览器
			filename = URLEncoder.encode(filename,"UTF-8");
		}
		return filename;
	}
	protected void doGet(HttpServletRequest request, HttpServletResponse response) throws ServletException, IOException {
		/**
		 *  a.获取要下载的文件的真实路径信息(发布路径下的目录)
		 *  D:\dev\soft\tomcat\apache-tomcat-8.5.23\webapps\JavaWeb\img\...
		 */
		String path = this.getServletContext().getRealPath("img/1.jpg");
		// b.根据真实路径信息完成文件的读写
		String filename = path.substring(path.lastIndexOf("\\")+1);
		// c.根据不同的浏览器获取下载文件的名称
		filename = encodeDownloadFileName(filename, request.getHeader("user-agent"));
		// d.利用response设置输出消息头
		response.setHeader("content-disposition", "attachment;filename="+filename);
		// e.实现文件下载
		InputStream in = new FileInputStream(path);
		OutputStream out = response.getOutputStream();
		int hasRead=0;
		byte[] buffer = new byte[1024];
		while((hasRead=in.read(buffer))!=-1) {
			out.write(buffer,0,hasRead);
		}
		in.close();
		out.close();
	}

	protected void doPost(HttpServletRequest request, HttpServletResponse response) throws ServletException, IOException {
		doGet(request, response);
	}
}
结果展示:

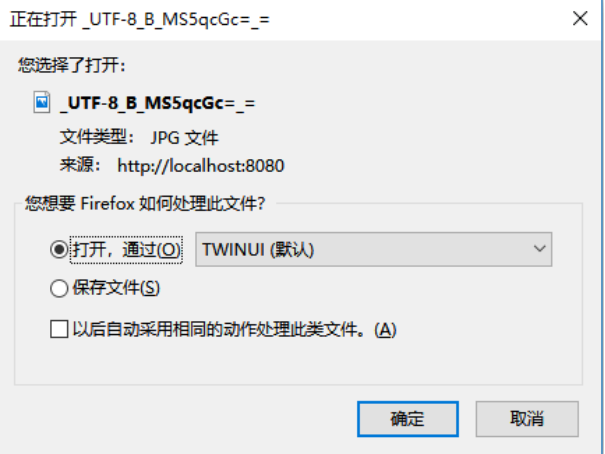
(4)案例3:通过response对象生成随机图片(验证码)
参考案例
1)ResponseDemo3.java
/**
 * 案例3:通过response对象生成随机图片(验证码)
 * 设计步骤:
 * a.定义随机字典,实现随机生成6个任意字符
 * b.获取随机颜色作为背景色,并将其反色作为文本颜色
 * c.获取上述两步中得到的文字和颜色,利用画笔绘制文本和背景
 * d.输出绘制的图片到指定页面(可设置噪点)
 */
@WebServlet("/ResponseDemo3")
public class ResponseDemo3 extends HttpServlet {
	private static final long serialVersionUID = 1L;
	Random r = new Random();
	/**
	 *  a.定义随机字典,实现生成6个随机字符
	 */
	private static char[] ch = {
			'0','1','2','3','4','5','6','7','8','9','a','b','c',
			'd','e','f','g','h','i','j','k','l','m','n','o','p',
			'q','r','s','t','u','v','w','x','y','z','A','B','C',
			'D','E','F','G','H','I','J','K','L','M','N','O','P',
			'Q','R','S','T','U','V','W','X','Y','Z'
	};
	private String getRandom6char() {
		StringBuffer sb = new StringBuffer();
		for(int i=0;i<6;i++) {
			sb.append(ch[r.nextInt(ch.length)]);
		}
		return sb.toString();
	}
 	/**
 	 *  b.获取随机颜色作为背景色,将其反色作为文本颜色
 	 */
	private Color getBackgroundColor() {
		// rgb三原色:red、green、blue
		Color bgcolor = new Color(r.nextInt(255),r.nextInt(255),r.nextInt(255));
		return bgcolor;
	}
	private Color getReverseColor(Color c) {
		Color reverse = new Color(255-c.getRed(),255-c.getGreen(),255-c.getBlue());
		return reverse;
	}

	protected void doGet(HttpServletRequest request, HttpServletResponse response) throws ServletException, IOException {
		/**
		 * c.绘制文本和背景
		 */
		// 获取绘制验证码所需要数据信息(文本、背景色)
		String str = getRandom6char();
		Color bgcolor = getBackgroundColor();
		Color reverseColor = getReverseColor(bgcolor);
		// 创建用于输出文件的对象
		BufferedImage bi = new BufferedImage(100, 30, BufferedImage.TYPE_INT_RGB);
		// 获取画笔,绘制文本和背景
		Graphics g = bi.getGraphics();
		// 设置画笔颜色,绘制背景色
		g.setColor(bgcolor);
		g.fillRect(0, 0, 100, 30);
		// 设置画笔颜色和文本样式,绘制文本内容
		g.setColor(reverseColor);
		g.setFont(new Font(Font.SANS_SERIF,Font.BOLD,16));
		g.drawString(str, 18, 20);
		// 可添加绘制噪点
		for(int i=0,n=r.nextInt(100);i<n;i++) {
			g.drawRect(r.nextInt(100), r.nextInt(30), 1, 1);
		}
		/**
		 *  d.设置输出数据的类型,直接输出图片到指定的页面
		 */
		response.setContentType("image/jpeg");
		ImageIO.write(bi, "jpg", response.getOutputStream());

	}
	protected void doPost(HttpServletRequest request, HttpServletResponse response) throws ServletException, IOException {
		doGet(request, response);
	}
}
2)identify.html:测试页面
<!DOCTYPE html>
<html>
<head>
<meta charset="UTF-8">
<title>生成验证码</title>
</head>
	<script type="text/javascript">
		function  reloadImage() {
			document.getElementById('btn').disabled=true; //禁用掉按钮
			document.getElementById('identity').src="../ResponseDemo3?ts="+new Date();//随机加上一个时间让服务器区别这是不同的请求
		}
	</script>
	<body>
		<!-- 此处需要注意引用的文件路径 -->
		<img alt="" src="../ResponseDemo3" id="identity" onload="btn.disabled=false">
		<input type="button" value="换个图片" onclick="reloadImage()" id="btn"/>
	</body>
</html>
3)结果展示:
http://localhost:8080/JavaWeb/ResponseDemo3

http://localhost:8080/JavaWeb/html/identify.html

HttpServletRequest对象
(1)案例1:通过request对象常用的方法
参考案例
1)RequestDemo1.java
/**
 * 案例1:通过HttpServletRequest对象常用的方法
 */
@WebServlet("/RequestDemo1")
public class RequestDemo1 extends HttpServlet {
	private static final long serialVersionUID = 1L;
	protected void doGet(HttpServletRequest request, HttpServletResponse response) throws ServletException, IOException {
		/**
		 * HttpServletRequest对象的作用主要是响应客户端请求,从客户端中获取数据
		 * 常用方法
		 * a.获取和路径相关的数据
		 * 	getRequestURL():获取完整路径(http://localhost:8080/工程名/请求资源)
		 * 	getRequestURI():获取短路径(工程名/请求资源)
		 * b.获取服务器的地址、查询参数等数据
		 * 	getRemoteAddr():获取服务器地址
		 * 		(本机访问:127.0.0.1对应0:0:0:...1   外部访问:192.168.8.8)
		 * 	getQueryString():获取通过地址栏传递的参数(没有传递返回null)
		 * 		(传递参数:?参数名=参数值     ?username=noob)
		 * 	getRemotePort():获取服务器对外端口号(不是8080)
		 * 	getMethod():获取客户端请求的方式(get、post)
		 * 	getServerPort():获取访问端口号(8080)
		 * 	getServletPath():获取请求的资源信息(/RequestDemo1)
		 */
		// a.获取和路径相关的数据
		System.out.println("完整路径:"+request.getRequestURL());
		System.out.println("短路径:"+request.getRequestURI());
		// b.获取相关参数
		System.out.println("服务器地址:"+request.getRemoteAddr());
		System.out.println("地址栏传递参数:"+request.getQueryString());
		System.out.println("服务器对外端口号:"+request.getRemotePort());
		System.out.println("客户端请求方式:"+request.getMethod());
		System.out.println("访问端口号:"+request.getServerPort());
		System.out.println("请求的资源信息:"+request.getServletPath());
	}

	protected void doPost(HttpServletRequest request, HttpServletResponse response) throws ServletException, IOException {
		doGet(request, response);
	}
}
2)结果展示
http://localhost:8080/JavaWeb/RequestDemo1
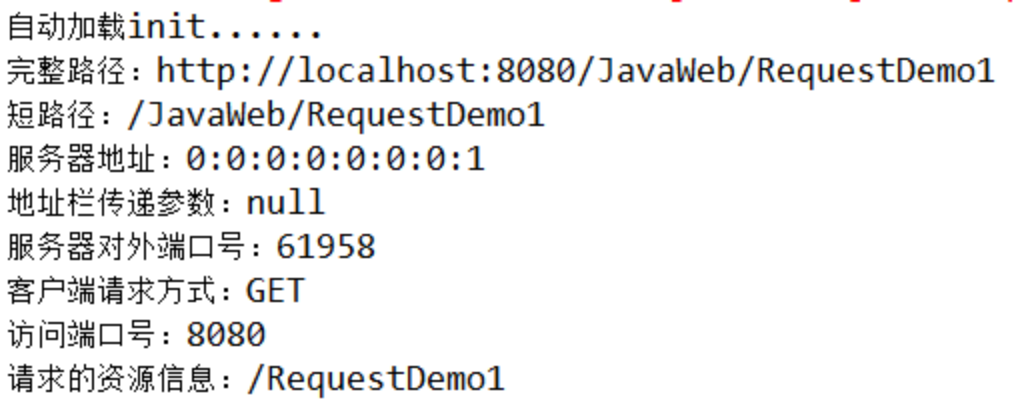
(2)案例2:获取表单的各项输入的数据
参考案例
1)RequestDemo2.java
/**
 * 案例2:通过HttpServletRequest对象获取提交表单的数据
 */
@WebServlet("/RequestDemo2")
public class RequestDemo2 extends HttpServlet {
	private static final long serialVersionUID = 1L;

	protected void doGet(HttpServletRequest request, HttpServletResponse response) throws ServletException, IOException {
		// 1.获取提交表单的数据信息
		String username =  request.getParameter("username");
		String password =  request.getParameter("pwd");
		String sex =  request.getParameter("sex");
		String year =  request.getParameter("year");
		String month =  request.getParameter("month");
		String day =  request.getParameter("day");
		String birthday = year+"-"+month+"-"+day;
		String[] likes =  request.getParameterValues("likes");
		String eduction =  request.getParameter("eduction");
		// 2.将获取到的数据信息封装为model对象并通过相应的service保存到数据库中
		User user = new User(username, password, sex, birthday, likes, eduction);
		System.out.println(user);
	}

	protected void doPost(HttpServletRequest request, HttpServletResponse response) throws ServletException, IOException {
		doGet(request, response);
	}
}
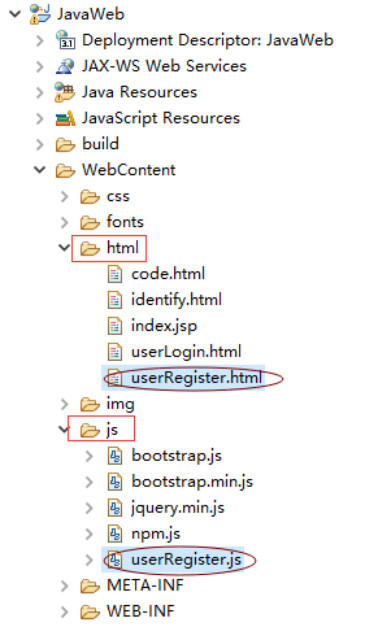
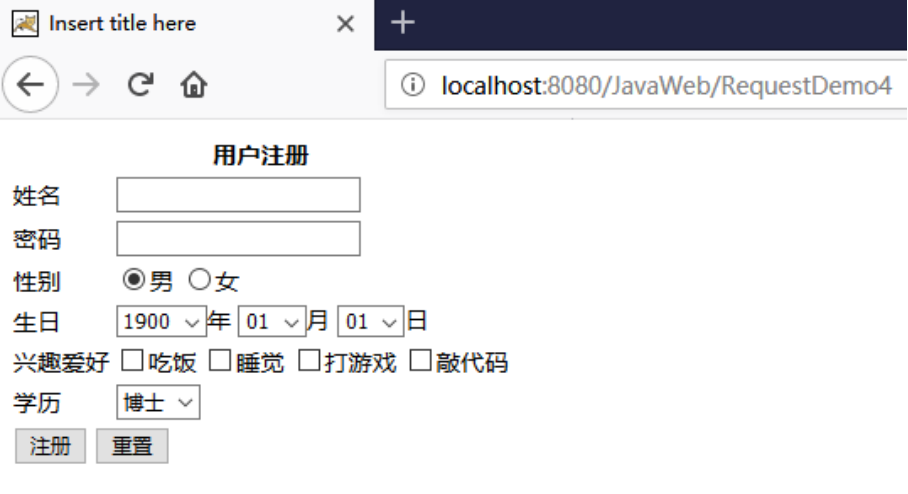
2)userRegister.html:用户注册测试界面
<!DOCTYPE html>
<html>
<head>
<meta charset="UTF-8">
<title>Insert title here</title>
</head>
	<!-- 导入自定义的js文件 -->
 	<script type="text/javascript" src="../js/userRegister.js" ></script>
	<!-- 导入bootstrap提供的相关的css、js文件,设定指定的编码集 -->
	<link rel="stylesheet" href="../css/bootstrap.min.css" />
	<script src="../js/jquery.min.js" type="text/javascript" charset="utf-8"></script>
	<script src="../js/bootstrap.min.js" type="text/javascript" charset="utf-8"></script>
	<body onload="loadData()">
		<div class="container">
			<form action="../RequestDemo2" method="post" name="form1">
				<table class="table table-striped table-bordered table-hover">
					<tr>
						<th colspan="2">用户注册</th>
					</tr>

					<tr>
						<td>姓名</td>
						<td><input type="text" name="username"/></td>
					</tr>

					<tr>
						<td>密码</td>
						<td><input type="password" name="pwd"/></td>
					</tr>

					<tr>
						<td>性别</td>
						<td>
							<input type="radio" name="sex" value="male" checked="checked"/>男
							<input type="radio" name="sex" value="female" />女
						</td>
					</tr>

					<tr>
						<td>生日</td>
						<td>
							<select name="year" onchange="reloadDay()">
								<option value="1900">1900</option>
							</select>年
							<select name="month" onchange="reloadDay()">
								<option value="01">01</option>
							</select>月
							<select name="day">
								<option value="01">01</option>
							</select>日
						</td>
					</tr>

					<tr>
						<td>兴趣爱好</td>
						<td>
							<input type="checkbox" name="likes" value="eat"/>吃饭
							<input type="checkbox" name="likes" value="sleep"/>睡觉
							<input type="checkbox" name="likes" value="game"/>打游戏
							<input type="checkbox" name="likes" value="qdm"/>敲代码
						</td>
					</tr>

					<tr>
						<td>学历</td>
						<td>
							<select name="eduction">
								<option value="boshi">博士</option>
								<option value="boshi">硕士</option>
								<option value="boshi">本科</option>
								<option value="boshi">专科</option>
								<option value="boshi">博士</option>
							</select>
						</td>
					</tr>

					<tr>
						<td colspan="2">
							<input type="submit" value="注册"/>
							<input type="reset" value="重置" />
						</td>
					</tr>
				</table>
			</form>
		</div>
	</body>
</html>
3)userRegister.js:初始化年月日下拉列表
function loadData(){
	loadYear();
	loadMonth();
	loadDay();
}

// 加载年份
function loadYear(){
	// 获取指定的表单中的下拉列表
	var year = document.forms["form1"].year;
	// 依次加载数据
	for(var i=1901;i<=new Date().getFullYear();i++){
		// 创建新的节点并设置相关的属性,挂载节点到指定的位置
		var op = document.createElement("option");
		op.value = i;
		op.textContent = i;
		year.appendChild(op);
	}
}

// 加载月份
function loadMonth(){
	// 获取指定的表单中的下拉列表
	var month = document.forms["form1"].month;
	// 依次加载数据
	for(var i=2;i<=12;i++){
		// 创建新的节点并设置相关的属性,挂载节点到指定的位置
		var op = document.createElement("option");
		// 调整月份格式
		if(i<10){
			op.value = "0"+ i;
			op.textContent = "0" + i;
		}else{
			op.value = i;
			op.textContent = i;
		}
		month.appendChild(op);
	}
}

// 加载日期
function loadDay(){
	// 获取指定的表单中的下拉列表
	var day = document.forms["form1"].day;
	// 依次加载数据
	for(var i=1;i<=31;i++){
		// 创建新的节点并设置相关的属性,挂载节点到指定的位置
		var op = document.createElement("option");
		// 调整月份格式
		if(i<10){
			op.value = "0"+ i;
			op.textContent = "0" + i;
		}else{
			op.value = i;
			op.textContent = i;
		}
		day.appendChild(op);
	}
}

// 设置二级联动,当选择了相应的年份、月份获取相应的天数
function reloadDay(){
	// 获取当前选择的年份月份
	var selectYear = document.forms["form1"].year.value;
	var selectMonth = document.forms["form1"].month.value;
	// 获取某年某月有几天
	var month = parseInt(selectMonth,10) + 1;
    var date = new Date(selectYear, selectMonth, 0);
    var count =  date.getDate();
    // 获取day,重新加载天数信息
    var day = document.forms["form1"].day;
    day.length=0;
   	// 依次加载数据
	for(var i=1;i<=count;i++){
		// 创建新的节点并设置相关的属性,挂载节点到指定的位置
		var op = document.createElement("option");
		// 调整月份格式
		if(i<10){
			op.value = "0"+ i;
			op.textContent = "0" + i;
		}else{
			op.value = i;
			op.textContent = i;
		}
		day.appendChild(op);
	}
}
4)结果展示
http://localhost:8080/JavaWeb/RequestDemo2
如果是直接访问RequestDemo2则没有获取表单提交的数据,显示为null,如果是通过指定的html提交指定的表单数据则正常回显信息
http://localhost:8080/JavaWeb/html/userRegister.html

(3)案例3:通过request请求参数中文乱码问题
参考案例
1)RequestDemo3.java
/**
 * 案例3:通过HttpServletRequest对象解决中文乱码问题
 */
@WebServlet("/RequestDemo3")
public class RequestDemo3 extends HttpServlet {
	private static final long serialVersionUID = 1L;

	protected void doGet(HttpServletRequest request, HttpServletResponse response) throws ServletException, IOException {
		// 解决form表单post方式导致的中文乱码问题
		request.setCharacterEncoding("UTF-8");
		// 接受来自code.html的内容
		String content = request.getParameter("content");
		System.out.println(content);
	}
	protected void doPost(HttpServletRequest request, HttpServletResponse response) throws ServletException, IOException {
		doGet(request, response);
	}
	// 解决form表单get方式导致的中文乱码问题
	private void messycode(HttpServletRequest request) throws IOException {
		String content=request.getParameter("content");
		content=new String(content.getBytes("ISO-8859-1"),"UTF-8");
        System.out.println(content);
	}
}
2)code.html:测试界面
<!DOCTYPE html>
<html>
<head>
<meta charset="UTF-8">
<title>乱码问题</title>
</head>
<body>
	<form action="../RequestDemo3" method="post">
		<input type="text" name="content"/>
		<input type="submit" value="测试"/>
	</form>
</body>
</html>
3)结果显示:
http://localhost:8080/JavaWeb/html/code.html

4>项目乱码问题解决
如果是提交方式是post 如果不想乱码,只需要设置request.setCharacterEncoding("UTF-8"); 和页面的编码集一致 <meta charset="UTF-8">
如果提交表单的方式是get,设置request是无效的,如果想获取的参数显示不是乱码,需要重新封装获取的数据再进行输出,参考示例如下:
String username=request.getParameter("username");
username=new String(username.getBytes("ISO-8859-1"),"UTF-8");
System.out.println(username);
get方式乱码,还可以通过设置服务器的配置实现,可以在tomcat安装目录下更改conf/server.xml

请求转发和重定向
请求转发 VS 重定向
一个web资源接收到客户端请求后,通知浏览器去调用另外一个web资源进行处理,称之为请求转发
一个web资源接收到客户端请求后,通知浏览器去访问另外一个web资源,称之请求重定向
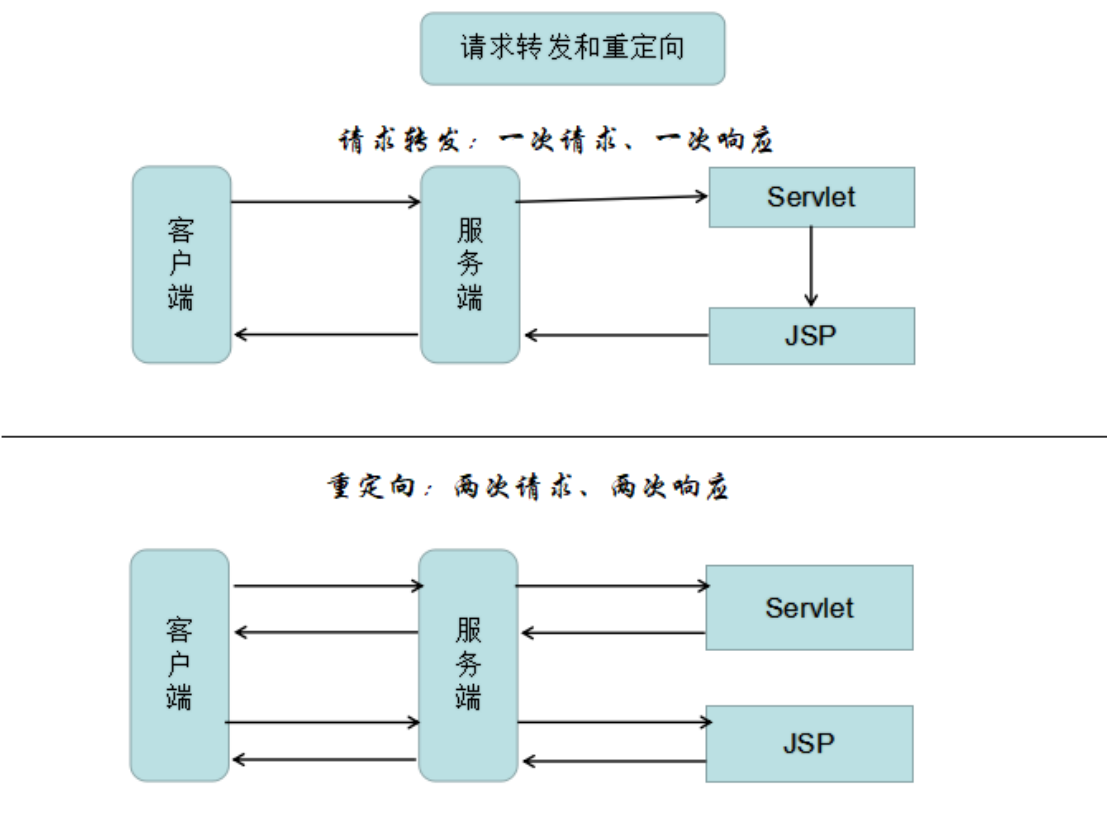
参考案例
1)RequestDemo4.java
/**
 * 请求转发和重定向
 * 请求转发:一个web资源接收到客户端请求后,通知浏览器去调用另外一个web资源进行处理
 * 重定向:一个web资源接收到客户端请求后,通知浏览器去访问另外一个web资源
 */
//@WebServlet("/RequestDemo4")
public class RequestDemo4 extends HttpServlet {
	private static final long serialVersionUID = 1L;

	protected void doGet(HttpServletRequest request, HttpServletResponse response) throws IOException, ServletException {
		test1(response);
//		test2(request,response);
	}

	/**
	 *  重定向:两次请求、两次响应
	 *  相应地址栏的url会定位到指定的位置
	 */
	private void test1(HttpServletResponse response) throws IOException{
		response.sendRedirect("/JavaWeb/html/userRegister.html");
	}

	/**
	 *  请求转发:一次请求、一次响应
	 *  不会改变url地址
	 */
	private void test2(HttpServletRequest request, HttpServletResponse response) throws IOException, ServletException {
		RequestDispatcher rd = request.getRequestDispatcher("/html/userRegister.html");
		rd.forward(request, response);
	}

	protected void doPost(HttpServletRequest request, HttpServletResponse response) throws ServletException, IOException {
		doGet(request, response);
	}
}
2)结果展示:
a.重定向测试:地址栏发生变化,页面跳转到指定的页面资源
http://localhost:8080/JavaWeb/RequestDemo4
http://localhost:8080/JavaWeb/html/userRegister.html
b.请求转发测试:
地址栏不会发生变化,页面显示指定的页面资源,此处显示css样式失效是由于在指定的html测试文件中的路径设置参考的是当前地址,因此无法准确定位到相应的bootstrap提供的样式,可以明确用${pageContext.request.contextPath}表示当前工程目录即可
http://localhost:8080/JavaWeb/RequestDemo4
请求转发和重定向有什么区别?
RequestDispatcher.forward方法只能将请求转发给同一个WEB应用中的组件;而HttpServletResponse.sendRedirect 方法还可以重定向到同一个站点上的其他应用程序中的资源,甚至是使用绝对URL重定向到其他站点的资源。 (范围的不同)
如果传递给HttpServletResponse.sendRedirect 方法的相对URL以“/”开头,它是相对于整个WEB站点的根目录;如果创建RequestDispatcher对象时指定的相对URL以“/”开头,它是相对于当前WEB应用程序的根目录。 (“/”的含义)
调用HttpServletResponse.sendRedirect方法重定向的访问过程结束后,浏览器地址栏中显示的URL会发生改变,由初始的URL地址变成重定向的目标URL;调用RequestDispatcher.forward 方法的请求转发过程结束后,浏览器地址栏保持初始的URL地址不变。(URL地址是否变化)
HttpServletResponse.sendRedirect方法对浏览器的请求直接作出响应,响应的结果就是告诉浏览器去重新发出对另外一个URL的访问请求;RequestDispatcher.forward方法在服务器端内部将请求转发给另外一个资源,浏览器只知道发出了请求并得到了响应结果,并不知道在服务器程序内部发生了转发行为。 (请求次数和响应次数)
RequestDispatcher.forward方法的调用者与被调用者之间共享相同的request对象和response对象,它们属于同一个访问请求和响应过程;而HttpServletResponse.sendRedirect方法调用者与被调用者使用各自的request对象和response对象,它们属于两个独立的访问请求和响应过程。
3.会话管理
【1】Cookie VS Session
应用场景
在购物或者论坛发帖时候往往需要登录验证身份,登录后服务器会将登录信息保存在服务器端的会话中,而会话管理技术的场景则是在多次请求间实现数据共享
而在JavaEE项目中会话管理主要分为客户端会话管理技术和服务端会话管理技术
- 客户端会话管理技术:将要共享的数据保存到了客户端(也就是浏览器端)。每次请求时,把会话信息带到服务器,从而实现多次请求的数据共享
- 服务端会话管理技术:其本质仍是采用客户端会话管理技术,只不过保存到客户端的是一个特殊的标识,并且把要共享的数据保存到了服务端的内存对象中。每次请求时,通过这个标识访问服务端,找到对应的内存空间,从而实现数据共享
Cookie
Cookie是客户端技术,程序把每个用户的数据以cookie的形式写给用户各自的浏览器。当用户使用浏览器再去访问服务器中的web资源时,就会带着各自的数据去。这样,web资源处理的就是用户各自的数据
Session
Session是服务器端技术,利用这个技术,服务器在运行时可以为每一个用户的浏览器创建一个其独享的session对象,由于session为用户浏览器独享,所以用户在访问服务器的web资源时,可以把各自的数据放在各自的session中,当用户再去访问服务器中的其它web资源时,其它web资源再从用户各自的session中取出数据为用户服务
【2】Cookie
Cookie是客户端技术,是用户访问web服务器的时候,服务器在用户硬盘上的存放方式,服务器可以根据Cookie来获取状态
Cookie可以保存客户浏览器访问网站的相关内容(需要客户端不禁用Cookie)。从而在每次访问需要同一个内容时,先从本地缓存获取,使资源共享,提高效率
Cookie属性
| 属性名称 | 属性作用 | 说明 |
|---|---|---|
| name | cookie的名称 | 必要属性 |
| value | cookie的值(不能是中文) | 必要属性 |
| path | cookie的路径 | |
| domain | cookie的域名 | |
| maxAge | cookie的生存时间 | |
| version | cookie的版本号 | |
| comment | cookie的说明 |
Cookie有大小,个数限制。每个网站最多只能存20个cookie,且大小不能超过4kb。且所有网站的cookie总数不超过300个。
当删除Cookie时,设置maxAge值为0。当不设置maxAge时,使用的是浏览器的内存,当关闭浏览器之后,cookie将丢失。设置了此值,就会保存成缓存文件(值必须是大于0的,以秒为单位)
常用API
| 方法 | 说明 |
|---|---|
| public Cookie(String name, String value) | 创建Cookie |
| public void addCookie(Cookie cookie) | 向服务器添加cookie |
| public Cookie[] getCookies(); | 从服务器端获取Cookie |
⚡Cookie的设置和获取
Cookie的属性是由domain+path+name确定的:
- domain:域名(IP、端口)
- path:cookie的path属性(cookie的path存在默认值,可在浏览器中访问servlet,查看设置的Cookie信息)
- name:cookie的name属性
客户端带cookie到服务器的时机:
- 由请求资源URI和cookie的path对比结果决定:请求资源URI.startWith(cookie的path) 返回true则带cookie,返回false不带
| 访问URL | URI部分 | Cookie-Path | 是否携带Cookie | 能否取到Cookie |
|---|---|---|---|---|
| servlet1 http://localhost:8080/sp/servlet1 | /sp/servlet1 | /sp/ | 带 | 能取到 |
| servlet2 http://localhost:8080/servlet2 | /servlet2 | /sp/ | 不带 | 不能取到 |
案例1:显示用户上次访问的时间
1)CookieDemo1.java
/**
 * 案例分析1:利用cookie完成显示上次用户访问的时间
 */
@WebServlet("/CookieDemo1")
public class CookieDemo1 extends HttpServlet {
	private static final long serialVersionUID = 1L;
	protected void doGet(HttpServletRequest request, HttpServletResponse response) throws ServletException, IOException {

		// 2.得到Cookie的相关数据并显示到客户端
		/**
		 * 设置编码集UTF-8
		 */
		response.setContentType("text/html;charset=UTF-8");
		PrintWriter pw = response.getWriter();
		/**
		 * 获取客户端中保存的cookie
		 * 此处通过HttpServletRequest对象获取的是所有的Cookie数据
		 * 循环遍历所有的cookie,根据key值查找指定的cookie
		 */
		Cookie[] cookies = request.getCookies();
		for(int i=0;cookies!=null&&i<cookies.length;i++) {
			Cookie ck = cookies[i];
			if(ck.getName().equals("lastAccessTime")) {
				// 查找成功显示数据信息
				Long time = Long.parseLong(ck.getValue());
				Date date = new Date(time);
				SimpleDateFormat sdf = new SimpleDateFormat("yyyy-MM-dd HH:mm:ss");
				pw.write("上次访问当前页面的时间:"+sdf.format(date));
			}
		}

		// 1.给用户以Cookie的形式发送最新的时间保存到Cookie中
		/**
		 * 创建Cookie,其包含两个参数:
		 * key用于保存Cookie的名称
		 * value用于保存Cookie对应的值
		 */
		Cookie cookie = new Cookie("lastAccessTime",System.currentTimeMillis()+"");
		/**
		 * 设置Cookie的相关属性(有效期、保存路径等)
		 * setMaxAge():设置Cookie的有效期
		 * setPath():设置Cookie保存的路径信息
		 */
		cookie.setMaxAge(10000);
		cookie.setPath("/JavaWeb");
		/**
		 * 将Cookie添加到客户端
		 */
		response.addCookie(cookie);
	}

	protected void doPost(HttpServletRequest request, HttpServletResponse response) throws ServletException, IOException {
		doGet(request, response);
	}
}
2)CookieDemo2.java:删除指定的cookies进行测试
@WebServlet("/CookieDemo2")
public class CookieDemo2 extends HttpServlet {
	private static final long serialVersionUID = 1L;
	protected void doGet(HttpServletRequest request, HttpServletResponse response) throws ServletException, IOException {
		/**
		 * 删除指定的cookie进行测试
		 * 通过request获取客户端所有的cookie,随后根据指定的cookie名称删除
		 * 相应的cookie即可,此处删除有两种形式实现
		 * a.将相应的cookie设置为空
		 * b.创建同名的cookie对原有cookie进行覆盖
		 */
		// 同名覆盖,与上述效果一致
		Cookie cookie = new Cookie("lastAccessTime",System.currentTimeMillis()+"");
		cookie.setMaxAge(0);
		cookie.setPath("/JavaWeb");
		response.addCookie(cookie);
	}
	protected void doPost(HttpServletRequest request, HttpServletResponse response) throws ServletException, IOException {
		doGet(request, response);
	}
}
3)结果展示:
http://localhost:8080/JavaWeb/CookieDemo1
第一次访问无相应的访问记录则不显示数据

访问完成,刷新页面进入下一次访问

执行http://localhost:8080/JavaWeb/CookieDemo2,删除指定的cookies,再次访问CookieDemo1又是第一次访问,以此类推
案例2:显示用户的书籍浏览记录
参考案例:
模拟数据库操作书籍信息
1)Book.java
/**
 * 创建model书籍类:
 * id、名称、作者、详细描述
 */
public class Book {
	private String id;
	private String name;
	private String author;
	private String descr;
	public Book() {
		super();
	}
	public Book(String id, String name, String author, String descr) {
		super();
		this.id = id;
		this.name = name;
		this.author = author;
		this.descr = descr;
	}
	public String getId() {
		return id;
	}
	public void setId(String id) {
		this.id = id;
	}
	public String getName() {
		return name;
	}
	public void setName(String name) {
		this.name = name;
	}
	public String getAuthor() {
		return author;
	}
	public void setAuthor(String author) {
		this.author = author;
	}
	public String getDescr() {
		return descr;
	}
	public void setDescr(String descr) {
		this.descr = descr;
	}
	@Override
	public String toString() {
		return "Book [id=" + id + ", name=" + name + ", author=" + author + ", descr=" + descr + "]";
	}
}
2)DBBook.java
/**
 * 模拟数据库
 */
public class DBBook {
	// 模拟数据库创建书籍信息
	private static Map<String,Book> map = new LinkedHashMap<>();
	// 添加书籍信息
	static {
		map.put("1",new Book("1","JavaWeb入门基础","张三","书籍描述...."));
		map.put("2",new Book("2","Oracle数据库入门基础","李四","书籍描述...."));
		map.put("3",new Book("3","Mysql数据库入门基础","王五","书籍描述...."));
		map.put("4",new Book("4","数据库实践","赵六","书籍描述...."));
		map.put("5",new Book("5","JavaEE企业级开发","小七","书籍描述...."));
		map.put("6",new Book("6","算法设计与分析","刘八","书籍描述...."));
		map.put("7",new Book("7","数据结构与算法分析","李一","书籍描述...."));
		map.put("8",new Book("8","C++程序设计","haha","书籍描述...."));
	}
	// 定义公有方法获取所有的书籍信息
	public static Map getAllBook() {
		return map;
	}
}
3)IndexServlet.java
/**
 * 案例2:制作书籍访问记录cookie
 * 1.模拟数据库创建相关书籍进行测试
 * 2.提供首页用于显示所有的书籍信息和相应的访问记录
 * 3.提供详情页用于显示指定书籍的详细信息并相应更新数据
 */
@WebServlet("/IndexServlet")
public class IndexServlet extends HttpServlet {
	private static final long serialVersionUID = 1L;
	protected void doGet(HttpServletRequest request, HttpServletResponse response) throws ServletException, IOException {
		/**
		 * 首页设置编码集统一:
		 * a.展示所有的书籍信息
		 * b.显示所有曾经浏览过的书籍信息
		 * 由于是自定义的cookie存储规则,在获取数据的时候相应地
		 * 需要进行转化
		 */
		// 设置编码集统一
		response.setContentType("text/html;charset=UTF-8");
		PrintWriter pw = response.getWriter();
		// a.显示所有的书籍信息
		pw.write("所有书籍信息显示如下:<br/>");
		Set<Map.Entry<String,Book>> set = DBBook.getAllBook().entrySet();
		for(Map.Entry<String, Book> entry : set) {
			Book book =entry.getValue();
			/**
			 * 为每本书籍创建超链接,传入id作为参数
			 * <a href='/JavaWeb/InfoServlet?id=..' target='_blank'>...</a>
			 */
			pw.write("<a href='/JavaWeb/InfoServlet?id="+book.getId()
			+"' target='_blank'>"+book.getName()+"</a><br/>");
		}

		// b.显示曾经浏览过的所有书籍信息
		pw.write("浏览记录显示如下:<br/>");
		Cookie[] cookies = request.getCookies();
		for(int i=0;i<cookies.length&&cookies!=null;i++) {
			Cookie ck = cookies[i];
			if(ck.getName().equals("bookHistory")) {
				// 将cookie数据进行拆分(以下划线进行拆分,需要转义)
				String[] ids = ck.getValue().split("\\_");
				// 从书籍中查找相应的记录进行显示即可
				for(String id : ids) {
					Book book = (Book) DBBook.getAllBook().get(id);
					pw.write("id:"+book.getId()+"--名称:"+book.getName()+"<br/>");
				}
			}
		}
	}

	protected void doPost(HttpServletRequest request, HttpServletResponse response) throws ServletException, IOException {
		doGet(request, response);
	}
}
4)InfoServlet.java
/**
 * InfoServlet用以显示浏览的书籍的具体信息
 * 与此同时更新cookie记录
 */
@WebServlet("/InfoServlet")
public class InfoServlet extends HttpServlet {
	private static final long serialVersionUID = 1L;

	protected void doGet(HttpServletRequest request, HttpServletResponse response) throws ServletException, IOException {
		// 设置统一的编码集
		response.setContentType("text/html;charset=UTF-8");
		PrintWriter pw = response.getWriter();
		// 根据用户传入的参数id得到书籍的相信信息
		String id = request.getParameter("id");
		Book book = (Book) DBBook.getAllBook().get(id);
		pw.write("您当前浏览的书籍详细信息列举如下:<br/>");
		pw.write("书籍id:"+book.getId()+"<br/>");
		pw.write("书籍名称:"+book.getName()+"<br/>");
		pw.write("书籍作者:"+book.getAuthor()+"<br/>");
		pw.write("书籍描述:"+book.getDescr()+"<br/>");
		// 用户当前浏览了该书籍,则需要更新cookie记录,自定义规则更新数据
		String bookHistory = getBookHistory(request,id);
		Cookie ck = new Cookie("bookHistory", bookHistory);
		ck.setMaxAge(1*30*24*3600);
		ck.setPath("/JavaWeb");
		response.addCookie(ck);
	}

	public String  getBookHistory(HttpServletRequest request,String id) {
	     /**
	      * 此处假设之多保存3个浏览记录,多余的内容进行覆盖
	      * bookHistory=null        1       bookHistory=1
	      * bookHistory=1           3       bookHistory=3_1
	      * bookHistory=3_1         1       bookHistory=1_3
	      * bookHistory=1_3         4       bookHistory=4_1_3
	      * bookHistory=4_1_3       3       bookHistory=3_4_1
	      * bookHistory=3_4_1       5       bookHistory=5_3_4
	      */
	    String bookHistory=null;

	    //得到客户端的访问记录
	    Cookie [] cookies =request.getCookies();
	    for(int i=0;cookies!=null && i<cookies.length;i++) {
	        if(cookies[i].getName().equals("bookHistory")) {
	            bookHistory=cookies[i].getValue();//从客户端查询到具体的数据
	        }
	    }
	    /**
	     * 判断当前的cookie是否为null,如果为null则说明是第一次访问某个
	     * 书籍链接,因此直接返回对应的id即可
	     *  bookHistory=null       1         bookHistory=1
	     */
	    if(bookHistory==null) {
	        return id;
	    }
	    /**
	     * 如果当前的cookie不为null,则说明此前已有相应的记录,则需要根据不同
	     * 的情况对数据进行拆分分析、再更新
	     * 分类讨论方式:
	     * a.判断当前的cookie中是否包含当前访问的书籍信息
	     * 如果包含则将其删除再将其添加至头部(表示最新访问)
	     * 如果不包含则将判断当前是否超出“3个”的限制:
	     * 		超出则去除最后一个并将当前查阅信息添加至头部
	     * 		不超出则可直接添加至头部
	     */
	    //拆分cookie数据,保存到列表中
	    List l=Arrays.asList(bookHistory.split("\\_"));
	    LinkedList<String> list =new LinkedList<>();
	    list.addAll(l); //把List集合的数据全部添加到LinkedList中

	    //根据不同的情况进行不同的处理
	    if(list.contains(id)) {
	       // 如果当前书籍借阅记录已存在
	       list.remove(id);//移除指定的数据
	       list.addFirst(id);//把指定的数据添加到头部
	    }else {
	        // 如果当前借阅记录数已满足大于等于3
	        if(list.size()>=3) {
	            list.removeLast();//移除最后一个
	            list.addFirst(id);//把新访问的数据添加到头部;
	        }else {
	        	// 如果当前借阅记录数小于3,则直接在头部添加新访问的数据
	        	list.addFirst(id);
	        }
	    }

	    //完成后把数据从List集合拼接为相应的String字符串再保存到cookie中
	    StringBuffer sb =new StringBuffer();
	    for (String str : list) {
            sb.append(str+"_");
        }
	    // 此时获取的字符串形式为:4_2_3_,最终返回的字符串应当去除最后一个下划线
	    return sb.deleteCharAt(sb.length()-1).toString();
	}

	protected void doPost(HttpServletRequest request, HttpServletResponse response) throws ServletException, IOException {
		doGet(request, response);
	}
}
5)结果展示:
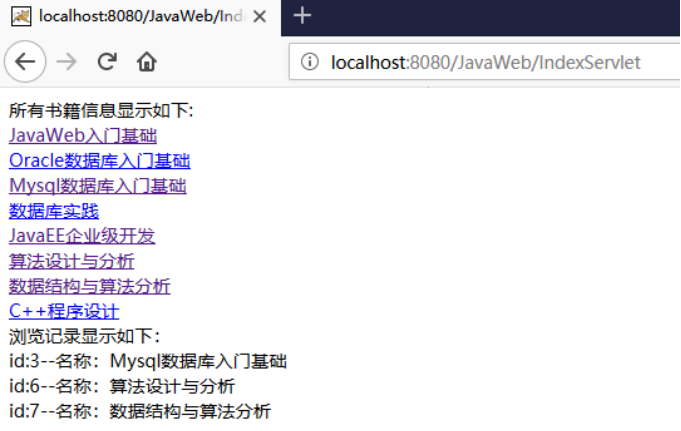
http://localhost:8080/JavaWeb/IndexServlet
首次访问没有指定的cookies存在,浏览记录显示为空,点击任意书籍后查看相应书籍的详细信息,此处点击“JavaWeb入门基础”,显示如下信息

完成书籍查阅返回主页刷新数据可以看到相应的浏览记录刷新,此处cookies的更新是根据指定的规则进行操作的,最多存储3本书籍的浏览记录,根据不同的情况更新cookies信息
Cookie相关细节问题
一个Cookie只能标识一种信息,它至少含有一个标识该信息的名称(NAME)和设置值(VALUE)。
一个WEB站点可以给一个WEB浏览器发送多个Cookie,一个WEB浏览器也可以存储多个WEB站点提供的Cookie。
浏览器一般只允许存放300个Cookie,每个站点最多存放20个Cookie,每个Cookie的大小限制为4KB。
如果创建了一个cookie,并将他发送到浏览器,默认情况下它是一个会话级别的cookie(即存储在浏览器的内存中),用户退出浏览器之后即被删除。若希望浏览器将该cookie存储在磁盘上,则需要使用maxAge,并给出一个以秒为单位的时间。将最大时效设为0则是命令浏览器删除该cookie。
注意,删除cookie时,path必须一致,否则不会删除
【3】Session
在WEB开发中,服务器可以为每个用户浏览器创建一个会话对象(session对象),注意:一个浏览器独占一个session对象(默认情况下)。因此,在需要保存用户数据时,服务器程序可以把用户数据写到用户浏览器独占的session中,当用户使用浏览器访问其它程序时,其它程序可以从用户的session中取出该用户的数据,为用户服务。
Session和Cookie的主要区别在于:
Cookie是把用户的数据写给用户的浏览器
Session技术把用户的数据写到用户独占的session中
Session对象由服务器创建,开发人员可以调用request对象的getSession方法得到session对象
HttpSession
HttpSession是Servlet规范中提供的一个接口(一个服务端会话对象,用于存储用户的会话数据、实现数据共享),它也是Servlet规范中四大域对象之一的会话域对象。该接口的实现由Servlet规范的实现提供商提供,例如使用Tomcat服务器,它对Servlet规范进行了实现,所以HttpSession接口的实现由Tomcat提供。该对象用于提供一种通过多个页面请求或访问网站来标识用户并存储有关该用户的信息的方法。
| 域对象 | 作用范围 | 使用场景 |
|---|---|---|
| ServletContext | 整个应用范围 | 当前项目中需要数据共享时,可以使用此域对象 |
| ServletRequest | 当前请求范围 | 在请求或者当前请求转发时需要数据共享可以使用此域对象 |
| HttpSession | 会话返回 | 在当前会话范围中实现数据共享。它可以在多次请求中实现数据共享 |
HttpSession的钝化和活化
- 持久化:
把长时间不用,但还不到过期时间的HttpSession进行序列化,写到磁盘上(HttpSession持久化也叫做钝化,反之为活化)
- 持久化使用场景:
访问量很大时,服务器会根据getLastAccessTime来进行排序,对长时间不用但还没到过期时间的HttpSession进行持久化
当服务器进行重启的时候,为了保持客户HttpSession中的数据,也要对HttpSession进行持久化
- 持久化的执行
HttpSession的持久化由服务器来负责管理,只有实现了序列化接口的类才能被序列化
案例1:利用session实现数据存取
原理分析
HttpSession虽然是服务端会话管理技术的对象,但其本质仍是一个Cookie。是一个由服务器自动创建的特殊的Cookie(Cookie名称为JSESSIONID,Cookie的值是服务器分配的一个唯一的标识)
当使用HttpSession时,浏览器在没有禁用Cookie的情况下,都会把这个Cookie带到服务器端,然后根据唯一标识去查找对应的HttpSession对象
参考案例
在请求SessionDemo1这个Servlet时,携带用户名信息,并且把信息保存到会话域中,随后从SessionDemo2这个Servlet中获取登录信息
1)SessionDemo1.java
/**
 * 案例1:利用session作为域对象,用于存取数据
 * 1个浏览器独占1个session对象
 */
@WebServlet("/SessionDemo1")
public class SessionDemo1 extends HttpServlet {
	private static final long serialVersionUID = 1L;
	protected void doGet(HttpServletRequest request, HttpServletResponse response) throws ServletException, IOException {
		// 通过HttpServletRequest对象获取session
		HttpSession session = request.getSession();
		// 将session作为域对象存储数据
		session.setAttribute("username", "noob");
	}
	protected void doPost(HttpServletRequest request, HttpServletResponse response) throws ServletException, IOException {
		doGet(request, response);
	}
}
2)SessionDemo2.java
/**
 * 通过session对象获取通过SessionDemo1存储的session数据
 */
@WebServlet("/SessionDemo2")
public class SessionDemo2 extends HttpServlet {
	private static final long serialVersionUID = 1L;
	protected void doGet(HttpServletRequest request, HttpServletResponse response) throws ServletException, IOException {
		// 通过HttpServletRequest对象获取session
		HttpSession session = request.getSession();
		System.out.println("获取的数据为:"+session.getAttribute("username"));
		// 分析:如果SessionDemo1中存储了数据则获取相应的内容,反之返回null
	}
	protected void doPost(HttpServletRequest request, HttpServletResponse response) throws ServletException, IOException {
		doGet(request, response);
	}
}
3)结果展示:
先执行http://localhost:8080/JavaWeb/SessionDemo1,再执行http://localhost:8080/JavaWeb/SessionDemo2,可以看到控制台显示输出数据:noob
如果是直接访问http://localhost:8080/JavaWeb/SessionDemo2,此时还没有指定的数据存储,因此显示为null
且观察访问url携带的Cookie内容:HttpSession作为一个特殊的Cookie,所设定的内容都是唯一的:JSEEIONID=xxxxxxxxxx
案例2:模拟实现购物车
代码分析:
此处模拟数据库实现书籍的购买,Book.java和DBBook.java参考上述案例中的内容
通过ShoppingIndexServlet显示所有书籍信息,点击任意链接模拟购物车功能,通过BuyServlet将指定内容添加到购物车,随后再通过ListCartServlet.java显示购物车信息即可
1)ShoppingIndexServlet.java
/**
 * 模拟商品购物车的实现
 */
@WebServlet("/ShoppingIndexServlet")
public class ShoppingIndexServlet extends HttpServlet {
	private static final long serialVersionUID = 1L;
	protected void doGet(HttpServletRequest request, HttpServletResponse response) throws ServletException, IOException {
		/**
		 * 首页设置编码集统一:
		 * 展示所有的书籍信息并实现点击添加指定商品到相应的购物车
		 */
		// 设置编码集统一
		response.setContentType("text/html;charset=UTF-8");
		PrintWriter pw = response.getWriter();
		// a.显示所有的书籍信息
		pw.write("所有书籍信息显示如下:<br/>");
		Set<Map.Entry<String,Book>> set = DBBook.getAllBook().entrySet();
		for(Map.Entry<String, Book> entry : set) {
			Book book =entry.getValue();
			/**
			 * 为每本书籍创建超链接,传入id作为参数
			 * <a href='/JavaWeb/InfoServlet?id=..' target='_blank'>...</a>
			 */
			pw.write("<a href='/JavaWeb/BuyServlet?id="+book.getId()
			+"' target='blank'>"+book.getName()+"</a><br/>");
		}
	}
	protected void doPost(HttpServletRequest request, HttpServletResponse response) throws ServletException, IOException {
		doGet(request, response);
	}
}
2)BuyServlet.java
/**
 * 添加至购物车的实现
 * a.从ShoppingIndexServlet中获取点击的书籍id
 * b.从“数据库”中获取指定id的书籍信息
 * c.通过HttpServletRequest对象获取session,
 *   将相应书籍添加至相应的列表并更新session
 *   需要判断当前购物车是否有保存的数据,如果购物车为空则需要
 *   设置session,再将相应书籍添加即可
 * d.转发页面到ListCartServlet显示购物车信息
 */
@WebServlet("/BuyServlet")
public class BuyServlet extends HttpServlet {
	private static final long serialVersionUID = 1L;
	protected void doGet(HttpServletRequest request, HttpServletResponse response) throws ServletException, IOException {
		// 获取当前传入的书籍id
		String id=request.getParameter("id");
		Book book =(Book) DBBook.getAllBook().get(id);
		// 通过HttpServletRequest对象获取session
		HttpSession session =request.getSession();
		//获取Session中是否有保存的数据
		List list =(List) session.getAttribute("list");
		if(list==null) {
			//购物车为空,设置session属性
			list=new ArrayList<>();
			session.setAttribute("list", list);
		}
		//如果不为空则把新购买的书籍添加到集合中
		list.add(book);
		// 转发页面到ListCartServlet,显示购物车详情
		request.getRequestDispatcher("/ListCartServlet").forward(request, response);
	}
	protected void doPost(HttpServletRequest request, HttpServletResponse response) throws ServletException, IOException {
		doGet(request, response);
	}
}
3)ListCartServlet.java
/**
 * ListCartServlet显示购物车详情
 */
@WebServlet("/ListCartServlet")
public class ListCartServlet extends HttpServlet {
	private static final long serialVersionUID = 1L;

	protected void doGet(HttpServletRequest request, HttpServletResponse response) throws ServletException, IOException {
		// 设置编码集
		response.setContentType("text/html;charset=UTF-8");
		PrintWriter pw = response.getWriter();
		// 通过HttpServletRequest获取session
		HttpSession session = request.getSession();
		List<Book> list = (List<Book>) session.getAttribute("list");
		// 如果list为空则显示相应的提示信息
		if(list==null||list.size()==0) {
			pw.write("抱歉,您当前没有任何购物记录!<br/>");
		}else {
			pw.write("当前购买书籍如下:<br/>");
			// 按照当前的list进行分组,将重复记录进行合并
			Map<String,Integer> map = getMergeList(list);
			// 遍历显示数据信息即可
			Set<Map.Entry<String,Integer>> set = map.entrySet();
			for(Map.Entry<String,Integer> entry : set) {
				// 根据映射关系获取书籍的id、书籍的相应数据和对应的数目
				Book book = (Book) DBBook.getAllBook().get(entry.getKey());
				int count = entry.getValue();
				pw.write("书籍id:"+book.getId()+"<br/>");
				pw.write("书籍名称:"+book.getName()+"<br/>");
				pw.write("书籍作者:"+book.getAuthor()+"<br/>");
				pw.write("书籍描述:"+book.getDescr()+"<br/>");
				pw.write("当前数目:"+count+"<br/><br/>");
			}
		}
	}

	// 定义方法合并重复记录
	public Map<String,Integer> getMergeList(List<Book> list){
		// 定义map集合存放书籍id和相应的加入购物车的次数
		Map<String,Integer> map = new HashMap<>();
		for(int i=0;i<list.size();i++) {
			/**
			 *  判断当前是否存在该书籍的计数记录,如果存在则直接改动数据
			 *  如果不存在则添加计数记录
			 */
			if(!map.containsKey(list.get(i).getId())) {
				map.put(list.get(i).getId(), 1);
			}else {
				// 获取当前的书籍id和对应的计数
				String id = list.get(i).getId();
				int count = map.get(id)+1;
				map.replace(id,count);
			}
		}
		return map;
	}

	protected void doPost(HttpServletRequest request, HttpServletResponse response) throws ServletException, IOException {
		doGet(request, response);
	}
}
4)结果展示:
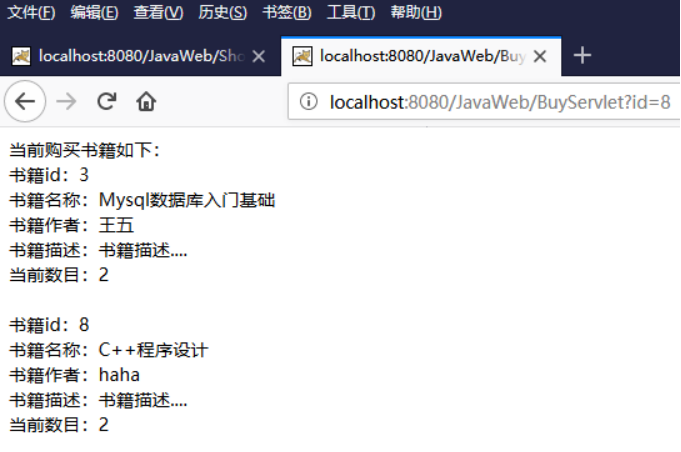
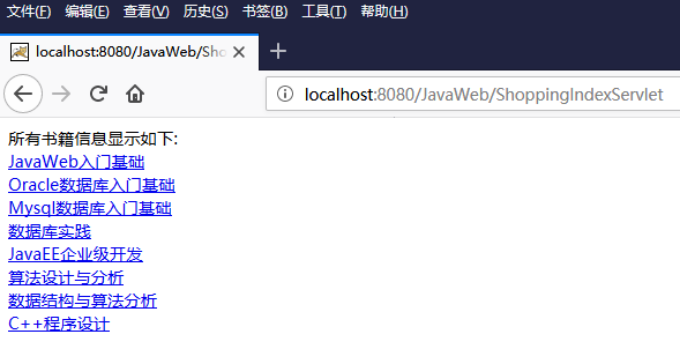
访问http://localhost:8080/JavaWeb/ShoppingIndexServlet,点击任意书籍信息,模拟购物车功能,将指定书籍添加到购物车,并跳转到显示购物车详情界面(针对相同的数据进行合并)
案例3:模拟用户登录操作
1)User.java
/**
 * 创建model:User
 */
public class User {
	private String id;
	private String username;
	private String password;
	public User() {
		super();
	}
	public User(String id, String username, String password) {
		super();
		this.id = id;
		this.username = username;
		this.password = password;
	}
	public String getId() {
		return id;
	}
	public void setId(String id) {
		this.id = id;
	}
	public String getUsername() {
		return username;
	}
	public void setUsername(String username) {
		this.username = username;
	}
	public String getPassword() {
		return password;
	}
	public void setPassword(String password) {
		this.password = password;
	}
	@Override
	public String toString() {
		return "User [id=" + id + ", username=" + username + ", password=" + password + "]";
	}
}
2)DBUser.java:模拟数据库存储用户信息
/**
 * 模拟数据库:存储数据信息、查找数据
 */
public class DBUser {

	private static List<User> list = new ArrayList<>();

	static {
		list.add(new User("1","haha","haha"));
		list.add(new User("2","xixi","xixi"));
		list.add(new User("3","bibi","bibi"));
	}

	// 根据指定的用户名、密码查找是否存在该用户
	public static User findUser(String username,String password) {
		for(User user : list) {
			if(user.getUsername().equals(username)&&user.getPassword().equals(password)) {
				// 查找成功,返回查找的数据
				return user;
			}
		}
		return null;
	}
}
3)LoginServlet.java:模拟用户登录
/**
 * 模拟用户登录:
 * 根据当前用户输入的数据,从模拟数据库中济宁查找
 * 查找失败则显示相应的信息,查找成功则保存数据到session随后跳转到主页
 */
@WebServlet("/LoginServlet")
public class LoginServlet extends HttpServlet {
	protected void doGet(HttpServletRequest request, HttpServletResponse response) throws ServletException, IOException {
		response.setContentType("text/html;charset=UTF-8");
		// 获取当前用户输入的账号、密码
		String username = request.getParameter("username");
		String password = request.getParameter("pwd");
		// 从模拟数据库中查找数据信息
		User findUser = DBUser.findUser(username, password);
		if(findUser==null) {
			response.getWriter().write("用户名或密码错误");
			return;
		}
		// 查找成功则保存findUser到session并跳转到主页
		HttpSession session = request.getSession();
		session.setAttribute("user", findUser);
		response.sendRedirect("/JavaWeb/html/index.jsp");
	}

	protected void doPost(HttpServletRequest request, HttpServletResponse response) throws ServletException, IOException {
		doGet(request, response);
	}
}
4)userLogin.html:模拟用户登录测试
<!DOCTYPE html>
<html>
<head>
<meta charset="UTF-8">
<title>模拟用户登录测试</title>
</head>
	<!-- 导入bootstrap提供的相关的css、js文件,设定指定的编码集 -->
	<link rel="stylesheet" href="../css/bootstrap.min.css" />
	<script src="../js/jquery.min.js" type="text/javascript" charset="utf-8"></script>
	<script src="../js/bootstrap.min.js" type="text/javascript" charset="utf-8"></script>
<body>
	<div class="container">
			<form action="../LoginServlet" method="post" name="form1">
				<table class="table table-striped table-bordered table-hover">
					<tr>
						<th colspan="2">用户登录</th>
					</tr>

					<tr>
						<td>姓名</td>
						<td><input type="text" name="username"/></td>
					</tr>

					<tr>
						<td>密码</td>
						<td><input type="password" name="pwd"/></td>
					</tr>
					<tr>
						<td><input type="submit" value="提交"/></td>
						<td><input type="reset" value="重置"/></td>
					</tr>
				</table>
			</form>
		</div>
	</body>
</html>
5)index.jsp:显示用户登录信息
<%@page import="com.noob.web.session.User"%>
<%@ page language="java" contentType="text/html; charset=UTF-8"
    pageEncoding="UTF-8"%>
<!DOCTYPE html PUBLIC "-//W3C//DTD HTML 4.01 Transitional//EN" "http://www.w3.org/TR/html4/loose.dtd">
<html>
<head>
<meta http-equiv="Content-Type" content="text/html; charset=UTF-8">
<title>Insert title here</title>
</head>
<body>
	欢迎您,
	<%
		// 获取当前传入的session数据
		User user = (User)session.getAttribute("user");
		if(user!=null){
			out.write(user.getUsername());
		}
	%>
	<br/>
	<a href="userLogin.html">登录</a>
</body>
</html>
6)结果展示:
访问http://localhost:8080/JavaWeb/html/userLogin.html,进行用户登录测试,登录完成提交数据,跳转到主页显示相应的用户登录信息(验证登录信息,根据不同的登录信息完成相应的提示)

如果是直接访问主页http://localhost:8080/JavaWeb/html/index.jsp,则没有相应的登录信息,点击“登录”跳转到用户登录界面
4.JSP
【1】JSP的概述
JSP的基础知识
JSP全称是Java Server Pages,其本质为一个Servlet
JSP这门技术的最大的特点在于写jsp就像在写html,相对于html而言,html只能为用户提供静态数据,而Jsp技术允许在页面中嵌套java代码,为用户提供动态数据。
| 技术栈 | 适用场景 |
|---|---|
| HTML | 只能开发静态资源,不能包含java代码,无法添加动态数据 |
| Servlet | 写java代码,可以输出页面内容,但是很不方便,开发效率较低 |
| JSP | 包括了HTML的展示技术,同时具备Servlet输出动态资源的能力(不适合作为控制器) |
(1)jsp快速入门:在jsp页面中输出当前时间
<%@page import="java.util.Date"%>
<%@ page language="java" contentType="text/html; charset=UTF-8"
	pageEncoding="UTF-8"%>
<!DOCTYPE html PUBLIC "-//W3C//DTD HTML 4.01 Transitional//EN" "http://www.w3.org/TR/html4/loose.dtd">
<html>
<head>
<meta http-equiv="Content-Type" content="text/html; charset=UTF-8">
<title>1.jsp的基本使用:获取当前系统时间</title>
</head>
<body>
	<pre>
		1.JSP全称是Java Server Pages,jsp与servelet技术一样,
		     均是SUN公司定义的用于开发动态Web资源的技术
		2.JSP这门技术的最大的特点在于,写jsp就像在写html,
		    但它相比html而言,html只能为用户提供静态数据,
		    而Jsp技术允许在页面中嵌套java代码,为用户提供动态数据
	</pre>
	<%
		// 编写java代码
		Date date = new Date();
		out.write("当前系统时间" + date.toLocaleString());
	%>
</body>
</html>
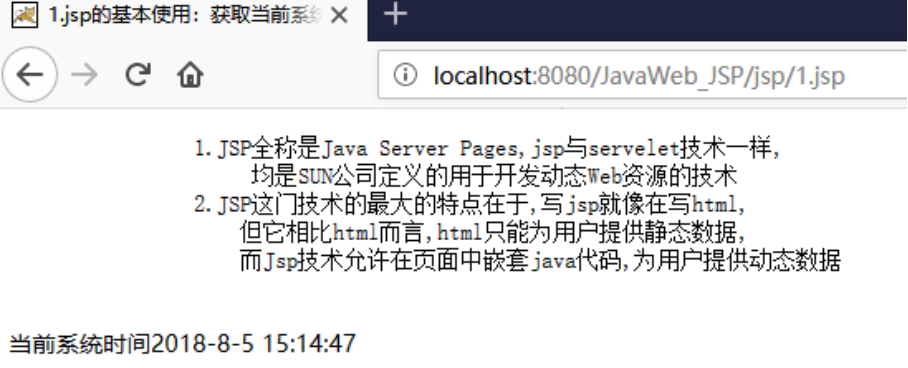
结果展示:
http://localhost:8080/JavaWeb_JSP/jsp/1.jsp
JSP的原理
分析底层源码,掌握4个问题
web服务器是如何调用并执行一个jsp页面的?
jsp页面中的html排版标签是如何被发送到客户端的?
jsp页面中的java代码服务器是如何执行的?
web服务器在调用jsp时,会给jsp提供一些什么java对象?
(1)问题1:web服务器是如何调用并执行一个jsp页面的?
Web服务器最终把jsp翻译为一个java类,在tomcat发布项目的目录下对应的文件目录中查找到相应的jsp信息,分析如下
E:\soft\tomcat\apache-tomcat-8.5.23\work\Catalina\localhost\JavaWeb_JSP
E:\soft\tomcat\apache-tomcat-8.5.23\work\Catalina\localhost\JavaWeb_JSP\org\apache\jsp\jsp

经过查看源码发现这个java类就是一个Servlet,所以web服务器调用一个jsp的页面的过程就是调用一个servlet的过程。 有三个阶段:init、 service、 detory
(2)问题2:jsp页面中的html排版标签是如何被发送到客户端的?
经过查看源码,发现html代码直接输出,通过out对象直接输出到客户端

(3)问题3:jsp页面中的java代码服务器是如何执行的?
通过查看源码发现,Java代码是没有任何改变,其本身还是一个java类,可以直接执行

(4)问题4:web服务器在调用jsp时,会给jsp提供一些什么java对象?
通过查看源码发现,Web服务器在调用jsp时,给jsp提供了下述对象,并且这些对象可以直接在jsp中直接使用

【2】JSP语法基础
JSP模板元素
JSP页面中的HTML内容称之为JSP模版元素
JSP模版元素定义了网页的基本骨架,即定义了页面的结构和外观
JSP源代码分为两个部分模板数据和元素
模板数据: JSP中的HTML代码,其内容是固定的,无论程序怎样运行,模板数据输出到客户端浏览器是不变的
元素: 就是JSP中的java代码部分,元素决定着程序的流程
JSP语法
(1)JSP脚本表达式
JSP脚本表达式(expression)用于将程序数据输出到客户端
语法:<%= 变量或表达式 %>
举例:当前时间:<%= new java.util.Date() %>
JSP引擎在翻译脚本表达式时,会将程序数据转成字符串,然后在相应位置用out.print(…) 将数据输给客户端。
JSP脚本表达式中的变量或表达式后面不能有分号(;)
(2)JSP脚本片段
JSP脚本片断(scriptlet)用于在JSP页面中编写多行Java代码
语法:
<%
		多行java代码
%>
注意:
JSP脚本片断中只能出现java代码,不能出现其它模板元素, JSP引擎在翻译JSP页面中,会将JSP脚本片断中的Java代码将被原封不动地放到Servlet的_jspService方法中。
JSP脚本片断中的Java代码必须严格遵循Java语法,例如,每执行语句后面必须用分号(;)结束。
在一个JSP页面中可以有多个脚本片断,在两个或多个脚本片断之间可以嵌入文本、HTML标记和其他JSP元素。多个脚本片断中的代码可以相互访问,犹如将所有的代码放在一对<%%>之中的情况。
单个脚本片断中的Java语句可以是不完整的,但多个脚本片断组合后的结果必须是完整的Java语句
(3)JSP的注释
<!-- JSP的显示注释方式:客户端可以通过查看源代码进行查阅 -->
<%-- JSP的隐式注释方式:客户端无法通过查看源代码进行查阅 --%>
<%@ page language="java" contentType="text/html; charset=UTF-8"
    pageEncoding="UTF-8"%>
<!DOCTYPE html PUBLIC "-//W3C//DTD HTML 4.01 Transitional//EN" "http://www.w3.org/TR/html4/loose.dtd">
<html>
<head>
<meta http-equiv="Content-Type" content="text/html; charset=UTF-8">
<title>2.JSP的脚本表达式、脚本片段、注释</title>
</head>
<body>
	<!-- JSP的显示注释方式:客户端可以通过查看源代码进行查阅 -->
	<%-- JSP的隐式注释方式:客户端无法通过查看源代码进行查阅 --%>
	<%
		for(int i=0;i<10;i++){
	%>
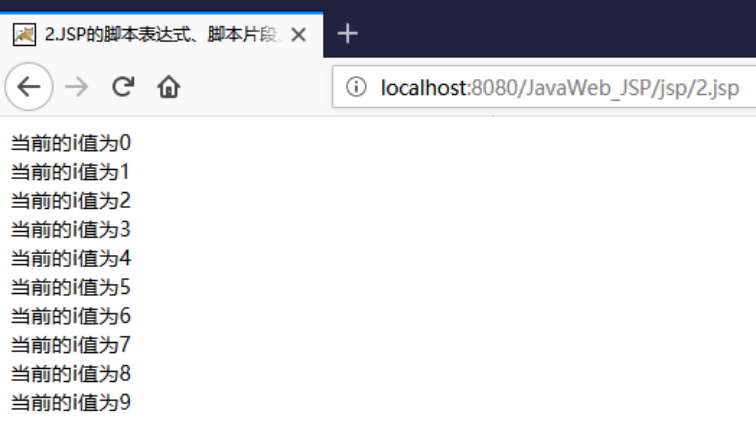
	当前的i值为<%= i %><br/><!-- JSP的脚本表达式等价于out.write(...); -->
	<%
		}
	%>
	<!--
		JSP的脚本片段:用于在JSP页面中编写多行java代码
		单个脚本片断中的Java语句可以是不完整的,但是多个脚本
		片断组合后的结果必须是完整的Java语句
	 -->
</body>
</html>
【3】JSP指令
JSP指令(directive)是为JSP引擎而设计的,它们并不直接产生任何可见输出,而只是告诉引擎如何处理JSP页面中的其余部分。在JSP 2.0规范中共定义了三个指令:
page指令、Include指令、taglib指令
page指令
JSP指令的基本语法格式:<%@ 指令 属性名="值" %>
举例:<%@ page contentType="text/html;charset=gb2312"%>
如果一个指令有多个属性,这多个属性可以写在一个指令中,也可以分开写
例如:
<%@ page contentType="text/html;charset=gb2312"%>
<%@ page import="java.util.Date"%>
等价于:
<%@ page contentType="text/html;charset=gb2312" import="java.util.Date"%>
page指令用于定义JSP页面的各种属性,无论page指令出现在JSP页面中的什么地方,它作用的都是整个JSP页面,为了保持程序的可读性和遵循良好的编程习惯,page指令最好是放在整个JSP页面的起始位置
⚡JSP 2.0规范中定义的page指令的完整语法:
<%@ page
	[ language="java" ]
	[ extends="package.class" ]
	[ import="{package.class | package.*}, ..." ]
	[ session="true | false" ]
	[ buffer="none | 8kb | sizekb" ]
	[ autoFlush="true | false" ]
	[ isThreadSafe="true | false" ]
	[ info="text" ]
	[ errorPage="relative_url" ]
	[ isErrorPage="true | false" ]
	[ contentType="mimeType [ ;charset=characterSet ]" | "text/html ; charset=ISO-8859-1" ]
	[ pageEncoding="characterSet | ISO-8859-1" ]
	[ isELIgnored="true | false" ]
%>

# page指令详解
<%@ page
	[ language="java" ]
  # 告知引擎脚本使用的java,默认支持java

	[ extends="package.class" ]
  # 告知引擎JSP对应的Servlet的父类是哪个

	[ import="{package.class | package.*}, ..." ]
  # 告知引擎导入依赖包,引擎会自动引入java.lang.*,javax.servlet.*,javax.servlet.http.*,javax.servlet.jsp

	[ session="true | false" ]
  # 告知引擎是否产生HttpSession对象,默认true

	[ buffer="none | 8kb | sizekb" ]
  # JspWriter用于输出JSP内容到页面上,告知引擎设定缓存大小

	[ autoFlush="true | false" ]

	[ isThreadSafe="true | false" ]

	[ info="text" ]

	[ errorPage="relative_url" ]
  # 告知引擎当前页面出现异常后,应该转发到哪个页面上(/代表当前应用)
  # 部分情况下可能出现ie8不兼容,可在web.xml配置全局错误页面(error-page属性)

	[ isErrorPage="true | false" ]
  # 告知引擎,是否抓住异常,默认为false(如果该属性为true,页面中可以使用exception对象,打印异常的详细信息)

	[ contentType="mimeType [ ;charset=characterSet ]" | "text/html ; charset=ISO-8859-1" ]
  # 告知引擎响应正文的MIME类型,相当于response.setContentType("...");

	[ pageEncoding="characterSet | ISO-8859-1" ]
  # 告知引擎翻译jsp时(从磁盘上读取jsp文件)所用的码表

	[ isELIgnored="true | false" ]
  # 告知引擎是否忽略EL表达式,默认值是false
%>
JSP 引擎自动导入下面的包:
java.lang.*
javax.servlet.*
javax.servlet.jsp.*
javax.servlet.http.*
JSP中引入import属性中引入数据
可以在一条page指令的import属性中引入多个类或包,其中的每个包或类之间使用逗号分隔:
<%@ page import="java.util.Date,java.sql.*,java.io.*"%>
上面的语句也可以改写为使用多条page指令的import属性来分别引入各个包或类:
		<%@ page import="java.util.Date"%>
		<%@ page import="java.sql.*"%>
		<%@ page import="java.io.*"%>
errorPage属性的设置
errorPage属性的设置值必须使用相对路径,如果以“/”开头,表示相对于当前WEB应用程序的根目录(注意不是站点根目录),否则,表示相对于当前页面。
可以在web.xml文件中使用<error-page>元素为整个WEB应用程序设置错误处理页面,其中的<exception-type>子元素指定异常类的完全限定名,<location>元素指定以“/”开头的错误处理页面的路径。
如果设置了某个JSP页面的errorPage属性,那么在web.xml文件中设置的错误处理将不对该页面起作用
(1)案例1:error-page配置指定异常信息
案例分析:异常触发信息提示
a.error-page属性:指定异常触发跳转的页面errorPage="/error/error.jsp"
b.配置异常的jsp信息:eg:error.jsp
c.在web.xml中配置相应的异常
<error-page>
    <exception-type>java.lang.ArithmeticException</exception-type>
    <location>/error/error.jsp</location>
</error-page>
代码展示:
<%@ page language="java" contentType="text/html; charset=UTF-8"
    pageEncoding="UTF-8" errorPage="/error/error.jsp"%>
<!DOCTYPE html PUBLIC "-//W3C//DTD HTML 4.01 Transitional//EN" "http://www.w3.org/TR/html4/loose.dtd">
<html>
<head>
<meta http-equiv="Content-Type" content="text/html; charset=UTF-8">
<title>3.JSP的指令page:error-page的使用</title>
</head>
<body>
	<!--
		JSP的page指令可以用于解决JSP中文乱码问题
		1.JSP程序存在有与Servlet程序完全相同的中文乱码问题
			a.输出响应正文时出现的中文乱码问题
			b.读取浏览器传递的参数信息时出现的中文乱码问题
		2.JSP引擎将JSP页面翻译成Servlet源文件时也可能导致中文乱码问题
			a.JSP引擎将JSP源文件翻译成的Servlet源文件默认采用UTF-8编码,
			     而JSP开发人员可以采用各种字符集编码来编写JSP源文件,因此,JSP引擎
			     将JSP源文件翻译成Servlet源文件时,需要进行字符编码转换。
			b.如果JSP文件中没有说明它采用的字符集编码,JSP引擎将把它当作默认的ISO8859-1
			     字符集编码处理。
		3.如何解决JSP引擎翻译JSP页面时的中文乱码问题
			a.通过page指令的contentType属性说明JSP源文件的字符集编码
			b.page指令的pageEncoding属性说明JSP源文件的字符集编码
	 -->
	 <!--
	 	可以利用errorPage指定错误页面的显示,需要在web.xml中配置相关的属性
	 	既可以配置错误的异常,也可以配置错误码
	 	page  errorPage="/error/error.jsp"%
	 	web.xml中配置:
	 	<error-page>
			<exception-type>异常类型</exception-type>
			<location>指定错误页面路径</location>
		</error-page>
   		<error-page>
   	   		<error-code>错误码代号</error-code>
   	   		<location>指定错误页面路径</location>
   		</error-page>
	 -->
	<%
	 	// 定义错误触发异常
	  	int x=10/0;
	  	out.write(x);
	%>
</body>
</html>
error.jsp:
<%@ page language="java" contentType="text/html; charset=UTF-8"
    pageEncoding="UTF-8"%>
<!DOCTYPE html PUBLIC "-//W3C//DTD HTML 4.01 Transitional//EN" "http://www.w3.org/TR/html4/loose.dtd">
<html>
<head>
<meta http-equiv="Content-Type" content="text/html; charset=UTF-8">
<title>异常错误提示</title>
</head>
<body>
	<h3>当前触发异常!!!</h3>
</body>
</html>
web.xml:配置触发异常和相应指定的错误页面
<error-page>
    <exception-type>java.lang.ArithmeticException</exception-type>
    <location>/error/error.jsp</location>
  </error-page>
结果显示:

(2)案例2:error-page配置错误码
a.定义指定的错误页面信息
b.在Web.xml中直接配置
<error-page>
    <error-code>404</error-code>
    <location>/error/404.jsp</location>
</error-page>
示例:
<error-page>
    <error-code>404</error-code>
    <location>/error/404.jsp</location>
</error-page>

404.jsp:
<%@ page language="java" contentType="text/html; charset=UTF-8"
    pageEncoding="UTF-8"%>
<!DOCTYPE html PUBLIC "-//W3C//DTD HTML 4.01 Transitional//EN" "http://www.w3.org/TR/html4/loose.dtd">
<html>
<head>
<meta http-equiv="Content-Type" content="text/html; charset=UTF-8">
<title>访问页面不存在</title>
</head>
<body>
	<h3>当前访问的页面不存在!!!</h3>
</body>
</html>
结果展示:随机访问一个不存在的页面资源http://localhost:8080/JavaWeb_JSP/jsp/haha.jsp,显示如下内容

include指令
include指令用于引入其它JSP页面,如果使用include指令引入了其它JSP页面,那么JSP引擎将把这多个JSP翻译成一个servlet。所以include指令引入通常也称之为静态引入。
语法:
<%@ include file="relativeURL"%>
其中的file属性用于指定被引入文件的路径。路径以“/”开头,表示代表当前web应用。
细节:
被引入的文件必须遵循JSP语法
被引入的文件可以使用任意的扩展名,即使其扩展名是html,JSP引擎也会按照处理jsp页面的方式处理它里面的内容,为了见明知意,JSP规范建议使用.jspf(JSP fragments)作为静态引入文件的扩展名
由于使用include指令将会涉及到2个JSP页面,并会把2个JSP翻译成一个servlet,所以这2个JSP页面的指令不能冲突(除了pageEncoding和导包除外)
案例分析:
主测试jsp:
<%@ page language="java" contentType="text/html; charset=UTF-8"
    pageEncoding="UTF-8"%>
<!DOCTYPE html PUBLIC "-//W3C//DTD HTML 4.01 Transitional//EN" "http://www.w3.org/TR/html4/loose.dtd">
<html>
<head>
<meta http-equiv="Content-Type" content="text/html; charset=UTF-8">
<title>4.JSP的指令include:引入其它页面</title>
</head>
<body>
	<%@ include file="/public/head.jsp" %>
	<p>我是4.jsp中定义的内容</p>
	<%@ include file="/public/footer.jsp" %>
</body>
</html>

在WebContent下新建public目录,分别创建head.jsp和footer.jsp用以引用
head.jsp:
<%@ page language="java" contentType="text/html; charset=UTF-8"
    pageEncoding="UTF-8"%>
<!DOCTYPE html PUBLIC "-//W3C//DTD HTML 4.01 Transitional//EN" "http://www.w3.org/TR/html4/loose.dtd">
<html>
<head>
<meta http-equiv="Content-Type" content="text/html; charset=UTF-8">
<title>头部文件</title>
</head>
<body>
	<h3>我是位于public文件目录下的头部文件head.jsp</h3>
</body>
</html>
footer.jsp:
<%@ page language="java" contentType="text/html; charset=UTF-8"
    pageEncoding="UTF-8"%>
<!DOCTYPE html PUBLIC "-//W3C//DTD HTML 4.01 Transitional//EN" "http://www.w3.org/TR/html4/loose.dtd">
<html>
<head>
<meta http-equiv="Content-Type" content="text/html; charset=UTF-8">
<title>脚注文件</title>
</head>
<body>
	<h3>我是位于public文件目录下的脚注文件footer.jsp</h3>
</body>
</html>
结果展示:
访问http://localhost:8080/JavaWeb_JSP/jsp/4.jsp显示如下信息:
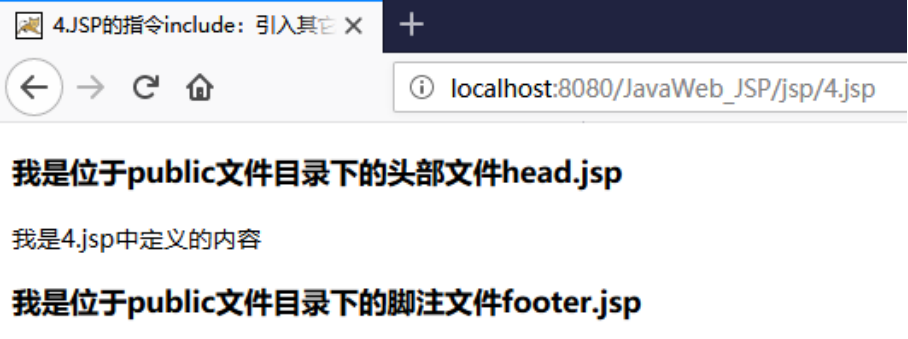
taglib指令
【4】JSP的九大内置对象
每个JSP 页面在第一次被访问时,WEB容器都会把请求交给JSP引擎(即一个Java程序)去处理。JSP引擎先将JSP翻译成一个_jspServlet(实质上也是一个servlet) ,然后按照servlet的调用方式进行调用
由于JSP第一次访问时会翻译成servlet,所以第一次访问通常会比较慢,但第二次访问,JSP引擎如果发现JSP没有变化,就不再翻译,而是直接调用,所以程序的执行效率不会受到影响
JSP引擎在调用JSP对应的_jspServlet时,会传递或创建9个与web开发相关的对象供_jspServlet使用。JSP技术的设计者为便于开发人员在编写JSP页面时获得这些web对象的引用,特意定义了9个相应的变量,开发人员在JSP页面中通过这些变量就可以快速获得这9大对象的引用
| 对象 | 类型 | 说明 | |
|---|---|---|---|
| request | HttpServletRequest | javax.servlet.http.HttpServletRequest | |
| response | HttpServletResponse | javax.servlet.http.HttpServletResponse | |
| config | ServletConfig | javax.servlet.ServletConfig | |
| application | ServletContext | javax.servlet.ServletContext | |
| exception | Excetion对象 | java.lang.Throwable | |
| session | HttpSession | javax.servlet.http.HttpSession | |
| page | Object | Java.lang.Object | 当前jsp对应的servlet引用实例 |
| out | JspWriter | javax.servlet.jsp.JspWriter | 字符输出流,相当于printwriter |
| pageContext | PageContext | javax.servlet.jsp.PageContext | servlet独有的对象 |
out对象
(1)案例1:out对象与response对象
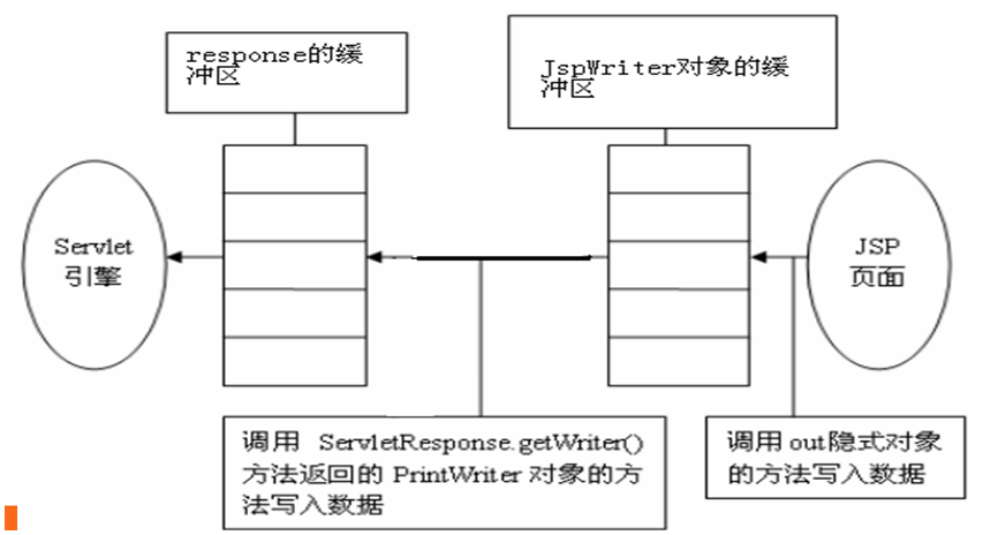
代码展示:
<%@ page language="java" contentType="text/html; charset=UTF-8"
    pageEncoding="UTF-8"%>
<!DOCTYPE html PUBLIC "-//W3C//DTD HTML 4.01 Transitional//EN" "http://www.w3.org/TR/html4/loose.dtd">
<html>
<head>
<meta http-equiv="Content-Type" content="text/html; charset=UTF-8">
<title>5.JSP的九大对象</title>
</head>
<body>
	<!--
		利用out对象和response对象向页面输出数据
		a.JspWriter通过out缓冲区写带有缓冲的输出,只有缓冲区域满或者程序执行完毕
		     再输出到response缓冲区
		b.Response的缓冲区是直接输出到页面
		因此通过response对象输出的数据优先显示
		下述例子输出结果为:bbb、ddd、aaa、ccc
	-->
	<%
		out.write("aaa");
		response.getWriter().write("bbb");
		out.write("ccc");
		response.getWriter().write("ddd");
	%>
</body>
</html>
结果分析:
访问资源http://localhost:8080/JavaWeb_JSP/jsp/5.jsp,显示如下信息

(2)案例2:利用out对象实现文件的下载
1)代码展示1:普通测试
<%@page import="java.io.FileInputStream"%>
<%@page import="java.io.OutputStream"%>
<%@ page language="java" contentType="text/html; charset=UTF-8"
    pageEncoding="UTF-8"%>
<!DOCTYPE html PUBLIC "-//W3C//DTD HTML 4.01 Transitional//EN" "http://www.w3.org/TR/html4/loose.dtd">
<html>
<head>
<meta http-equiv="Content-Type" content="text/html; charset=UTF-8">
<title>6.利用out对象实现文件的下载</title>
</head>
<body>
	<!--
		文件下载的实现步骤
		a.获取文件的真实路径和名称
		b.设置消息头
		c.利用response对象获取OutputStream实现文件下载
		此处实现文件下载有一个隐藏的小问题,虽然能够实现文件下载,但是却由于
		JspWriter对象out与用户自定义的OutputStream对象sout存在字符流
		与字节流写入的冲突,会导致后台代码报错,为了解决问题,可以打开相应的
		源码文件查看将jsp转化为相应的servlet的代码,删除掉除了<% %>之外
		所有的out输出的数据即可
		即利用out对象实现文件的下载,在一个java类中不能使用字节流和字符流
		同时向一个页面输出数据否则会报错
	 -->
	<%
		// 获取文件的真实路径和名称
		String path = request.getRealPath("/img/1.jpg");
		String filename = path.substring(path.lastIndexOf("\\")+1);
		FileInputStream fis = new FileInputStream(path);
		// 设置消息头
		response.setHeader("content-disposition", "attachment;filename="+filename);
		// 通过OutputStream字节流实现文件下载
		OutputStream sout = response.getOutputStream();
		int hasRead=0;
		byte[] buffer = new byte[1024];
		while((hasRead=fis.read(buffer))!=-1){
			sout.write(buffer, 0, hasRead);
		}
	%>
</body>
</html>
2)代码展示2:去除out相关的输出
<%@page import="java.io.OutputStream"%><%@page import="java.io.FileInputStream"%><%@ page language="java" contentType="text/html; charset=UTF-8" pageEncoding="UTF-8"%><%
	// application就是ServletContext对象
	String path= application.getRealPath("/img/1.jpg");
	//得到文件的名字
	String filename=path.substring(path.lastIndexOf("\\")+1);// 4.jpg
	response.setHeader("content-disposition", "attachment;filename="+filename);
	FileInputStream fis =new FileInputStream(path);
	int hasRead=0;
	byte [] buffer =new byte[1024];
	OutputStream  sout=response.getOutputStream();
	while((hasRead=fis.read(buffer))!=-1){
		sout.write(buffer,0,hasRead);
	}
 %>
结果显示:访问http://localhost:8080/JavaWeb_JSP/jsp/6.jsp资源
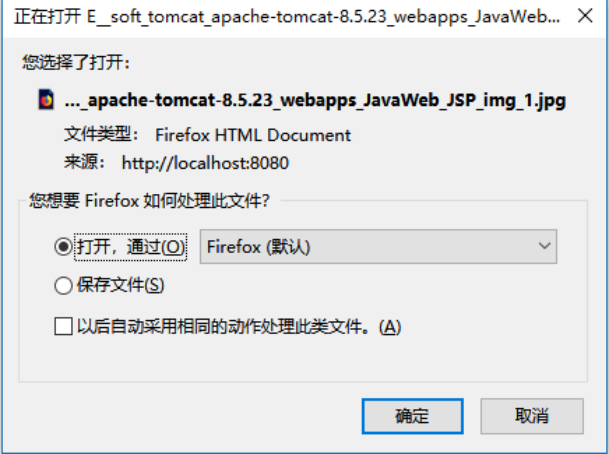
此处需要注意一点,在测试的时候发现控制台触发下述异常,查找原因,在一个java类中不能使用字节流和字符流同时向一个页面输出,数据否则会报错

查看Web服务器将指定jsp转码成servlet后的信息发现,该java文件中即存在字符流又存在字节流从而导致出错,因此为了完成使用jsp实现文件的下载需根据指定的内容删除所有与out相关的输出数据的语句信息,重启服务器,再次进行测试即可看到无异常现象
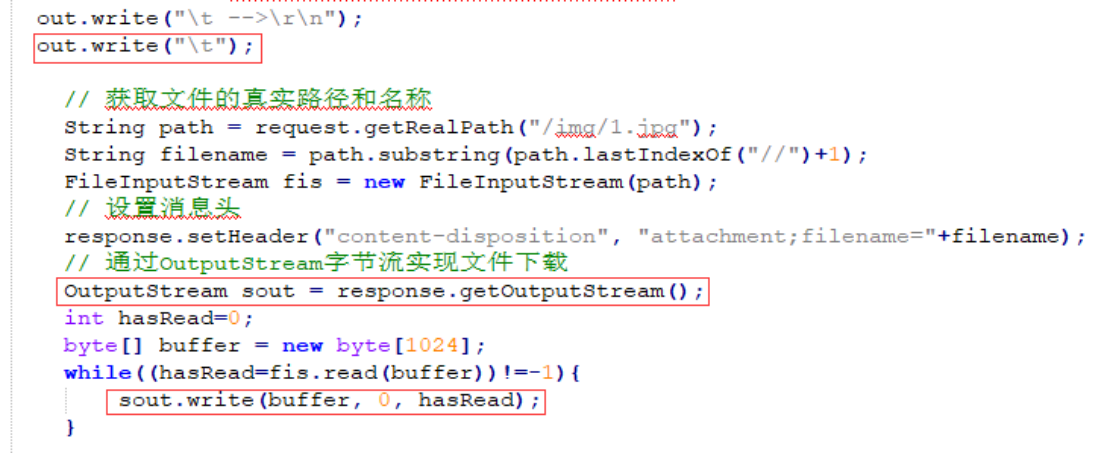
pageContext对象
pageContext对象是JSP技术中最重要的一个对象,它代表JSP页面的运行环境,这个对象不仅封装了对其它8大隐式对象的引用,它自身还是一个域对象,可以用来保存数据。并且,这个对象还封装了web开发中经常涉及到的一些常用操作,例如引入和跳转其它资源、检索其它域对象中的属性等
(1)pageContext对象如何获取其他的对象
| 方法 | 说明 |
|---|---|
| getException | 返回exception隐式对象 |
| getPage | 返回page隐式对象 |
| getRequest | 返回request隐式对象 |
| getResponse | 返回response隐式对象 |
| getServletConfig | 返回config隐式对象 |
| getServletContext | 返回application隐式对象 |
| getSession | 返回session隐式对象 |
| getOut | 返回out隐式对象 |
pageContext封装其它8大内置对象的意义,思考:如果在编程过程中,把pageContext对象传递给一个普通java对象,那么这个java对象将具有什么功能?
(2)pageContext是一个域对象可以把数据存储到自身域对象,也可以存储到其他域对象中
案例分析
<%@ page language="java" contentType="text/html; charset=UTF-8"
    pageEncoding="UTF-8"%>
<!DOCTYPE html PUBLIC "-//W3C//DTD HTML 4.01 Transitional//EN" "http://www.w3.org/TR/html4/loose.dtd">
<html>
<head>
<meta http-equiv="Content-Type" content="text/html; charset=UTF-8">
<title>7.PageContext对象:存取数据</title>
</head>
<body>
	<!--
		pageContext对象是JSP技术中最重要的一个对象,它代表JSP页面的运行环境,
		这个对象不仅封装了对其它8大隐式对象的引用,它自身还是一个域对象,可以用来保存数据。
		并且,这个对象还封装了web开发中经常涉及到的一些常用操作,例如引入和跳转其它资源、
		检索其它域对象中的属性等。
		示例:将pageContext作为域对象存取数据,可以将数据存储到自身域对象,也可以将
			数据存储到其他的域对象
	-->
	<%
		// pageContext存储数据到自身域对象
		pageContext.setAttribute("data", "pageContext存储数据到自身域对象");
		// 从pageContext与对象中获取数据
		String data = (String)pageContext.getAttribute("data");
		// 输出数据到页面中
		out.write(data);

		// pageContext存储数据到其他域对象中
		pageContext.setAttribute("info", "pageContext存储数据到其他的域对象", PageContext.SESSION_SCOPE);
		// 从指定的域对象中获取数据
		String info = (String)session.getAttribute("info");
		// 输出数据到页面中
		out.write(info);
	%>
</body>
</html>
结果显示:
访问资源http://localhost:8080/JavaWeb_JSP/jsp/7.jsp,显示如下数据

(3)四大域对象
| 域 | 域对象 | 作用域 | 说明 |
|---|---|---|---|
| PAGE_SCOPE | pageContext (PageContext) | 【页面范围】只针对当前页有效 | 页面范围内有效(servlet中没有) |
| REQUEST_SCOPE | request (ServletRequest) | 【请求范围】一次请求有效 | 当请求转发之后,再次转发时请求域丢失 |
| SESSION_SCOPE | session (HttpSession) | 【会话范围】一个ip地址从头到尾都有效 | 多次请求共享数据,但不同的客户端不能共享 |
| APPLICATION_SCOPE | application (ServletContext) | 【应用范围】所有的页面都有效 | 如果对数据有修改需要做同步处理 |
案例分析:
8.jsp:在8.jsp中定义四大域对象,通过9.jsp再次访问,观察四大域对象的作用范围
<%@ page language="java" contentType="text/html; charset=UTF-8"
    pageEncoding="UTF-8"%>
<!DOCTYPE html PUBLIC "-//W3C//DTD HTML 4.01 Transitional//EN" "http://www.w3.org/TR/html4/loose.dtd">
<html>
<head>
<meta http-equiv="Content-Type" content="text/html; charset=UTF-8">
<title>8.四大域对象</title>
</head>
<body>
	<!--
		PAGE_SCOPE、REQUEST_SCOPE、SESSION_SCOPE、APPLICATION_SCOPE
		PageContext      只针对当前页有效
		Request          一次请求有效
		Session          一个ip地址从头到尾都有效
		Application      所有的页面都有效
	-->
	<!--
		案例分析:设置四大作用域保存相关数据,跳转页面测试相关数据是否存在
	-->
	<%
		// 设置四大作用域 保存数据
		pageContext.setAttribute("pageContextContent", "pageContext作用域测试...");
		request.setAttribute("requestContent", "request作用域测试...");
		session.setAttribute("sessionContent", "session作用域测试...");
		application.setAttribute("applicationContent", "application作用域测试...");
		// 获取四大作用作用域的数据
		String pageContextContent = (String)pageContext.getAttribute("pageContextContent");
		String requestContent = (String)request.getAttribute("requestContent");
		String sessionContent = (String)session.getAttribute("sessionContent");
		String applicationContent = (String)application.getAttribute("applicationContent");
		// 向页面中输出数据
		out.write(pageContextContent+"<br/>");
		out.write(requestContent+"<br/>");
		out.write(sessionContent+"<br/>");
		out.write(applicationContent+"<br/>");
	%>
	<!-- 提供链接跳转页面进行测试 -->
	<a href="9.jsp">跳转页面到9.jsp</a>
</body>
</html>
9.jsp:在9.jsp中分别获取四大域对象的内容,观察四大域对象的作用范围
<%@ page language="java" contentType="text/html; charset=UTF-8"
    pageEncoding="UTF-8"%>
<!DOCTYPE html PUBLIC "-//W3C//DTD HTML 4.01 Transitional//EN" "http://www.w3.org/TR/html4/loose.dtd">
<html>
<head>
<meta http-equiv="Content-Type" content="text/html; charset=UTF-8">
<title>9.四大作用域测试</title>
</head>
<body>
	<%
		// 获取四大作用作用域的数据
		String pageContextContent = (String)pageContext.getAttribute("pageContextContent");
		String requestContent = (String)request.getAttribute("requestContent");
		String sessionContent = (String)session.getAttribute("sessionContent");
		String applicationContent = (String)application.getAttribute("applicationContent");
		// 向页面中输出数据
		out.write(pageContextContent+"<br/>");
		out.write(requestContent+"<br/>");
		out.write(sessionContent+"<br/>");
		out.write(applicationContent+"<br/>");
	%>
</body>
</html>
结果显示:
访问资源http://localhost:8080/JavaWeb_JSP/jsp/8.jsp,显示如下内容
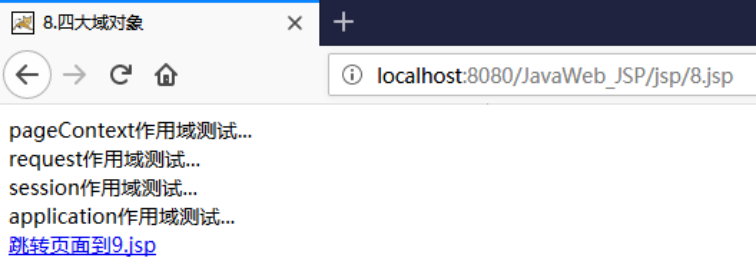
跳转到9.jsp进行测试:http://localhost:8080/JavaWeb_JSP/jsp/9.jsp,显示如下内容

application对象
案例:完成简单的网页计数器
<%@ page language="java" contentType="text/html; charset=UTF-8"
    pageEncoding="UTF-8"%>
<!DOCTYPE html PUBLIC "-//W3C//DTD HTML 4.01 Transitional//EN" "http://www.w3.org/TR/html4/loose.dtd">
<html>
<head>
<meta http-equiv="Content-Type" content="text/html; charset=UTF-8">
<title>10.Application对象:完成简单的网页计数器</title>
</head>
<body>
	<!--
		利用application对象完成一个简单的计数器
		a.判断当前是否为第一次访问,若为第一次则设置属性
		b.如果不是第一次访问,则执行计数操作
		c.显示计数信息到页面
	-->
	<%
		if(application.getAttribute("counter")==null){
			// 第一次访问:设置计数器
			application.setAttribute("counter", 1);
		}else{
			// 获取当前的计数,执行+1操作
			int count = (int)application.getAttribute("counter");
			count ++;
			application.setAttribute("counter", count);
		}
		// 显示数据到当前页面
		out.write("您是当前访问该页面的第"+application.getAttribute("counter")+"位访客");
	%>
</body>
</html>
结果展示:
访问资源http://localhost:8080/JavaWeb_JSP/jsp/10.jsp,显示如下信息,继续刷新可以看到数据不断刷新

【5】JSP标签
JSP标签也称之为Jsp Action(JSP动作)元素,它用于在Jsp页面中提供业务逻辑功能,避免在JSP页面中直接编写java代码,造成jsp页面难以维护。
<jsp:include>标签
<jsp:include>标签用于把另外一个资源的输出内容插入进当前JSP页面的输出内容之中,这种在JSP页面执行时的引入方式称之为动态引入。
语法:
<jsp:include page="relativeURL | <%=expression%>" flush="true|false" />
page属性用于指定被引入资源的相对路径,它也可以通过执行一个表达式来获得。
flush属性指定在插入其他资源的输出内容时,是否先将当前JSP页面的已输出的内容刷新到客户端。
与include指令的比较
<jsp:include>标签是动态引入, <jsp:include>标签涉及到的2个JSP页面会被翻译成2个servlet,这2个servlet的内容在执行时进行合并。
而include指令是静态引入,涉及到的2个JSP页面会被翻译成一个servlet,其内容是在源文件级别进行合并
不管是<jsp:include>标签,还是include指令,它们都会把两个JSP页面内容合并输出,所以这两个页面不要出现重复的HTML全局架构标签,否则输出给客户端的内容将会是一个格式混乱的HTML文档
案例分析:此处引用publilc文件目录下的head.jsp、footer.jsp进行测试
<%@ page language="java" contentType="text/html; charset=UTF-8"
    pageEncoding="UTF-8"%>
<!DOCTYPE html PUBLIC "-//W3C//DTD HTML 4.01 Transitional//EN" "http://www.w3.org/TR/html4/loose.dtd">
<html>
<head>
<meta http-equiv="Content-Type" content="text/html; charset=UTF-8">
<title>11.JSP标签的使用</title>
</head>
<body>
	<!--
		jsp:include标签是动态引入,对比include指令,两个最终实现
		将jsp页面中的内容合并,结合下列例子分析,区别在于jsp:include
		标签涉及到的2个jsp文件会被翻译成2个相应的servlet,这两个servlet
		的内容在执行的时候会进行合并,而include指令则是静态引入,其涉及到
		的两个jsp文件会被合并成1个servlet文件,其内容是在源文件级别进行
		合并。
	-->
	<jsp:include page="/public/head.jsp"/>
	<p>我是11.jsp中定义的内容</p>
	<jsp:include page="/public/footer.jsp"/>

	<!-- jsp:forward实现页面转发、jsp:param实现参数传递 -->
	<%--
		<jsp:forward page="12.jsp">
			<jsp:param value="noob" name="username"/>
		</jsp:forward>
	--%>
</body>
</html>
结果展示:
访问资源http://localhost:8080/JavaWeb_JSP/jsp/11.jsp
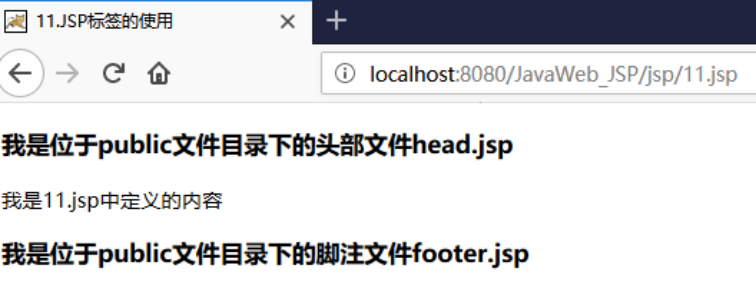
<jsp:param>标签
当使用<jsp:include>和<jsp:forward>标签引入或将请求转发给其它资源时,可以使用<jsp:param>标签向这个资源传递参数
语法1:
<jsp:include page="relativeURL | <%=expression%>">
	<jsp:param name="parameterName" value="parameterValue|<%= expression %>" />
</jsp:include>
语法2:
<jsp:forward page="relativeURL | <%=expression%>">
	<jsp:param name="parameterName" value="parameterValue|<%= expression %>" />
</jsp:include>
<jsp:param>标签的name属性用于指定参数名,value属性用于指定参数值。在<jsp:include>和<jsp:forward>标签中可以使用多个<jsp:param>标签来传递多个参数
案例分析:
在某个jsp中指定下述语句
<jsp:forward page="12.jsp">
	<jsp:param value="noob" name="username"/>
</jsp:forward>

12.jsp:定义12.jsp用于获取转发的数据
<%@ page language="java" contentType="text/html; charset=UTF-8"
    pageEncoding="UTF-8"%>
<!DOCTYPE html PUBLIC "-//W3C//DTD HTML 4.01 Transitional//EN" "http://www.w3.org/TR/html4/loose.dtd">
<html>
<head>
<meta http-equiv="Content-Type" content="text/html; charset=UTF-8">
<title>12.转发的页面测试</title>
</head>
<body>
	获取的用户名:<%= request.getParameter("username")%>
	<!--
		request.getParameter(name属性):
		获取的是表单的数据、通过地址栏传递的参数、通过a标签传递的参数

		request.getAttribute(key):
		获取的是保存在领域对象中的数据
	-->
</body>
</html>
结果显示:
假设在11.jsp中加入上述内容,访问资源http://localhost:8080/JavaWeb_JSP/jsp/11.jsp,显示如下信息

【6】JavaBean与JSP
🔖JSP开发模式
SUN公司推出JSP技术后,同时也推荐了两种web应用程序的开发模式,一种是JSP+JavaBean模式,一种是Servlet+JSP+JavaBean模式
JSP+JavaBean模式适合开发业务逻辑不太复杂的web应用程序,这种模式下,JavaBean用于封装业务数据,JSP即负责处理用户请求,又显示数据。
Servlet+JSP+JavaBean(MVC)模式适合开发复杂的web应用,在这种模式下,servlet负责处理用户请求,jsp负责数据显示,javabean负责封装数据。 Servlet+JSP、JavaBean模式程序各个模块之间层次清晰,web开发推荐采用此种模式
❓什么是JavaBean
JavaBean是一个遵循特定写法的Java类,它通常具有如下特点:
这个Java类必须具有一个无参的构造函数
属性必须私有化
私有化的属性必须通过public类型的方法暴露给其它程序,并且方法的命名也必须遵守一定的命名规范
虽然Sun公司在定义JavaBean规范时,允许Java开发人员把JavaBean设计得可以像Swing组件一样功能强大,但在实际的J2EE开发中,通常只使用到以上JavaBean最基本的特性
JavaBean在J2EE开发中,通常用于封装数据,对于遵循以上写法的JavaBean组件,其它程序可以通过反射技术实例化JavaBean对象,并且通过反射那些遵守命名规范的方法,从而获知JavaBean的属性,进而调用其属性保存数据
JavaBean的属性可以是任意类型,并且一个JavaBean可以有多个属性。每个属性通常都需要具有相应的setter、 getter方法,setter方法称为属性修改器,getter方法称为属性访问器
属性修改器必须以小写的set前缀开始,后跟属性名,且属性名的第一个字母要改为大写,例如,name属性的修改器名称为setName,password属性的修改器名称为setPassword
属性访问器通常以小写的get前缀开始,后跟属性名,且属性名的第一个字母也要改为大写,例如,name属性的访问器名称为getName,password属性的访问器名称为getPassword
一个JavaBean的某个属性也可以只有set方法或get方法,这样的属性通常也称之为只写、只读属性
📋JSP中使用JavaBean
JSP技术提供了三个关于JavaBean组件的动作元素,即JSP标签,它们分别为:
<jsp:useBean>标签:用于在JSP页面中查找或实例化一个JavaBean组件
<jsp:setProperty>标签:用于在JSP页面中设置一个JavaBean组件的属性
<jsp:getProperty>标签:用于在JSP页面中获取一个JavaBean组件的属性
(1)jsp:useBean
<jsp:useBean>标签用于在指定的域范围内查找指定名称的JavaBean对象:
如果存在则直接返回该JavaBean对象的引用。
如果不存在则实例化一个新的JavaBean对象并将它以指定的名称存储到指定的域范围中。
常用语法:
<jsp:useBean id="beanName" class="package.class" scope="page|request|session|application"/>
id属性用于指定JavaBean实例对象的引用名称和其存储在域范围中的名称
class属性用于指定JavaBean的完整类名(即必须带有包名)
scope属性用于指定JavaBean实例对象所存储的域范围,其取值只能是page、request、session和application等四个值中的一个,其默认值是page
(2)jsp:setProperty
<jsp:setProperty>标签用于设置和访问JavaBean对象的属性
语法格式:
<jsp:setProperty name="beanName"
{
	property="propertyName" value="{string | <%= expression %>}" |
	property="propertyName" [ param="parameterName" ] |
	property= "*"
}/>
name属性用于指定JavaBean对象的名称
property属性用于指定JavaBean实例对象的属性名
value属性用于指定JavaBean对象的某个属性的值,value的值可以是字符串,也可以是表达式。为字符串时,该值会自动转化为JavaBean属性相应的类型,如果value的值是一个表达式,那么该表达式的计算结果必须与所要设置的JavaBean属性的类型一致
param属性用于将JavaBean实例对象的某个属性值设置为一个请求参数值,该属性值同样会自动转换成要设置的JavaBean属性的类型
(3)jsp:getProperty
<jsp:getProperty>标签用于读取JavaBean对象的属性,也就是调用JavaBean对象的getter方法,然后将读取的属性值转换成字符串后插入进输出的响应正文中。
语法:
<jsp:getProperty name="beanInstanceName" property="PropertyName" />
name属性用于指定JavaBean实例对象的名称,其值应与jsp:useBean标签的id属性值相同
property属性用于指定JavaBean实例对象的属性名
如果一个JavaBean实例对象的某个属性的值为null,那么,使用<jsp:getProperty>标签输出该属性的结果将是一个内容为“null”的字符串
📌案例分析
(1)案例1:JSP中JavaBean的基本使用
1)Student.java
/**
 * 定义Student领域对象
 * id、username、password、birthday
 */
public class Student {
	private String id;
	private String username="xixi";
	private String password;
	private Date birthday;
	public Student() {
		super();
	}
	public Student(String id, String username, String password, Date birthday) {
		super();
		this.id = id;
		this.username = username;
		this.password = password;
		this.birthday = birthday;
	}
	public String getId() {
		return id;
	}
	public void setId(String id) {
		this.id = id;
	}
	public String getUsername() {
		return username;
	}
	public void setUsername(String username) {
		this.username = username;
	}
	public String getPassword() {
		return password;
	}
	public void setPassword(String password) {
		this.password = password;
	}
	public Date getBirthday() {
		return birthday;
	}
	public void setBirthday(Date birthday) {
		this.birthday = birthday;
	}
	@Override
	public String toString() {
		return "Student [id=" + id + ", username=" + username + ", password=" + password + ", birthday=" + birthday
				+ "]";
	}
}
2)测试jsp:
<%@page import="java.util.Date"%>
<%@ page language="java" contentType="text/html; charset=UTF-8"
    pageEncoding="UTF-8"%>
<!DOCTYPE html PUBLIC "-//W3C//DTD HTML 4.01 Transitional//EN" "http://www.w3.org/TR/html4/loose.dtd">
<html>
<head>
<meta http-equiv="Content-Type" content="text/html; charset=UTF-8">
<title>1.JSP中JavaBean的使用</title>
</head>
<body>
	<!--
		自定义一个领域对象model:Student
		其具有如下属性:id、username、password、birthday
	-->
	<!--
		a.jsp:useBean标签,其属性如下
		id属性用于指定JavaBean实例对象的引用名称和其存储在域范围中的名称
		class属性用于指定JavaBean的完整类名(即必须带有包名)
		scope属性用于指定JavaBean实例对象所存储的域范围,其默认值是page
		             其取值只能是page、request、session、application四者之一
	-->
	<jsp:useBean id="stu" class="com.noob.web.model.Student"></jsp:useBean>
	<% System.out.println("用户名:"+stu.getUsername()); %>

	<!--
		b.jsp:setProperty标签,其用于设置和访问JavaBean对象的属性
			name属性用于指定JavaBean对象的名称
			property属性用于指定JavaBean实例对象的属性名
			value属性用于指定JavaBean对象的某个属性的值,value的值可以是字符串,
				  也可以是表达式。为字符串时,该值会自动转化为JavaBean属性相应的类型,
				  如果value的值是一个表达式,那么该表达式的计算结果必须与所要设置的
				 JavaBean属性的类型一致。
			param属性用于将JavaBean实例对象的某个属性值设置为一个请求参数值,该属性值
				  同样会自动转换成要设置的JavaBean属性的类型
	-->
	<!-- 方式1:设置属性值的普通方式 -->
	<%--
	<jsp:setProperty property="id" name="stu" value="001"/>
	<jsp:setProperty property="username" name="stu" value="hhh"/>
	<jsp:setProperty property="password" name="stu" value="hhhpwd"/>
	<jsp:setProperty property="birthday" name="stu" value="<%=new Date() %>"/>
	--%>

	<!--
		方式2:通过地址栏参数传入
		http://localhost:8080/JavaWeb_JSP/jsp2/1.jsp?id=hhh&username=baba
	-->
	<%--
	<jsp:setProperty property="id" name="stu" param="id"/>
	<jsp:setProperty property="username" name="stu" param="username"/>
	--%>

	<!-- 方式3:所有的参数值都通过参数传递 -->
	<jsp:setProperty property="*" name="stu"/>

	<!-- 获取相应的值进行测试 -->
	<!--
		c.jsp:getProperty标签,用于读取JavaBean对象的属性,也就是调用JavaBean对象
			的getter方法,然后将读取的属性值转换成字符串后插入进输出的响应正文中
		name属性用于指定JavaBean实例对象的名称,其值应与jsp:useBean标签的id属性值相同
		  property属性用于指定JavaBean实例对象的属性名
		如果一个JavaBean实例对象的某个属性的值为null,则使用jsp:getProperty
		标签输出该属性的结果将是一个内容为“null”的字符串。
	-->
	用户id:<jsp:getProperty property="id" name="stu"/><br/>
	用户名:<jsp:getProperty property="username" name="stu"/><br/>
	密码:<jsp:getProperty property="password" name="stu"/><br/>
	生日:<jsp:getProperty property="birthday" name="stu"/><br/>
</body>
</html>
3)结果显示:
访问资源http://localhost:8080/JavaWeb_JSP/jsp2/1.jsp?id=001&password=000000,
(2)案例2:简易的网页计算器的实现
1)Calculator.java
/**
 * 定义计算器领域对象Calculator
 * 此处简易计算器的实现只是完成基本操作,没有对数据的运算类型作
 * 细化工作,只是作为JavaBean与JSP的结合使用的简单示例
 */
public class Calculator {
	/**
	 *  领域对象的属性必须与相应的jsp文件中的定义的数据名称一致
	 *  使得其能自动封装相应的内容
	 */
	private double num1;
	private double num2;
	private char operator='+';// 默认加
	private double result;
	public Calculator() {
		super();
	}
	public Calculator(double num1, double num2, char operator, double result) {
		super();
		this.num1 = num1;
		this.num2 = num2;
		this.operator = operator;
		this.result = result;
	}
	public double getNum1() {
		return num1;
	}
	public void setNum1(double num1) {
		this.num1 = num1;
	}
	public double getNum2() {
		return num2;
	}
	public void setNum2(double num2) {
		this.num2 = num2;
	}
	public char getOperator() {
		return operator;
	}
	public void setOperator(char operator) {
		this.operator = operator;
	}
	public double getResult() {
		return result;
	}
	public void setResult(double result) {
		this.result = result;
	}
	@Override
	public String toString() {
		return "Calculator [num1=" + num1 + ", num2=" + num2 + ", operator=" + operator + ", result=" + result + "]";
	}
	public void cal() {
		switch(operator) {
			case '+':
				result = num1 + num2;
				break;
			case '-':
				result = num1 - num2;
				break;
			case '*':
				result = num1 * num2;
				break;
			case '/':
				if(num2==0) {
					throw new RuntimeException("被除数不能为0....");
				}
				result = num1 / num2;
				break;
			default:
				throw new RuntimeException("运算异常......");
		}
	}
}
2)测试jsp
<%@ page language="java" contentType="text/html; charset=UTF-8"
    pageEncoding="UTF-8"%>
<!DOCTYPE html PUBLIC "-//W3C//DTD HTML 4.01 Transitional//EN" "http://www.w3.org/TR/html4/loose.dtd">
<html>
<head>
<meta http-equiv="Content-Type" content="text/html; charset=UTF-8">
<title>2.简易的网页计算器的实现</title>
</head>
	<!-- 导入bootstrap提供的相关的css、js文件,设定指定的编码集 -->
	<link rel="stylesheet" href="../css/bootstrap.min.css" />
	<script type="text/javascript" src="../js/jquery.min.js" charset="UTF-8" ></script>
	<script type="text/javascript" src="../js/bootstrap.min.js" charset="UTF-8" ></script>
	<body>
		<jsp:useBean id="calc" class="com.noob.web.model.Calculator"></jsp:useBean>
		<jsp:setProperty property="*" name="calc"/>
		<%
			// 调用cal()方法获取运算结果
			calc.cal();
		%>
		<!-- 显示运算结果 -->
		<div class="container">
			<h4 align="center">
				计算结果:
				<jsp:getProperty property="num1" name="calc"/>
				<jsp:getProperty property="operator" name="calc"/>
				<jsp:getProperty property="num2" name="calc"/>
				=
				<jsp:getProperty property="result" name="calc"/>
			</h4>
		</div>
		<div class="container">
			<form action="/JavaWeb_JSP/jsp2/2.jsp" method="post">
				<table class="table table-bordered table-hover table-striped">
					<tr>
						<td colspan="2" align="center">简易计算器</td>
					</tr>
					<tr>
						<td>参数1</td>
						<td>
							<input type="text" name="num1" />
						</td>
					</tr>
					<tr>
						<td>参数2</td>
						<td>
							<input type="text" name="num2" />
						</td>
					</tr>
					<tr>
						<td>运算符</td>
						<td>
							<select name="operator">
								<option value="+">+</option>
								<option value="-">-</option>
								<option value="*">*</option>
								<option value="/">/</option>
							</select>
						</td>
					</tr>
					<tr>
						<td colspan="2" align="center">
							<button type="submit" class="btn btn-success">提交</button>
						</td>
					</tr>
				</table>
			</form>
		</div>
	</body>
</html>
3)结果显示:
访问资源http://localhost:8080/JavaWeb_JSP/jsp2/2.jsp,显示如下内容

5.EL&JSTL表达式
【1】EL表达式的基础
EL 全名为Expression Language。EL主要作用:
获取数据:
EL表达式主要用于替换JSP页面中的脚本表达式,以从各种类型的web域 中检索java对象、获取数据。(某个web域 中的对象,访问javabean的属性、访问list集合、访问map集合、访问数组)
执行运算:
利用EL表达式可以在JSP页面中执行一些基本的关系运算、逻辑运算和算术运算,以在JSP页面中完成一些简单的逻辑运算。$
获取web开发常用对象:
EL 表达式定义了一些隐式对象,利用这些隐式对象,web开发人员可以很轻松获得对web常用对象的引用,从而获得这些对象中的数据
调用Java方法:
EL表达式允许用户开发自定义EL函数,以在JSP页面中通过EL表达式调用Java类的方法
【2】获取数据
案例1:从四大作用域依次搜索数据、进行检索
1)ELServletDemo1.java
/**
 *	获取数据案例1:
 *	使用el表达式可以依次从四大领域中从小到大依次搜索、获取数据
 *	page -- request -- session -- application
 * */
@WebServlet("/ELServletDemo1")
public class ELServletDemo1 extends HttpServlet {

	protected void doGet(HttpServletRequest request, HttpServletResponse response) throws ServletException, IOException {
		// 设置消息头
		response.setContentType("text/html;charset=UTF-8");
		request.setAttribute("username", "noob");
		request.getSession().setAttribute("password", "000000");
		request.getServletContext().setAttribute("descr", "哈哈");
		// 转发页面到1.jsp进行测试
		request.getRequestDispatcher("/el/1.jsp").forward(request, response);
	}

	protected void doPost(HttpServletRequest request, HttpServletResponse response) throws ServletException, IOException {
		doGet(request, response);
	}

}
2)测试jsp
<%@ page language="java" contentType="text/html; charset=UTF-8"
    pageEncoding="UTF-8"%>
<!DOCTYPE html PUBLIC "-//W3C//DTD HTML 4.01 Transitional//EN" "http://www.w3.org/TR/html4/loose.dtd">
<html>
<head>
<meta http-equiv="Content-Type" content="text/html; charset=UTF-8">
<title>1.使用el表达式获取数据:获取四大领域对象的数据</title>
</head>
<body>
	<!-- 常规获取数据的方式 -->
	常规获取数据:<%=request.getAttribute("username") %><br/>
	<!-- 通过el表达式获取数据 -->
	通过el表达式获取四大领域对象的数据<br/>
	用户名:${username }<br/>
	密码:${password }<br/>
	具体描述:${descr }<br/>
</body>
</html>
3)结果展示
访问资源http://localhost:8080/JavaWeb_JSP/ELServletDemo1
案例2:获取Javabean的属性
1)ELServletDemo2.java
/**
 * 获取数据案例2:
 * 获取JavaBean的属性,此处以Peron领域对象为例进行分析
 */
@WebServlet("/ELServletDemo2")
public class ELServletDemo2 extends HttpServlet {
	protected void doGet(HttpServletRequest request, HttpServletResponse response) throws ServletException, IOException {
		// 设置消息头
		response.setContentType("text/html;charset=UTF-8");
		// 创建Person对象保存到作用域中
		Address address = new Address("中国","浙江","温州");
		Person person = new Person("1","noob","000000","男","我是哈哈...",address);
		request.setAttribute("person", person);
		// 转发页面到2.jsp
		request.getRequestDispatcher("/el/2.jsp").forward(request, response);
	}
	protected void doPost(HttpServletRequest request, HttpServletResponse response) throws ServletException, IOException {
		doGet(request, response);
	}
}
2)Person.java、Address.java
引用的类:Person.java、Address.java
/**
 * javaBean:Person领域对象
 * id、username、password、sex、descr、address
 */
public class Person {
	private String id;
	private String username;
	private String password;
	private String sex;
	private String descr;
	private Address address;
	public Person() {
		super();
	}
	public Person(String id, String username, String password, String sex, String descr, Address address) {
		super();
		this.id = id;
		this.username = username;
		this.password = password;
		this.sex = sex;
		this.descr = descr;
		this.address = address;
	}
	public String getId() {
		return id;
	}
	public void setId(String id) {
		this.id = id;
	}
	public String getUsername() {
		return username;
	}
	public void setUsername(String username) {
		this.username = username;
	}
	public String getPassword() {
		return password;
	}
	public void setPassword(String password) {
		this.password = password;
	}
	public String getSex() {
		return sex;
	}
	public void setSex(String sex) {
		this.sex = sex;
	}
	public String getDescr() {
		return descr;
	}
	public void setDescr(String descr) {
		this.descr = descr;
	}
	public Address getAddress() {
		return address;
	}
	public void setAddress(Address address) {
		this.address = address;
	}
	@Override
	public String toString() {
		return "Person [id=" + id + ", username=" + username + ", password=" + password + ", sex=" + sex + ", descr="
				+ descr + ", address=" + address + "]";
	}
}

Address.java:
/**
 * Address地址:country、city、street
 */
public class Address {
	private String country;
	private String city;
	private String street;
	public Address() {
		super();
	}
	public Address(String country, String city, String street) {
		super();
		this.country = country;
		this.city = city;
		this.street = street;
	}
	public String getCountry() {
		return country;
	}
	public void setCountry(String country) {
		this.country = country;
	}
	public String getCity() {
		return city;
	}
	public void setCity(String city) {
		this.city = city;
	}
	public String getStreet() {
		return street;
	}
	public void setStreet(String street) {
		this.street = street;
	}
	@Override
	public String toString() {
		return "Address [country=" + country + ", city=" + city + ", street=" + street + "]";
	}
}
3)测试jsp
<%@ page language="java" contentType="text/html; charset=UTF-8"
    pageEncoding="UTF-8"%>
<!DOCTYPE html PUBLIC "-//W3C//DTD HTML 4.01 Transitional//EN" "http://www.w3.org/TR/html4/loose.dtd">
<html>
<head>
<meta http-equiv="Content-Type" content="text/html; charset=UTF-8">
<title>2.使用el表达式获取数据:获取javaBean的属性</title>
</head>
<body>
	获取到的Person对象<br />
	<!-- 可以获取javaBean的属性 -->
	得到的person:${person }<br />
	id:${person.id }<br />
	username:${person.username }<br />
	password:${person.password }<br />
	sex:${person.sex }<br />
	descr:${person.descr }<br />
	address:${person.address }<br />
	<!-- el表达式可以通过“.”继续获取相关的属性或对象 -->
	具体的address:<br />
	country:${person.address.country }<br />
	city:${person.address.city }<br />
	street:${person.address.city }<br />
</body>
</html>
4)结果展示
访问资源http://localhost:8080/JavaWeb_JSP/ELServletDemo2
案例3:获取集合(array、list、map)的数据
1)ELServletDemo3.java
/**
 * 获取数据案例3:根据el表达式获取数组、List集合、Map集合数据
 */
@WebServlet("/ELServletDemo3")
public class ELServletDemo3 extends HttpServlet {

	protected void doGet(HttpServletRequest request, HttpServletResponse response) throws ServletException, IOException {
		Address a1 = new Address("中国","广东","深圳");
		Person p1 = new Person("1","哈哈","000000","男","我是哈哈...",a1);

		Address a2 = new Address("中国","浙江","杭州");
		Person p2 = new Person("2","哔哔","000000","男","我是哔哔...",a2);

		Address a3 = new Address("中国","上海","浦东");
		Person p3 = new Person("3","嘻嘻","000000","女","我是嘻嘻...",a3);

		// 将上述的用户分别添加到数组、list、map集合中进行测试
		Person[] array = {p1,p2,p3};
		List<Person> list = new LinkedList<>();
		list.add(p1);
		list.add(p2);
		list.add(p3);
		Map<String,Person> map = new LinkedHashMap<>();
		map.put("person1", p1);
		map.put("person2", p2);
		map.put("person3", p3);

		// 设置领域对象的相关属性
		request.setAttribute("array", array);
		request.setAttribute("list", list);
		request.setAttribute("map", map);

		// 转发页面到3.jsp进行测试
		request.getRequestDispatcher("/el/3.jsp").forward(request, response);
	}

	protected void doPost(HttpServletRequest request, HttpServletResponse response) throws ServletException, IOException {
		doGet(request, response);
	}
}
2)测试jsp
<%@ page language="java" contentType="text/html; charset=UTF-8"
    pageEncoding="UTF-8"%>
<%@taglib uri="http://java.sun.com/jsp/jstl/core" prefix="c" %>
<!DOCTYPE html PUBLIC "-//W3C//DTD HTML 4.01 Transitional//EN" "http://www.w3.org/TR/html4/loose.dtd">
<html>
<head>
<meta http-equiv="Content-Type" content="text/html; charset=UTF-8">
<title>3.获取数据案例3:通过el表达式获取数组、list、map集合的数据</title>
</head>
	<body>
		<!--
			普通获取 :
			如果仅仅只是普通获取数组、list集合数据则可通过下标进行获取
			${array }获取的是数组的地址
			${list }获取的是整个列表所有数据
			通过指定的下标可以获取对应的数据,进一步获取相关属性
		-->
		获取数组数据:<br/>
		${array }<br/>
		${array[0] }<br/>
		${array[0].username }<br/>
		获取列表数据:<br/>
		${list }<br/>
		${list[1] }<br/>
		${list[1].username }<br/>

		<!--
			此处使用el表达式结合jstl实现循环遍历
			需要导入相应的jstl.jar,并在页面中引入该文件方能正常使用
			@taglib uri="http://java.sun.com/jsp/jstl/core" prefix="c"
		-->
		<!-- 此处只简单显示id、用户名、密码 -->
		<table border="1">
			<tr>
				<td colspan="3" align="center">迭代数组</td>
			</tr>
			<tr>
				<td>id</td>
				<td>用户名</td>
				<td>密码</td>
			</tr>
			<!-- c:forEach循环迭代:var是迭代后的变量名 items是要进行迭代的数据 -->
			<c:forEach var="person" items="${array }" >
				<tr>
					<td>${person.id }</td>
					<td>${person.username }</td>
					<td>${person.password }</td>
				</tr>
			</c:forEach>
		</table><hr/>
		<!-- 迭代list集合 -->
		<table border="1">
			<tr>
				<td colspan="3" align="center">迭代list集合</td>
			</tr>
			<tr>
				<td>id</td>
				<td>用户名</td>
				<td>密码</td>
			</tr>
			<!-- c:forEach循环迭代:var是迭代后的变量名 items是要进行迭代的数据 -->
			<c:forEach var="person" items="${list }" >
				<tr>
					<td>${person.id }</td>
					<td>${person.username }</td>
					<td>${person.password }</td>
				</tr>
			</c:forEach>
		</table><hr/>
		<!-- 迭代map集合 -->
		<table border="1">
			<tr>
				<td colspan="3" align="center">迭代map集合</td>
			</tr>
			<tr>
				<td>用户1</td>
				<td>用户名</td>
				<td>密码</td>
			</tr>
			<tr>
				<td>${map.person1 }</td>
				<td>${map.person1.username }</td>
				<td>${map.person1.password }</td>
			</tr>
		</table><hr/>
	</body>
</html>
3)结果展示
访问资源http://localhost:8080/JavaWeb_JSP/ELServletDemo3
【3】执行运算
1)ELServletDemo4.java
/**
 * 使用el表达式执行运算:有常见的运算符的使用
 * 此处只简单列举常见的问题案例
 * 判断对象是否为空
 * 	empty运算符:检查对象是否为null或“空”
 * 	二元表达式:${user!=null?user.name : "提示"}
 * 常见的还有 [ ] 和  . 号运算符
 */
@WebServlet("/ELServletDemo4")
public class ELServletDemo4 extends HttpServlet {
	protected void doGet(HttpServletRequest request, HttpServletResponse response) throws ServletException, IOException {
		// 设置消息头
		response.setContentType("text/html;charset=UTF-8");
		// 设置领域对象
		Address address = new Address("中国","广东","深圳");
		Person person = new Person("1","哈哈","000","男","我是哈哈",address);
		request.setAttribute("person", person);
		// 将页面跳转到4.jsp进行测试
		request.getRequestDispatcher("el/4.jsp").forward(request, response);
	}

	protected void doPost(HttpServletRequest request, HttpServletResponse response) throws ServletException, IOException {
		doGet(request, response);
	}
}
2)测试jsp
<%@ page language="java" contentType="text/html; charset=UTF-8"
    pageEncoding="UTF-8"%>
<%@taglib uri="http://java.sun.com/jsp/jstl/core" prefix="c" %>
<!DOCTYPE html PUBLIC "-//W3C//DTD HTML 4.01 Transitional//EN" "http://www.w3.org/TR/html4/loose.dtd">
<html>
<head>
<meta http-equiv="Content-Type" content="text/html; charset=UTF-8">
<title>4.el表达式执行运算示例</title>
</head>
	<body>
		<!-- el表达式可以直接执行相应的运算,得到相应的数据进行显示 -->
		一天有24*3600=${24*3600 }秒<hr/>
		<!--
			el表达式结合jstl用以判断数据是否为空
			c:if test="${expression}"
			test中指定的内容如果返回true则执行相应标签中的内容,
			可以通过empty(object)判断对象是否为空
		-->
		empty判断对象是否为空测试<br/>
		<c:if test="${person!=null }">
			当前用户:${person.username }
		</c:if>
		<c:if test="${empty(person) }">
			抱歉!当前没有数据显示......
		</c:if>
		<hr/>
		<!--
			可以通过二元运算符判断传入的对象是否为空
			${(expression)?statement1:statement2}
			如果expression返回的值为true则执行statement1,否则执行statement2
			可以根据servlet传递的参数进行数据回显
		-->
		二元运算符测试<br/>
		${(person!=null)?person.username:"当前没有数据显示哦!!!" }
		<!-- 根据servlet传递的参数进行数据回显 -->
		<input type="radio" name="gender" value="男" ${(person.sex=='男')?'checked':'' }/>男
		<input type="radio" name="gender" value="女" ${(person.sex=='女')?'checked':''}/>女
	</body>
</html>
3)结果展示
访问资源http://localhost:8080/JavaWeb_JSP/ELServletDemo4,结果显示如下
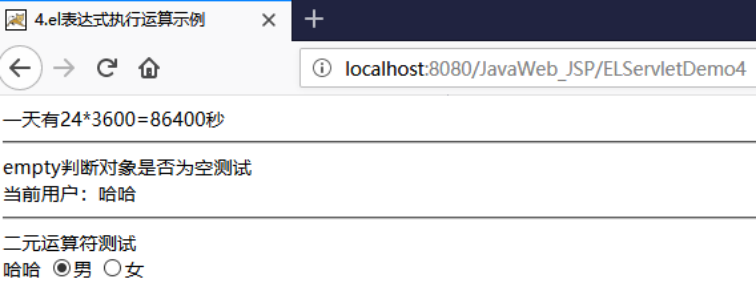
如果是直接访问jsp资源http://localhost:8080/JavaWeb_JSP/el/4.jsp,当前没有数据传入,则显示如下信息
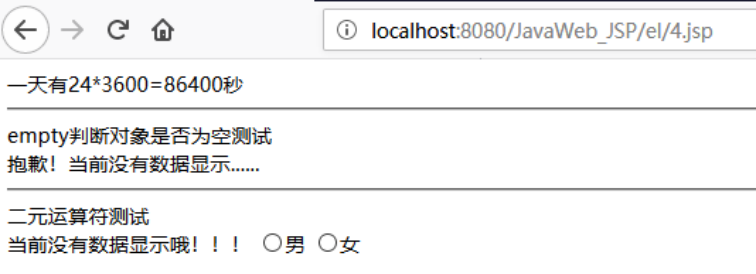
【4】JSTL表达式
JSTL(JSP Standard Tag Libary)是JSP中标准的标签库,它由Apache实现的
由于在JSP页面中显示数据时,经常需要对显示的字符串进行处理,SUN公司针对于一些常见处理定义了一套EL函数库供开发者使用。这些EL函数在JSTL开发包中进行描述
在JSP页面中使用SUN公司的EL函数库,需要导入JSTL开发包(eclipse:在WEB-INF目录中创建一个lib目录存放jstl.jar,随后将其载入工程),并在页面中导入EL函数库
<%@taglib uri="http://java.sun.com/jsp/jstl/functions" prefix="fn"%>
在使用jstl表达式的时候需要导入相应的标签库,再结合定义规则使用即可,常用的核心标签库说明如下所示
| 标签名称 | 功能分类 | 分类 | 作用 |
|---|---|---|---|
<c:if> | 流程控制 | 核心标签库 | 用于判断 |
<c:choose>,<c:when>,<c:otherwise> | 流程控制 | 核心标签库 | 用于多个条件判断 |
<c:foreache> | 迭代操作 | 核心标签库 | 用于循环遍历 |
6.过滤器
【1】过滤器的基础知识
Filter也称之为过滤器,WEB开发人员通过Filter技术,对web服务器管理的所有web资源(jsp、servlet、静态html、静态图片等)进行拦截,从而实现一些特殊的功能。例如实现URL级别的身份认证、日志记录、图像转换、权限访问控制、过滤敏感词汇、数据压缩(压缩响应信息)等一些高级功能
Servlet API中提供了一个Filter接口,开发web应用时,如果编写的Java类实现了这个接口,则把这个java类称之为过滤器Filter。通过Filter技术,开发人员可以实现用户在访问某个目标资源之前,对访问的请求和响应进行拦截,如下所示:

Filter接口中有一个doFilter方法,当开发人员编写好Filter,并配置对哪个web资源进行拦截后,WEB服务器每次在调用web资源的service方法之前,都会先调用一下filter的doFilter方法(可在该方法中编写业务逻辑代码,实现调用目标资源之前,让一段代码执行)
是否调用目标资源(即是否让用户访问web资源):web服务器在调用doFilter方法时,会传递一个filterChain对象进来,filterChain对象是filter接口中最重要的一个对象,它也提供了一个doFilter方法,开发人员可以根据需求决定是否调用此方法,调用该方法,则web服务器就会调用web资源的service方法(即web资源就会被访问),否则web资源不会被访问。
filterChain可以决定是否放行到目标资源
Filter开发步骤:
1)编写java类实现Filter接口,并实现其doFilter方法
2)在 web.xml 文件中使用<filter>和<filter-mapping>元素对编写的filter类进行注册,并设置它所能拦截的资源
Filter链
在一个web应用中,可以开发编写多个Filter,这些Filter组合起来称之为一个Filter链
web服务器根据Filter在web.xml文件中的注册顺序,决定先调用哪个Filter,当第一个Filter的doFilter方法被调用时,web服务器会创建一个代表Filter链的FilterChain对象传递给该方法。在doFilter方法中,开发人员如果调用了FilterChain对象的doFilter方法,则web服务器会检查FilterChain对象中是否还有filter,如果有,则调用第2个filter,如果没有,则调用目标资源。
Filter链实验(查看filterChain API文档),如果有多个过滤器,进入的顺序和出来的顺序是相反的
案例分析:过滤器的基本使用
参考案例
1)编写java类实现Filter接口,并实现其doFilter方法
- 过滤器FilterDemo1
/**
 * 过滤器的基本使用
 * a.实现Filter接口(javax.servlet)
 * b.配置web.xml中相关过滤器属性(与servlet的配置方法大同小异)
 * <filter>
 * 		<filter-name>过滤器名称</filter-name>
 * 		<filter-class>类全名</filter-class>
 * </filter>
 * <filter-mapping>
 * 		<filter-name>过滤器名称</filter-name>
 * 		<url-pattern>/*</url-pattern>
 * </filter-mapping>
 * c.可以配置多个Filter,在访问的时候其顺序取决于Filter在web.xml中
 * 	配置的先后顺序,且其进入的顺序与返回的顺序恰恰相反,可以参考filter
 * 	的执行过程进行理解分析
 * 	此处案例结果显示:...1 3 4 2...
 */
public class FilterDemo1 implements Filter{
	@Override
	public void init(FilterConfig filterConfig) throws ServletException {
		System.out.println("filter1....init......");
	}
	@Override
	public void doFilter(ServletRequest request, ServletResponse response, FilterChain chain)
			throws IOException, ServletException {
		System.out.println("在执行目标资源文件之前执行.....1");
		/**
		 * 如果想要执行到目标资源则需要使用FilterChain对象
		 * 放行到目标资源,否则无法执行下一步
		 */
		chain.doFilter(request, response);
		System.out.println("在执行目标资源文件之后执行......2");
	}
	@Override
	public void destroy() {
		System.out.println("filter1....destory......");
	}
}
- 过滤器FilterDemo2
/**
 * 定义配置过滤器filter2...
 */
public class FilterDemo2 implements Filter{
	@Override
	public void init(FilterConfig filterConfig) throws ServletException {
		System.out.println("filter2....init......");
	}
	@Override
	public void doFilter(ServletRequest request, ServletResponse response, FilterChain chain)
			throws IOException, ServletException {
		System.out.println("在执行目标资源文件之前执行.....3");
		/**
		 * 如果想要执行到目标资源则需要使用FilterChain对象
		 * 放行到目标资源,否则无法执行下一步
		 */
		chain.doFilter(request, response);
		System.out.println("在执行目标资源文件之后执行......4");
	}
	@Override
	public void destroy() {
		System.out.println("filter2....destory......");
	}
}
2)在配置文件 web.xml 文件中使用filter、filter-mapping元素对编写的filter类进行注册,并设置它所能拦截的资源
- web.xml中对上述定义的过滤器进行注册
<!-- 过滤器1 -->
<filter>
	<filter-name>FilterDemo1</filter-name>
	<filter-class>com.noob.web.filter.FilterDemo1</filter-class>
</filter>
<filter-mapping>
  <filter-name>FilterDemo1</filter-name>
  <url-pattern>/*</url-pattern>
</filter-mapping>
<!-- 过滤器2 -->
<filter>
	<filter-name>FilterDemo2</filter-name>
	<filter-class>com.noob.web.filter.FilterDemo2</filter-class>
</filter>
<filter-mapping>
  <filter-name>FilterDemo2</filter-name>
  <url-pattern>/*</url-pattern>
</filter-mapping>
3)编写目标资源测试类
/**
 *	过滤器的基本使用:
 *	了解过滤器的使用流程
 */
@WebServlet("/FilterTest1Servlet")
public class FilterTest1Servlet extends HttpServlet {
	protected void doGet(HttpServletRequest request, HttpServletResponse response) throws ServletException, IOException {
		System.out.println("我是目标资源,我被执行!!");
	}

	protected void doPost(HttpServletRequest request, HttpServletResponse response) throws ServletException, IOException {
		doGet(request, response);
	}
}
4)结果展示
访问资源http://localhost:8080/JavaWeb_Filter/FilterTest1Servlet,结果显示如下:
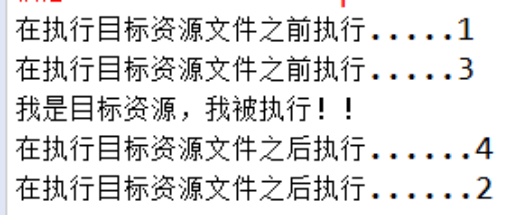
由结果分析可知:多个过滤器的执行顺序,执行目标资源之前的调用顺序和执行目标资源之后的调用顺序是相反的,且由<filter-mapping>配置的前后顺序(映射配置顺序)决定过滤器的调用顺序
⚡过滤器的拦截行为
在实际开发中,过滤器目前拦截的内容主要有请求、请求转发、请求包含以及由服务器触发调用的全局错误页面,参考配置如下所示
<!--配置过滤器-->
<filter>
    <filter-name>FilterDemo1</filter-name>
    <filter-class>com.noob.web.filter.FilterDemo1</filter-class>
    <!--配置开启异步支持,当dispatcher配置ASYNC时,需要配置此行-->
    <async-supported>true</async-supported>
</filter>
<filter-mapping>
    <filter-name>FilterDemo1</filter-name>
    <url-pattern>/ServletDemo1</url-pattern>
    <!--过滤请求:默认值。-->
    <dispatcher>REQUEST</dispatcher>
    <!--过滤全局错误页面:当由服务器调用全局错误页面时,过滤器工作-->
    <dispatcher>ERROR</dispatcher>
    <!--过滤请求转发:当请求转发时,过滤器工作。-->
    <dispatcher>FORWARD</dispatcher>
    <!--过滤请求包含:当请求包含时,过滤器工作。它只能过滤动态包含,jsp的include指令是静态包含-->
    <dispatcher>INCLUDE</dispatcher>
    <!--过滤异步类型,它要求我们在filter标签中配置开启异步支持-->
    <dispatcher>ASYNC</dispatcher>
</filter-mapping>
Servlet VS 过滤器
| 方法/类型 | Servlet | Filter | 备注 |
|---|---|---|---|
| 初始化 方法 | void init(ServletConfig); | void init(FilterConfig); | 两者大同小异,可用该对象的方法可以获取到在web.xml中配置的参数 |
| 提供服务方法 | void service(request,response); | void dofilter(request,response,FilterChain); | 过滤器比Servlet更为强大,Filter比Servlet多了一个FilterChain,它不仅能完成Servlet的功能,而且还可以决定程序是否能继续执行 |
| 销毁方法 | void destroy(); | void destroy(); |
【2】过滤器经典案例分析
案例1:解决全站乱码问题
参考案例
1)过滤器配置
/**
 * 在web.xml中进行相应配置
 * 过滤器的使用案例1:
 * 通过过滤器解决全站乱码问题
 * 1.所有的客户端请求:request请求 全部经过当前过滤器进行处理设置编码集
 * 2.输出到客户端:response 全部经过当前过滤器进行处理设置编码集
 */
public class FilterExample1 implements Filter{
	private FilterConfig filterConfig;
	// 指定要进行设置的编码集
	private String defaultCharset="UTF-8";
	@Override
	public void init(FilterConfig filterConfig) throws ServletException {
		this.filterConfig = filterConfig;
	}
	/**
	 * 一般在获取客户端数据或输出数据到客户端的时候为了解决乱码问题难免要设置
	 * 指定的编码集,通过过滤器进行统一的设定,只需要进行相应的配置即可
	 */
	@Override
	public void doFilter(ServletRequest request, ServletResponse response, FilterChain chain)
			throws IOException, ServletException {
		// a.将指定的内容转化为相应的HttpServletRequest、HttpServletResponse
		HttpServletRequest req = (HttpServletRequest) request;
		HttpServletResponse res = (HttpServletResponse) response;
		// b.获取当前系统默认的编码集
		String charset = filterConfig.getInitParameter("charset");
		// c.设置统一的编码集
		if(charset==null) {
			charset=defaultCharset;
		}
		// request设置:由客户端请求服务端的编码集
		request.setCharacterEncoding(charset);
		// response设置:由服务端输出到客户端的编码集,设置成统一
		response.setCharacterEncoding(charset);
		response.setContentType("text/html;charset="+defaultCharset);
		// d.放行到目标资源(此处放行的是经过处理之后的request、response)
		chain.doFilter(req, res);
	}

	@Override
	public void destroy() {

	}
}
2)过滤器注册
 <filter>
    <filter-name>FilterExample1</filter-name>
    <filter-class>com.noob.web.filter.FilterExample1</filter-class>
  </filter>
  <filter-mapping>
    <filter-name>FilterExample1</filter-name>
    <url-pattern>/*</url-pattern>
  </filter-mapping>
3)Servlet定义
/**
 * 全站乱码测试
 */
@WebServlet("/FilterExample1Servlet")
public class FilterExample1Servlet extends HttpServlet {
	protected void doGet(HttpServletRequest request, HttpServletResponse response) throws ServletException, IOException {
		String city = request.getParameter("city");
		response.getWriter().write(city);
	}
	protected void doPost(HttpServletRequest request, HttpServletResponse response) throws ServletException, IOException {
		doGet(request, response);
	}
}
4)目标资源JSP测试
<%@ page language="java" contentType="text/html; charset=UTF-8"
    pageEncoding="UTF-8"%>
<!DOCTYPE html PUBLIC "-//W3C//DTD HTML 4.01 Transitional//EN" "http://www.w3.org/TR/html4/loose.dtd">
<html>
<head>
<meta http-equiv="Content-Type" content="text/html; charset=UTF-8">
<title>全站乱码测试</title>
</head>
<body>
	<form action="${pageContext.request.contextPath }/FilterExample1Servlet" method="post">
		<input type="text" name="city" value="城市"/>
		<button type="submit">测试</button>
	</form>
</body>
</html>
5)测试结果分析
访问资源http://localhost:8080/JavaWeb_Filter/filter/1.jsp,点击测试结果显示如下,数据正常显示

案例2:防盗链Filter
1)过滤器配置
/**
 * 过滤器的使用案例2:
 * 防盗链:用户可以通过提供的网址访问链接,但不能够直接通过地址栏访问链接
 * 测试的时候清空缓存、通过手动配置web.xml进行测试
 * 可以通过配置url从而保留多个地址栏
 * <url-pattern>/unload/*</url-pattern>
 */
public class FilterExample2 implements Filter{
	@Override
	public void init(FilterConfig filterConfig) throws ServletException {
	}
	@Override
	public void doFilter(ServletRequest request, ServletResponse response, FilterChain chain)
			throws IOException, ServletException {
		HttpServletRequest req = (HttpServletRequest) request;
		HttpServletResponse res = (HttpServletResponse) response;
		// a.设置消息头
		res.setDateHeader("expires", 0);
		res.setHeader("Cache-Control", "no-cache");
		res.setHeader("Pragma", "no-cache");
		// b.判断客户端访问地址的来源
		/**
		 * 如果是来自于服务器的调用则正常先显示数据,如果是外部链接或者是
		 * 通过地址栏直接访问则显示错误信息
		 */
		String referer = req.getHeader("referer");
		if(referer==null||!referer.contains(req.getServerName())) {
			// 地址来源不是本服务器,则转发到错误提示页面
			req.getRequestDispatcher("/img/error.jpg").forward(request, response);
		}else {
			// 反之正常显示图片
			chain.doFilter(request, response);
		}
	}
	@Override
	public void destroy() {
	}
}
2)过滤器注册
<filter>
    <filter-name>FilterExample2</filter-name>
    <filter-class>com.noob.web.filter.FilterExample2</filter-class>
  </filter>
  <filter-mapping>
    <filter-name>FilterExample2</filter-name>
    <url-pattern>/img/*</url-pattern>
    <url-pattern>/unload/*</url-pattern>
  </filter-mapping>
3)Servlet定义
/**
 * 防盗链测试
 */
@WebServlet("/FilterExample2Servlet")
public class FilterExample2Servlet extends HttpServlet {

	protected void doGet(HttpServletRequest request, HttpServletResponse response) throws ServletException, IOException {
		request.getRequestDispatcher("/filter/2.jsp").forward(request, response);
	}

	protected void doPost(HttpServletRequest request, HttpServletResponse response) throws ServletException, IOException {
		doGet(request, response);
	}
}
4)目标资源JSP测试
<%@ page language="java" contentType="text/html; charset=UTF-8"
    pageEncoding="UTF-8"%>
<!DOCTYPE html PUBLIC "-//W3C//DTD HTML 4.01 Transitional//EN" "http://www.w3.org/TR/html4/loose.dtd">
<html>
<head>
<meta http-equiv="Content-Type" content="text/html; charset=UTF-8">
<title>防盗链测试</title>
</head>
<body>
	<img alt="图片" src="${pageContext.request.contextPath }/img/1.jpg"/>
	<a href="javascript:window.open('../img/1.jpg')" onclick="window.open('${pageContext.request.contextPath }/img/1.jpg');return false">打开图片</a>
</body>
</html>
5)测试结果分析
访问资源:http://localhost:8080/JavaWeb_Filter/filter/2.jsp,点击打开图片数据正常显示(由浏览器自动跳转到指定的图片链接http://localhost:8080/JavaWeb_Filter/img/1.jpg)

但是,如果是人为指定地址栏http://localhost:8080/JavaWeb_Filter/img/1.jpg,而非服务器转发的数据,则无法显示信息,会做出相应的错误提示,如下所示

案例3:脏话过滤器
1)过滤器配置
/**
 * 过滤器的使用案例3: 脏话过滤器
 * 配置web.xml中的相关属性
 * 通过DirtyRequest类进行脏话替换
 * 但此处还不够完善,针对标签输入内容可能会导致异常的情况需要进行处理
 */
// DirtyRequest类的主要作用是重写requst中的方法进行增强
class DirtyRequest extends HttpServletRequestWrapper {
	// 模拟自定义脏话字典
	private List<String> dirtyWords = Arrays.asList("坑逼", "傻子", "畜生", "傻瓜");
	private HttpServletRequest request;

	public DirtyRequest(HttpServletRequest request) {
		super(request);
		this.request = request;
	}

	// 对request对象的getParmater方法进行增强
	@Override
	public String getParameter(String name) {

		// 获取表单的数据的内容的时候进行替换数据
		String value = this.request.getParameter(name);
		if (value == null) {
			return null;
		}
		/**
		 *  如果不是为空则循环迭代所有从数据库读取到的脏话字典
		 *  然后匹配用户的输入是否存在脏话如果存在则进行替换
		 */
		for (String dirtyword : dirtyWords) {
			if (value.contains(dirtyword)) {
				value = value.replace(dirtyword, "*****");
			}
		}
		return value;
	}
}

public class FilterExample3 implements Filter {
	@Override
	public void init(FilterConfig filterConfig) throws ServletException {

	}

	@Override
	public void doFilter(ServletRequest request, ServletResponse response, FilterChain chain)
			throws IOException, ServletException {
		HttpServletRequest req = (HttpServletRequest) request;
		HttpServletResponse res = (HttpServletResponse) response;
		// 通过DirtyRequest类进行脏话过滤
		DirtyRequest qr = new DirtyRequest(req);
		// 放行资源(此处传入的是经过处理之后的内容)
		chain.doFilter(qr, res);
	}

	@Override
	public void destroy() {
	}
}
2)过滤器注册
<filter>
    <filter-name>FilterExample3</filter-name>
    <filter-class>com.noob.web.filter.FilterExample3</filter-class>
  </filter>
  <filter-mapping>
    <filter-name>FilterExample3</filter-name>
    <url-pattern>/*</url-pattern>
  </filter-mapping>
3)Servlet定义
/**
 * 获取脏话过滤之后的内容
 */
@WebServlet("/FilterExample3Servlet")
public class FilterExample3Servlet extends HttpServlet {
	protected void doGet(HttpServletRequest request, HttpServletResponse response) throws ServletException, IOException {
		String content = request.getParameter("content");
		response.getWriter().write("上次留言:"+content);
	}

	protected void doPost(HttpServletRequest request, HttpServletResponse response) throws ServletException, IOException {
		doGet(request, response);
	}
}
4)目标资源测试
测试jsp:
<%@ page language="java" contentType="text/html; charset=UTF-8"
    pageEncoding="UTF-8"%>
<!DOCTYPE html PUBLIC "-//W3C//DTD HTML 4.01 Transitional//EN" "http://www.w3.org/TR/html4/loose.dtd">
<html>
<head>
<meta http-equiv="Content-Type" content="text/html; charset=UTF-8">
<title>脏话过滤测试</title>
</head>
<body>
	<form action="${pageContext.request.contextPath }/FilterExample3Servlet" method="post">
	<textarea name="content" rows="5" cols="60">
	</textarea>
	<button type="submit">测试</button>
	</form>
</body>
</html>
5)测试结果分析
访问资源http://localhost:8080/JavaWeb_Filter/filter/3.jsp,点击测试,结果显示如下

案例4:HTML转义
问题分析:
针对案例3-脏话过滤器中,如果输入数据为一段js代码例如下述内容
<script type="text/javascript">
  while(true){
   alert("哈哈,你这个大傻子!!");
  }
</script>
点击测试,则会出现下述内容(输入的文本内容被解析成js脚本)
因此,为了处理HTML转义问题,需要利用过滤器将相关内容进行转义
参考案例
1)过滤器配置
/**
* 过滤器的使用案例4:HTML转义
*/
class MyHtmlRequest extends HttpServletRequestWrapper {
private HttpServletRequest request;
public MyHtmlRequest(HttpServletRequest request) {
super(request);
this.request = request;
}
@Override
public String getParameter(String name) {
// 获取用户的输入;
String value = this.request.getParameter(name);
if (value == null) {
return null;
}
// 需要把用户输入的数据进行转义<>& " 把这四种转义即可
char[] content = new char[value.length()];
value.getChars(0, value.length(), content, 0); // 得到用户输入的每一个字符
StringBuffer result = new StringBuffer(content.length + 150);
// 循环用户输入的每一个字符如果是特殊符号则进行替换
for (int i = 0; i < content.length; i++) {
switch (content[i]) {
case '<':
result.append("<");
break;
case '>':
result.append(">");
break;
case '&':
result.append("&");
break;
case '"':
result.append(""");
break;
default:
result.append(content[i]);
break;
}
}
return result.toString();
}
}
public class FilterExample4 implements Filter {
@Override
public void init(FilterConfig filterConfig) throws ServletException {
}
@Override
public void doFilter(ServletRequest request, ServletResponse response, FilterChain chain)
throws IOException, ServletException {
HttpServletRequest req = (HttpServletRequest) request;
HttpServletResponse res = (HttpServletResponse) response;
// 通过MyHtmlRequest类进行HTML转义
MyHtmlRequest myrequst =new MyHtmlRequest(req);
// 放行资源(此处传入的是经过处理之后的内容)
chain.doFilter(myrequst, res);
}
@Override
public void destroy() {
}
}
2)过滤器注册
<filter>
    <filter-name>FilterExample4</filter-name>
    <filter-class>com.noob.web.filter.FilterExample4</filter-class>
  </filter>
  <filter-mapping>
    <filter-name>FilterExample4</filter-name>
    <url-pattern>/*</url-pattern>
  </filter-mapping>
3)目标资源测试
参考案例3中的内容进行测试,输入
<script type="text/javascript">
   while(true){
      alert("哈哈,你这个大傻子!!");
   }
</script>
4)测试结果分析
访问资源,输入上述js代码进行测试,显示结果如下,数据正常转义显示

案例5:静态资源设置缓存时间过滤器
在访问html,js,image时,不需要每次都重新发送请求读取资源,就可以通过设置响应消息头的方式,设置缓存时间。但是如果每个Servlet都编写相同的代码,显然不符合我们统一调用和维护的理念。可采用过滤器实现功能,或者引入AOP思想
参考案例
1)过滤器编写
public class FilterExample5 implements Filter {

    private FilterConfig filterConfig;

    @Override
    public void init(FilterConfig filterConfig) throws ServletException {
        this.filterConfig = filterConfig;
    }

    @Override
    public void doFilter(ServletRequest req, ServletResponse res,
                         FilterChain chain) throws IOException, ServletException {
        // 1.把doFilter的请求和响应对象转换成跟http协议有关的对象
        HttpServletRequest  request;
        HttpServletResponse response;
        try {
            request = (HttpServletRequest) req;
            response = (HttpServletResponse) res;
        } catch (ClassCastException e) {
            throw new ServletException("non-HTTP request or response");
        }
        // 2.获取请求资源URI
        String uri = request.getRequestURI();
        // 3.获取请求资源到底是什么类型
        String extend = uri.substring(uri.lastIndexOf(".")+1);
        // 4.判断资源类型(根据不同的资源类型设定缓存时间)
        long time = 60*60*1000;
        if("html".equals(extend)){
            //html 缓存1小时
            String html = filterConfig.getInitParameter("html");
            time = time*Long.parseLong(html);
        }else if("js".equals(extend)){
            //js 缓存2小时
            String js = filterConfig.getInitParameter("js");
            time = time*Long.parseLong(js);
        }else if("css".equals(extend)){
            //css 缓存3小时
            String css = filterConfig.getInitParameter("css");
            time = time*Long.parseLong(css);
        }
        // 5.设置响应消息头
        response.setDateHeader("Expires", System.currentTimeMillis()+time);
        // 6.放行
        chain.doFilter(request, response);
    }

    @Override
    public void destroy() {}

}
2)过滤器注册
<filter>
    <filter-name>FilterExample5</filter-name>
    <filter-class>com.noob.web.filter.FilterExample5</filter-class>
    <init-param>
        <param-name>html</param-name>
        <param-value>3</param-value>
    </init-param>
    <init-param>
        <param-name>js</param-name>
        <param-value>4</param-value>
    </init-param>
    <init-param>
        <param-name>css</param-name>
        <param-value>5</param-value>
    </init-param>
</filter>
<filter-mapping>
    <filter-name>FilterExample5</filter-name>
    <url-pattern>*.html</url-pattern>
</filter-mapping>
<filter-mapping>
    <filter-name>FilterExample5</filter-name>
    <url-pattern>*.js</url-pattern>
</filter-mapping>
<filter-mapping>
    <filter-name>FilterExample5</filter-name>
    <url-pattern>*.css</url-pattern>
</filter-mapping>
3)目标资源测试
可随便编辑test.css、test.html、test.js文件进行测试,将其放置在发布目录下,随后依次访问静态资源文件,查看请求的Headers参数信息的Expires参数
7.文件的上传和下载
【1】文件上传
实现web开发中的文件上传功能,需完成如下二步操作:
在web页面中添加上传输入项
在servlet中读取上传文件的数据,并保存到本地硬盘中
如何在web页面中添加上传输入项?
<input type="file">标签用于在web页面中添加文件上传输入项,设置文件上传输入项时须注意:
必须要设置input输入项的name属性,否则浏览器将不会发送上传文件的数据。
必须把form的enctype属值设为multipart/form-data设置该值后,浏览器在上传文件时,将把文件数据附带在http请求消息体中,并使用MIME协议对上传的文件进行描述,以方便接收方对上传数据进行解析和处理。
如何在Servlet中读取文件上传数据,并保存到本地硬盘中?
Request对象提供了一个getInputStream方法,通过这个方法可以读取到客户端提交过来的数据。但由于用户可能会同时上传多个文件,在servlet端编程直接读取上传数据,并分别解析出相应的文件数据是一项非常麻烦的工作,示例
为方便用户处理文件上传数据,Apache 开源组织提供了一个用来处理表单文件上传的一个开源组件( Commons-fileupload ),该组件性能优异,并且其API使用极其简单,可以让开发人员轻松实现web文件上传功能,因此在web开发中实现文件上传功能,通常使用Commons-fileupload组件实现
使用Commons-fileupload组件实现文件上传,需要导入该组件相应的支撑jar包:Commons-fileupload和commons-io。commons-io 不属于文件上传组件的开发jar文件,但Commons-fileupload 组件从1.1 版本开始,它工作时需要commons-io包的支持
文件上传需要导入相关jar包:commons-fileupload-1.3.3.jar、commons-io-2.6.jar
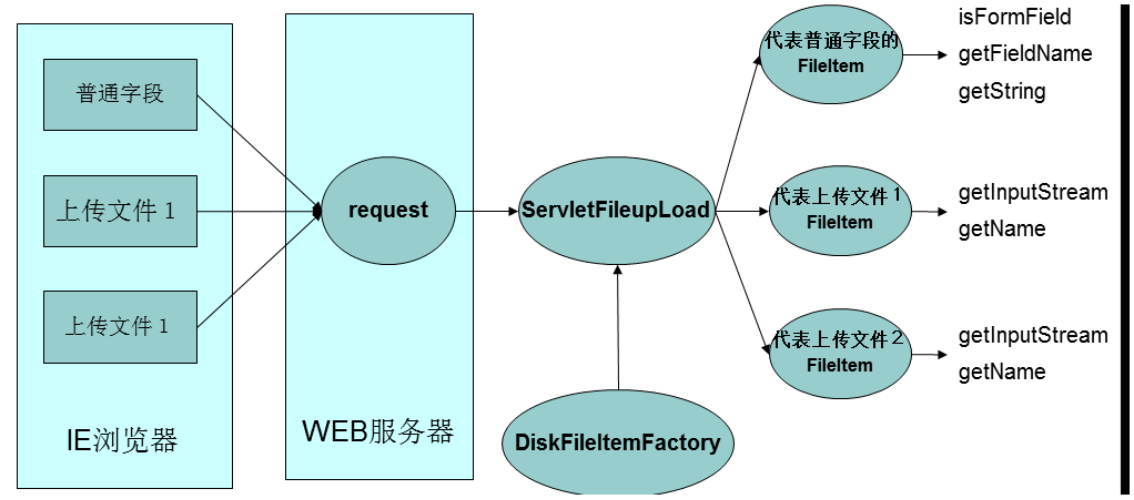
案例1:单文件上传案例分析
1)FileUploadServletDemo1.java
/**
 *	文件上传测试
 *	完成文件上传操作需要借助Apache提供的两个jar包完成
 *	步骤:
 *	a.导入commons-fileupload.jar、commons-io.jar
 *	b.编写jsp界面用于提供文件上传
 *	c.将相关数据提交到指定的servlet用于处理文件上传
 */
@WebServlet("/FileUploadServletDemo1")
public class FileUploadServletDemo1 extends HttpServlet {
	protected void doGet(HttpServletRequest request, HttpServletResponse response) throws ServletException, IOException {
		/**
		 * 处理文件上传:
		 * 1.获取解析工厂:
		 * 	DiskFileItemFactory df = new DiskFileItemFactory();
		 * 2.通过解析工厂获取解析器
		 * 	ServletFileUpload sfu = new ServletFileUpload(df);
		 * 3.判断是否为上传表单,如果是则进行解析,若不是则直接return
		 * 4.通过解析器解析request请求,获取每一个FileItem进行解析
		 *   根据不同的FileItem进行不同的操作即可,上传的文件可以根据需求保存到
		 *   任意位置
		 */
		// a.获取解析工厂
		DiskFileItemFactory df = new DiskFileItemFactory();
		// b.根据解析工厂获取解析器
		ServletFileUpload sfu = new ServletFileUpload(df);
		// c.判断是否为上传表单,如果不是则直接return
		if(!sfu.isMultipartContent(request)) {
			return;
		}
		// d.如果是上传表单则用解析器解析request请求
		try {
			List<FileItem> list = sfu.parseRequest(request);
			// 依次进行遍历,根据不同的FileItem类型进行不同的操作
			for (FileItem fileItem : list) {
				if(fileItem.isFormField()) {
					/**
					 *  如果是普通的上传项,获取相关的值进行打印
					 *  getFieldName():获取输入项的名称
					 *  getString():得到上传项的值
					 */
					String name = fileItem.getFieldName();
					String value = fileItem.getString();
					System.out.println("key:"+name+"--value:"+value);
				}else {
					/**
					 * 如果这个项是上传的文件,则通过io流进行读写操作
					 * getInputStream():获取输入流
					 * getName():获取文件完整路径信息
					 * 如果只需要获取文件名称,进行截取即可
					 */
					InputStream fis = fileItem.getInputStream();
					String filename = fileItem.getName();
					// 通过截取获取文件的名称
					filename = filename.substring(filename.lastIndexOf("\\")+1);
					// 利用io流知识进行读写操作
					String path="e:\\upload";
					FileOutputStream fos = new FileOutputStream(path+"\\"+filename);
					byte[] buffer = new byte[1024];
					int hasRead=0;
					while((hasRead=fis.read(buffer))!=-1) {
						fos.write(buffer, 0, hasRead);
					}
					// 关闭文件流
					fis.close();
					fos.close();
				}
			}
		} catch (FileUploadException e) {
			e.printStackTrace();
		}
	}
	protected void doPost(HttpServletRequest request, HttpServletResponse response) throws ServletException, IOException {
		doGet(request, response);
	}
}
2)测试jsp
<%@ page language="java" contentType="text/html; charset=UTF-8"
    pageEncoding="UTF-8"%>
<!DOCTYPE html PUBLIC "-//W3C//DTD HTML 4.01 Transitional//EN" "http://www.w3.org/TR/html4/loose.dtd">
<html>
<head>
<meta http-equiv="Content-Type" content="text/html; charset=UTF-8">
<title>文件上传简单测试</title>
</head>
<body>
	<!-- 文件上传jsp设计满足以下两个条件
		a.提交的form表单必须提供enctype="multipart/form-data"属性
		b.上传组件为'file'类型:<input type="file" name="..." />
	-->
	<form action="${pageContext.request.contextPath }/FileUploadServletDemo1" method="post" enctype="multipart/form-data">
		上传用户:<input type="text" name="username"/><br/>
		上传文件:<input type="file" name="file" /><br/>
		<button type="submit">上传</button>
	</form>
</body>
</html>
3)结果展示:
在e盘下创建upload文件目录,作为文件上传的目录
访问资源http://localhost:8080/JavaWeb_Filter/upload/upload1.jsp,测试文件上传,可看到对应目录下有上传的文件信息

案例2:多文件上传案例分析(针对文件上传常见问题)
单文件上传案例中还存在许多不足之处,例如文件同名上传问题、文件中文乱码问题、文件保存路径优化问题均需要加以完善,下述针对这些问题,进一步提出解决方案优化文件上传
1)FileUploadServletDemo2.java(优化后的文件上传Servlet)
/**
 * 文件上传测试2:实现多文件的上传,此外文件上传还有常见的几个小问题需要进行处理
 * a.文件同名问题: 通过UUID解决,对文件名称进行重新编码即可
 * b.上传文件中文乱码问题:
 * 		通过设置消息头进行解决: 如果是设置了过滤器则不需要特意指定也能解决中文乱码问题
 * 		但如果是直接从表单中获取数据并输出到控制台出现中文乱码,则需要对获取的数据进行
 * 		再次封装后再进行输出便能解决乱码问题(默认是ISO-8859-1编码)
 * 		eg:String value = new String(value.getBytes("ISO-8859-1"),"UTF-8");
 * c.自定义保存文件夹
 * 		随着文件删除数目的增加,普通的存储规则已经无法满足需求,一般情况下需要通过
 * 		指定的规则对上传文件进行存储,可以以日期进行分类,也可以用户名进行分类,亦可
 * 		通过传入的指定的文件名称的hashcode进行分类
 */
FileUploadServletDemo2.java:优化后的文件上传Servlet
@WebServlet("/FileUploadServletDemo2")
public class FileUploadServletDemo2 extends HttpServlet {
	protected void doGet(HttpServletRequest request, HttpServletResponse response)
			throws ServletException, IOException {
		// a.获取解析工厂
		DiskFileItemFactory df = new DiskFileItemFactory();
		// b.根据解析工厂获取解析器
		ServletFileUpload sfu = new ServletFileUpload(df);
		// c.判断是否为上传表单,如果不是则直接return
		if (!sfu.isMultipartContent(request)) {
			return;
		}
		// d.如果是上传表单则用解析器解析request请求
		try {
			List<FileItem> list = sfu.parseRequest(request);
			// 依次进行遍历,根据不同的FileItem类型进行不同的操作
			for (FileItem fileItem : list) {
				if (fileItem.isFormField()) {
					/**
					 * 如果是普通的上传项,获取相关的值进行打印 getFieldName():获取输入项的名称 getString():得到上传项的值
					 */
					String name = fileItem.getFieldName();
					String value = fileItem.getString();
					// 直接获取从表单中读取的数据,存在中文乱码问题,则重新封装该数据再进行输出即可
					value = new String(value.getBytes("ISO-8859-1"),"UTF-8");
					System.out.println("key:" + name + "--value:" + value);
				} else {
					/**
					 * 如果这个项是上传的文件,则通过io流进行读写操作 getInputStream():获取输入流 getName():获取文件完整路径信息
					 * 如果只需要获取文件名称,进行截取即可
					 */
					InputStream fis = fileItem.getInputStream();
					String filename = fileItem.getName();
					// 通过截取获取文件的名称
					filename = filename.substring(filename.lastIndexOf("\\") + 1);
					// 利用io流知识进行读写操作
					String path = "e:\\upload";
					/**
					 * 1.普通方式:
					 * FileOutputStream fos = new FileOutputStream(path + "\\" + filename);
					 */
					/**
					 * 2.通过自定义规则的文件名称进行保存(参考时间)
					 * FileOutputStream fos = new FileOutputStream(getPath(path) + "\\" + getFilename(filename));
					 */
					/**
					 * 3.通过自定义规则的文件名称进行保存(参考filename的hashcode)
					 * FileOutputStream fos = new FileOutputStream(getPath(path,filename) + "\\" + getFilename(filename));
					 */
					FileOutputStream fos = new FileOutputStream(getPath(path,filename) + "\\" + getFilename(filename));
					byte[] buffer = new byte[1024];
					int hasRead = 0;
					while ((hasRead = fis.read(buffer)) != -1) {
						fos.write(buffer, 0, hasRead);
					}
					// 关闭文件流
					fis.close();
					fos.close();
				}
			}
		} catch (FileUploadException e) {
			e.printStackTrace();
		}
	}

	// 根据UUID获取文件名称
	public String getFilename(String filename) {
		return UUID.randomUUID().toString()+"_"+filename;
	}

	// 根据自定义规则获取文件保存路径(参考时间)
	public String getPath(String path) {
		// 按照时间规则保存上传数据
		SimpleDateFormat sdf = new SimpleDateFormat("yyyy/MM/dd");
		String savePath = sdf.format(new Date());
		String dir = path + "/" + savePath;
		File file =new File(dir);
		// 如果指定目录不存在则创建目录即可
		if(!file.exists()) {
			file.mkdirs();
		}
		return dir;
	}

	// 根据自定义规则获取文件保存路径(参考filename的hashcode)
	public String getPath(String path,String filename) {
		int hashcode = filename.hashCode();
		int dir1 =hashcode & 0xf ;  // 得到0-15之间的数字
	    int dir2=(hashcode & 0xf0) >> 4 ; // 得到0-15之间的数字
	    // 将目录路径进行拼接
	    String dir=path+"/"+dir1+"/"+dir2;
		File file =new File(dir);
		// 如果指定目录不存在则创建目录即可
		if(!file.exists()) {
			file.mkdirs();
		}
		return dir;
	}

	protected void doPost(HttpServletRequest request, HttpServletResponse response)
			throws ServletException, IOException {
		doGet(request, response);
	}

}
2)测试jsp
<%@ page language="java" contentType="text/html; charset=UTF-8"
    pageEncoding="UTF-8"%>
<!DOCTYPE html PUBLIC "-//W3C//DTD HTML 4.01 Transitional//EN" "http://www.w3.org/TR/html4/loose.dtd">
<html>
<head>
<meta http-equiv="Content-Type" content="text/html; charset=UTF-8">
<title>多文件上传简单测试</title>
</head>
	<body>
	<!-- 文件上传jsp设计满足以下两个条件
		a.提交的form表单必须提供enctype="multipart/form-data"属性
		b.上传组件为'file'类型:<input type="file" name="..." />
	-->
	<form action="${pageContext.request.contextPath }/FileUploadServletDemo2" method="post" enctype="multipart/form-data">
			<table border="1">
				<tr>
					<td>上传用户</td>
					<td><input type="text" name="username"/></td>
				</tr>
				<tr>
					<td>上传文件</td>
					<td id="upload">
						<input type="file" name="file" />
						<button type="button" onclick="addMore()">上传更多</button>
					</td>
				</tr>
				<tr>
					<td colspan="2"><button type="submit">上传</button></td>
				</tr>
			</table>
			<script type="text/javascript">
				function addMore(){
					// 获取当前的父标签
					var td = document.getElementById("upload");
					// 定义要新建的标签
					var br = document.createElement("br");
					var input = document.createElement("input");
					input.type="file";
					input.name="file";
					var button = document.createElement("input");
					button.type="button";
					button.value="remove";
					button.onclick=function removeElement(){
						// 移除
						td.removeChild(br);
						td.removeChild(input);
						td.removeChild(button);
					}
					// 将标签进行添加
					td.appendChild(br);
					td.appendChild(input)
					td.appendChild(button);
				}
			</script>
		</form>
	</body>
</html>
3)结果展示:
保证e盘下有upload文件目录用于存放上传的资料信息
访问资源http://localhost:8080/JavaWeb_Filter/upload/upload2.jsp,上传相应的内容,在指定目录可以看到相应相应的文件按照指定的规则完成上传
【2】文件下载
案例1:文件下载
1)ListFileServlet:显示当前上传目录下所有的文件信息
/**
 * 显示当前上传目录下所有的文件信息
 */
@WebServlet("/ListFileServlet")
public class ListFileServlet extends HttpServlet {
	protected void doGet(HttpServletRequest request, HttpServletResponse response)
			throws ServletException, IOException {
		// 定义当前的上传路径根目录
		String filepath = "E:/upload";
		// 迭代当前目录结构
		Map map = new HashMap();
		// 列出指定文件夹下所有的文件 包括子目录中的内容 然后进行迭代后的结果存放在map中
		listFile(new File(filepath), map);
		// 转发页面,显示数据信息
		request.setAttribute("map", map);
		request.getRequestDispatcher("/download/download.jsp").forward(request, response);
	}

	private void listFile(File file, Map map) {
		if (file.isDirectory()) {// 代表是文件夹
			File[] files = file.listFiles();
			// 循环所有的子文件
			for (File fi : files) {
				listFile(fi, map);
			}

		} else {
			// 代表是文件
			// 得到文件的真实名称 06e00bf0-ded5-47b5-926a-ea1c56a8dcd8_1.jpg 真实名称是 1.jpg
			String realname = file.getName().substring(file.getName().indexOf("_") + 1);
			map.put(file.getName(), realname);
		}
	}

	protected void doPost(HttpServletRequest request, HttpServletResponse response)
			throws ServletException, IOException {
		doGet(request, response);
	}
}
2)download.jsp:下载页面定义
<%@ page language="java" contentType="text/html; charset=UTF-8"
	pageEncoding="UTF-8"%>
<%@ taglib uri="http://java.sun.com/jsp/jstl/core" prefix="c"%>
<!DOCTYPE html PUBLIC "-//W3C//DTD HTML 4.01 Transitional//EN" "http://www.w3.org/TR/html4/loose.dtd">
<html>
<head>
<meta http-equiv="Content-Type" content="text/html; charset=UTF-8">
<title>文件下载测试</title>
</head>
<body>
	<c:forEach var="mm" items="${map }">
		<c:url value="DownLoadServlet" var="downurl">
			<c:param name="filename" value="${mm.key }"></c:param>
		</c:url>
		${mm.value } <a href="${downurl }">下载</a>
		<br />
	</c:forEach>
</body>
</html>
3)DownLoadServlet.java:下载Servlet
/**
 * 下载指定的文件
 */
@WebServlet("/DownLoadServlet")
public class DownLoadServlet extends HttpServlet {

	protected void doGet(HttpServletRequest request, HttpServletResponse response)
			throws ServletException, IOException {
		String filename = request.getParameter("filename");// 06e00bf0-ded5-47b5-926a-ea1c56a8dcd8_1.jpg
		String name = filename.substring(filename.lastIndexOf("_") + 1); // 1.jpg

		String path = makeFilePath(name, "E:/upload");

		File file = new File(path + "/" + filename);

		if (!file.exists()) {
			request.setAttribute("msg", "您要下载的资源不存在!!");
			request.getRequestDispatcher("/message.jsp").forward(request, response);
			return;
		}
		response.setHeader("content-disposition", "attachment;filename=" + name);
		FileInputStream fis = new FileInputStream(file);
		OutputStream sout = response.getOutputStream();
		byte[] buffer = new byte[1024];
		int hasRead = 0;
		while ((hasRead = fis.read(buffer)) != -1) {
			sout.write(buffer, 0, hasRead);
		}
		fis.close();
		sout.close();
	}

	public String makeFilePath(String filename, String path) {
		// 根据filename的hashcode码进行创建不同的子文件
		int hashCode = filename.hashCode();
		int dir1 = hashCode & 0xf; // 0-15之间的数字
		int dir2 = (hashCode & 0xf0) >> 4; // 0-15之间的数字
		String dir = path + "/" + dir1 + "/" + dir2;
		File file = new File(dir);
		if (!file.exists()) {
			file.mkdirs();
		}
		return dir;
	}

	protected void doPost(HttpServletRequest request, HttpServletResponse response)
			throws ServletException, IOException {
		doGet(request, response);
	}

}
4)结果展示:
访问资源http://localhost:8080/JavaWeb_Filter/ListFileServlet,显示下载的文件,点击下载测试数据
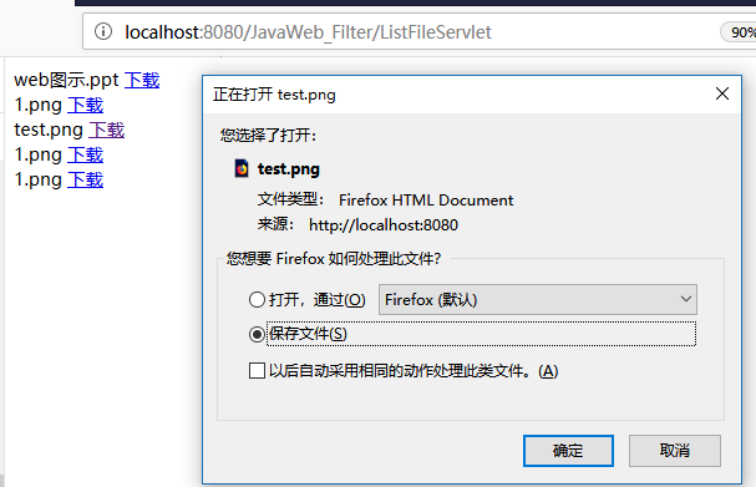
如果在下载过程中,源文件丢失导致下载失败,则显示相应的提示信息即可
